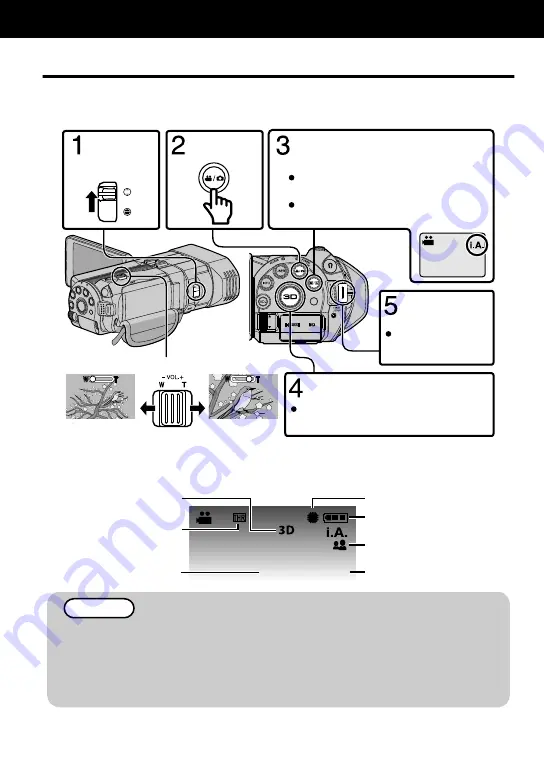
Video Recording
You can record without worrying about the setting details by using the Intelligent Auto mode. Settings
such as exposure and focus will be adjusted automatically to suit the shooting conditions.
Before recording an important scene, it is recommended to conduct a trial recording.
.
-
+
(Telephoto)
(Wide angle)
Zooming
3D recording may be performed when
the LED lights up. (p.16)
Select 3D or 2D recording mode.
Press again to stop.
Start recording.
(Rear)
The mode changes between Intelligent
Auto and Manual with every press.
If the mode is
H
Manual, press the
H
/
T
button to switch.
Check if the recording mode is
P
Intelligent Auto.
Select video
mode.
Open the
lens cover.
0
You can also tap
g
on the touch screen to record. To stop recording, tap
a
. In
addition, you can also tap T/W to zoom.
o
Indications during video recording
.
0:00:00 [000:22]
10:10AM
Remaining Recording Time
Intelligent Auto Mode
Battery Indicator
Recording Media
Scene Counter
Video Quality
3D/2D Mode
NOTE
0
If the microphone level is frequently displayed in red, lower the setting in “MIC LEVEL SETTING” such
that the display turns green so that more realistic audio sounds can be recorded.
0
The estimated recording time of the supplied battery pack is approximately 55 minutes during 3D
recording (MP4(MVC)) and 1 hour 20 minutes during 2D recording.(p. 31)
0
Do not remove the battery pack, AC adapter, or SD card when the access lamp is lighted. The recorded
data may become unreadable.
Recording
14
For more information, refer to the Detailed User Guide
http://manual.jvc.co.jp/index.html/


