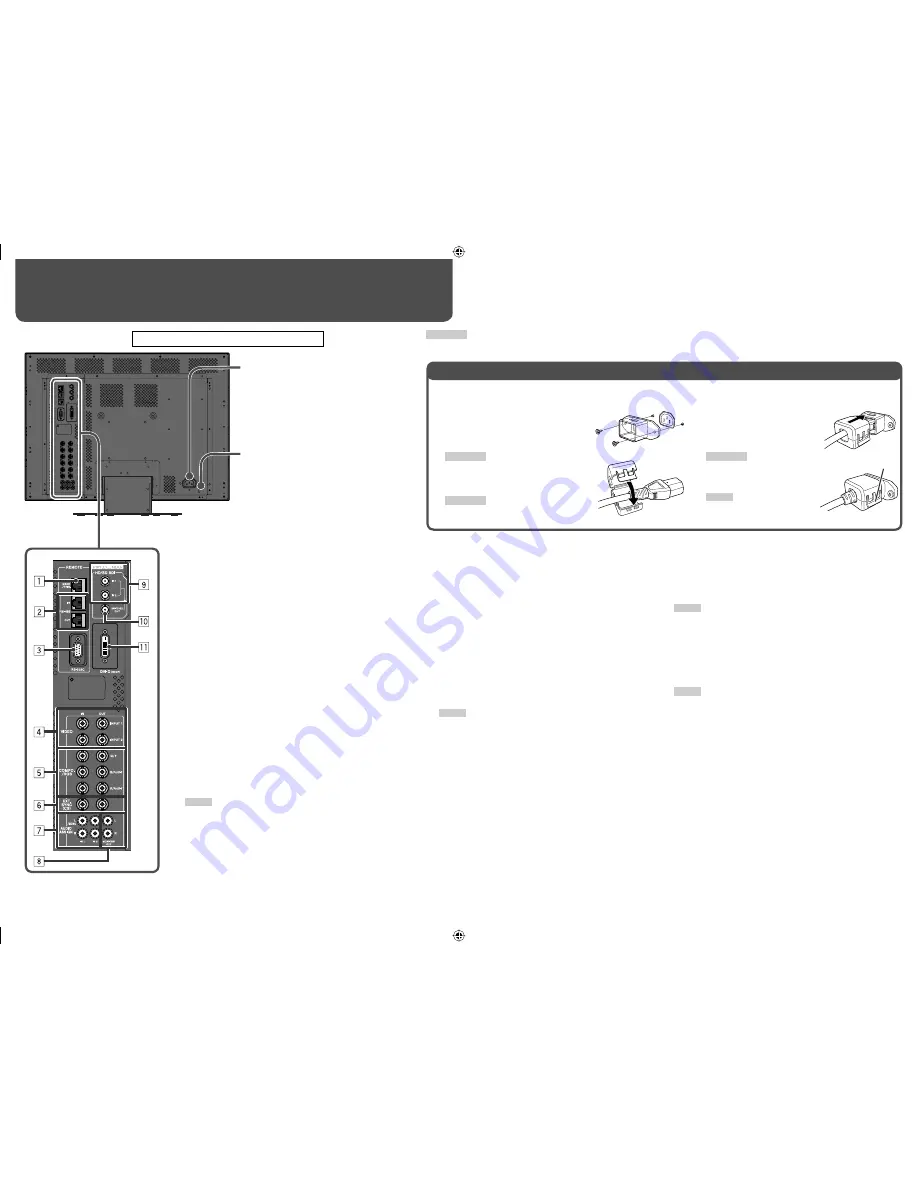
background image

8

7

 Rear panel

Daily Operations / Connections 

(cont.)

•  The provided power cord holder prevents accidental disconnection of the AC power cord from the AC inlet.
•  The power cord holder consists of two parts, a case and a cover.

1

  Attach the power cord holder case 

around the AC inlet on the rear 
of the monitor with two screws 
(provided).

CAUTION

Use only the provided screws.

2

  Attach the power cord holder cover 

to the AC power cord.

CAUTION

A different plug shape will result in the cover 
being attached to a different position.

3

  Plug in the AC power cord 

to the AC inlet, and attach 
the power cord holder 
cover to the case.

CAUTION

Make sure the plug will not be 
pulled out after the cover is 
attached.

NOTE

To detach the cover, release 
the tab.

Attaching the Power Cord Holder

7

 AUDIO ASSIGN (IN 1, IN 2) terminals (pin jack)

Input terminals for the analog audio signals.
• Select the video input to assign the audio signal 

in “AUDIO1 ASSIGN.” or “AUDIO2 ASSIGN.” (


“AUDIO SETTING” on page 11).

8

 AUDIO ASSIGN (MONITOR OUT) terminals (pin 

jack)

Output terminals for the analog audio signal.
• The terminals output the audio signal through AUDIO 

ASSIGN (IN 1) or AUDIO ASSIGN (IN 2) terminals 
when you select the video input you have selected 
for “AUDIO1 ASSIGN.” or “AUDIO2 ASSIGN.” in 
“AUDIO SETTING” (

 page 11).

• The EMBEDDED AUDIO signal is decoded into an 

analog signal, then emitted.

NOTE

•  The signal is output from this terminal only when the monitor 

is on.

•  The EMBEDDED AUDIO signal has priority over the audio 

signal input to AUDIO ASSIGN (IN 1) or AUDIO ASSIGN (IN 
2) terminals when “SDI 1” or “SDI 2” is selected for “AUDIO1 
ASSIGN.” or “AUDIO2 ASSIGN.” and the EMBEDDED 
AUDIO signal is input to HD/SD SDI (IN 1) or HD/SD SDI 
(IN 2) terminal.

9

 HD/SD SDI (IN 1, IN 2) terminals (BNC)

Input terminals for the HD SDI and SD SDI signals.
• The terminals accept also EMBEDDED AUDIO signals* 

including up to 12 audio channels with the sampling 
frequency of 48 kHz.

NOTE

The types of signals coming through the IN 1 and IN 2 terminals 
are automatically recognized—HD SDI or SD SDI signal. Note, 
however, that input is not changed automatically.

p

 HD/SD SDI (SWITCHED OUT) terminal (BNC)

Output terminal for the HD SDI and SD SDI signals.
• The SDI signal of the current input (SDI 1 or SDI 2) is 

re-clocked and output.

NOTE

•  When the input other than SDI 1 or SDI 2 is selected, the SDI 

signal of the input selected last time is re-clocked and output from 
this terminal.

•  The signal is output from this terminal only when the monitor is 

on.

q

 DVI-D (HDCP) terminal

Input terminal for the DVI-D signal.
• Select the signal type in “DVI INPUT SEL.” corresponding 

to the type of the input signal (

 page 10).

The illustration of the monitor is of DT-V24L1D.

Security slot

Install a security wire to this slot.

1

 REMOTE (MAKE/TRIG.) terminal (RJ-45)

Terminal for controlling the monitor by an external control.

 “External Control” on page 14

2

 REMOTE (RS-485) terminals (RJ-45)

Terminals for controlling the monitor by an external control.

 “External Control” on page 14

3

 REMOTE (RS-232C) terminal (D-sub 9-pin)

Terminal for controlling the monitor by an external control.

 “External Control” on page 14

4

 VIDEO (INPUT 1, INPUT 2) terminals (BNC)

Input (IN) and output (OUT) terminals for the composite 
signals.

5

 COMPO./RGB (G/Y, B/P

B

/B-Y, R/P

R

/R-Y) terminals 

(BNC)

Input (IN) and output (OUT) terminals for the analog 
component (color difference) or analog RGB signals.
• Select the signal type in “COMPO./RGB SEL.” 

corresponding to the type of the input signal (

 page 10).

6

 EXT.SYNC (CS) terminals (BNC)

Input (IN) and output (OUT) terminals for the external 
composite sync (Cs) signals.
• To use these terminals, set “SYNC INPUT SEL.” to “EXT.”

 “SYNC FUNCTION” on page 11

NOTE

•  The terminals are for all VIDEO (INPUT 1), VIDEO (INPUT 2) and 

COMPO./RGB.

•  When an external sync signal is input, external synchronization 

has priority over all VIDEO 1, VIDEO 2 and COMPO./RGB input.

•  The setting of “SYNC INPUT SEL.” is memorized for each input.

AC inlet

Power input connector. Connect the 
provided AC power cord to an AC outlet.
•  Attach the provided power cord holder 

to prevent accidental disconnection of 
the AC power cord (

 the right).

Tab

*Using the audio level meter 

(DT-V24L1D and DT-V20L1D only)

You can check the conditions of the current EMBEDDED 
AUDIO signals in the audio level meter. The setting for the 
level meter is  selected in “LEVEL METER SETTING” (


“AUDIO SETTING” on page 11).

DT-V24L1 and DT-V20L1 do not have 

9

 and 

p

.

CAUTION

It is recommended not to use the power cord holder when installing the monitor in a monitor rack etc. where you cannot easily pull out the AC 
power cord from an AC outlet.

DT-V2420L1D_UA_R.indd   8

DT-V2420L1D_UA_R.indd   8

06.11.17   10:40:15 AM

06.11.17   10:40:15 AM

Содержание DT-V20L1

Страница 1: ...l 6 Rear panel 8 Available signals 9 Menu Configuration MAIN MENU 10 Menu Configuration SET UP MENU 12 External Control 14 About the external control 14 Using the MAKE TRIGGER system 14 Using the serial communication 15 Troubleshooting 16 Self check program 16 Specifications 17 General 17 Input output terminals 17 Dimensions 18 The illustration of the monitor is of DT V24L1D LCT2202 001B DT V2420L...

Страница 2: ... soot or steam such as near the cooking counter or a humidifier near heat sources where condensation easily occurs such as near the window Do not place this product on an unstable cart stand or table The product may fall causing serious injury to a child or adult and serious damage to the product The product should be mounted according to the manufacturer s instructions and should use a mount reco...

Страница 3: ...do so in accordance with applicable national legislation or other rules in your country for the treatment of old electrical and electronic equipment Attention This symbol is only valid in the European Union Dear Customer This apparatus is in conformance with the valid European directives and standards regarding electromagnetic compatibility and electrical safety European representative of Victor C...

Страница 4: ...maged The illustration of the monitor is of DT V24L1D CAUTION Be careful not to pinch your fingers in the gap between the monitor and the stand When the stand plate is attached to the lower position of the stand body To adjust the stand height on page 5 you cannot tilt the monitor downward About 6 About 6 The illustrations of the monitor are of DT V24L1D CAUTION When lifting up the stand lay the m...

Страница 5: ... Higher position Lower position Screw holes for higher position Screw holes for lower position Stand plate Stand plate Stand body Stand body To prevent an accidental fall Fix the stand to a table or floor with M5 screws not supplied Choose the screws of proper length corresponding to the thickness of the table or floor Screw holes See page 18 for the specifications of the screw holes Screw holes S...

Страница 6: ...s in Green The monitor is on Lights in orange The monitor is off standby Flashes in orange The monitor is in the suspend mode Standby button Turns on and off standby the monitor NOTE To disconnect the mains line completely unplug the AC plug from the wall outlet Tally lamp This lamp is controlled by the tally function of MAKE TRIG terminal FUNCTION SETTING on page 12 and External Control on page 1...

Страница 7: ...d for a noncompliant video signal input When COLOR SYSTEM is set to AUTO OTHER SETTING on page 11 and the noncompliant video signal is a composite one OTHERS is displayed 3 Setting of COLOR TEMP WHITE BALANCE SET on page 12 is displayed at the end of the indication when 9300K or 6500K is selected in COLOR TEMP and its drive levels or cutoff points are adjusted 4 Displayed when SYNC INPUT SEL is se...

Страница 8: ... or SDI 2 is re clocked and output NOTE When the input other than SDI 1 or SDI 2 is selected the SDI signal of the input selected last time is re clocked and output from this terminal The signal is output from this terminal only when the monitor is on q DVI D HDCP terminal Input terminal for the DVI D signal Select the signal type in DVI INPUT SEL corresponding to the type of the input signal page...

Страница 9: ...DT V20L1D and DT V20L1 When No 8 9 or 11 signal is input thin lines will become obscured because their signal resolution is higher than the screen resolution Specification of DVI D HDCP terminal Connect it to DVI D output terminal on a personal computer Note for analog component analog RGB signals The monitor is compatible with G on sync Y on sync and composite sync Cs signals The monitor is not c...

Страница 10: ...u can display this AREA MARKER by using external control page 14 4 3 14 9 13 9 2 35 1 1 85 1 1 66 1 R SAFETY MARKER Adjust the size of SAFETY AREA within the area marked with AREA MARKER This AREA MARKER s aspect ratio is selected in R ASPECT SELECT OFF 80 100 NOTE To set up non R items press AREA MARKER or SAFETY MARKER button An external control system should not be operated at this time Using t...

Страница 11: ...ut Item To do Setting value BALANCE Adjust the balance between the right and left speakers L5 L1 0 R1 R5 AUDIO1 ASSIGN Select the video input which the audio signal through AUDIO ASSIGN IN 1 terminal is assigned to SDI 1 1 SDI 2 1 DVI COMP RGB VIDEO 1 VIDEO 2 AUDIO2 ASSIGN Select the video input which the audio signal through AUDIO ASSIGN IN 2 terminal is assigned to E AUDIO GROUP 1 2 Select the a...

Страница 12: ...TURE SUB ADJ SIZE POSI ADJ Adjusts the size and position of the picture Item To do Setting value H SIZE 2 Adjust the horizontal picture size Varies depending on the other settings H POSITION 2 Adjust the horizontal picture position V SIZE 2 Adjust the vertical picture size V POSITION 2 Adjust the vertical picture position sub menu Display the sub menu which enables you to adjust the items of SIZE ...

Страница 13: ...ay on page 7 OFF ON SUB HOUR METER Display the total hours of use unit hour You can reset this HOUR METER MODEL Display the model name of the monitor VERSION Display the version of the monitor HOUR METER Display the total hours of use unit hour This item is used for maintenance of the monitor You cannot reset this HOUR METER CONTROL LOCK Turns on or off the control lock function to disable the but...

Страница 14: ... following items of REMOTE SETTING in set up menu according to the external control terminal and control system you use page 13 Control system SERIAL TYPE setting PARALLEL TYPE setting MAKE MAKE TRIGGER TRIGGER Serial communication RS 485 RS485 1 RS 232C RS232C 1 1 On the monitor connected to the personal computer etc select the terminal the equipment actually connected to On the other monitors se...

Страница 15: ... Turns on the monitor No data 14 2 B P W 0 Cr Turns off the monitor standby No data 15 4 2 B I N A Cr Selects SDI 1 input No data 16 4 2 B I N B Cr Selects SDI 2 input No data 17 2 B I N C Cr Selects DVI input No data 18 2 B I N D Cr Selects COMPO RGB input No data 19 2 B I N E Cr Selects VIDEO 1 input No data 20 2 B I N F Cr Selects VIDEO 2 input No data 21 2 B D I S P Cr Displays the status 5 No...

Страница 16: ...appear on the menu The items which are not available for the current input or the current input signal are not displayed on the menu Change the input or the input signal Buttons on the monitor do not work Set CONTROL LOCK in the set up menu to OFF 13 The following are not malfunction When a still image is displayed for a long time it may remain on the screen after the picture changes This is due t...

Страница 17: ...eds dedicated packing material for transportation Never use any packing material supplied from sources other than JVC or JVC authorized dealers Options not supplied RACK MOUNT ADAPTER DT V20L1D and DT V20L1 only RK C20L1 For easy understanding pictures and illustrations are shown by being emphasized omitted or composed and may be slightly different from actual products Design and specifications ar...

Страница 18: ...0 117 100 117 394 6 15 5 8 359 6 14 1 4 448 6 17 3 4 413 6 16 3 8 at the higher position at the lower position VESA mounting holes Size M4 depth 10 mm 7 Dimensions Unit mm inch 160 6 3 8 260 10 1 4 145 7 5 3 4 20 7 8 4 ø8 4 ø5 16 Stand bottom Stand bottom 1 5 1 16 DT V24L1D DT V24L1 Front view Side view Rear view 51 2 1 8 4 ø8 4 ø5 16 160 6 3 8 260 10 1 4 145 7 5 3 4 20 7 8 51 2 1 8 99 4 52 7 2 1 ...

Страница 19: ...DT V2420L1D_UA_R indd 19 DT V2420L1D_UA_R indd 19 06 11 17 10 40 27 AM 06 11 17 10 40 27 AM ...

Страница 20: ... V24L1D DT V24L1 DT V20L1D DT V20L1 MULTI FORMAT LCD MONITOR 2006 Victor Company of Japan Limited 1106MKH MW VP DT V2420L1D_UA_R indd 20 DT V2420L1D_UA_R indd 20 06 11 17 10 40 27 AM 06 11 17 10 40 27 AM ...

Отзывы: