background image

19

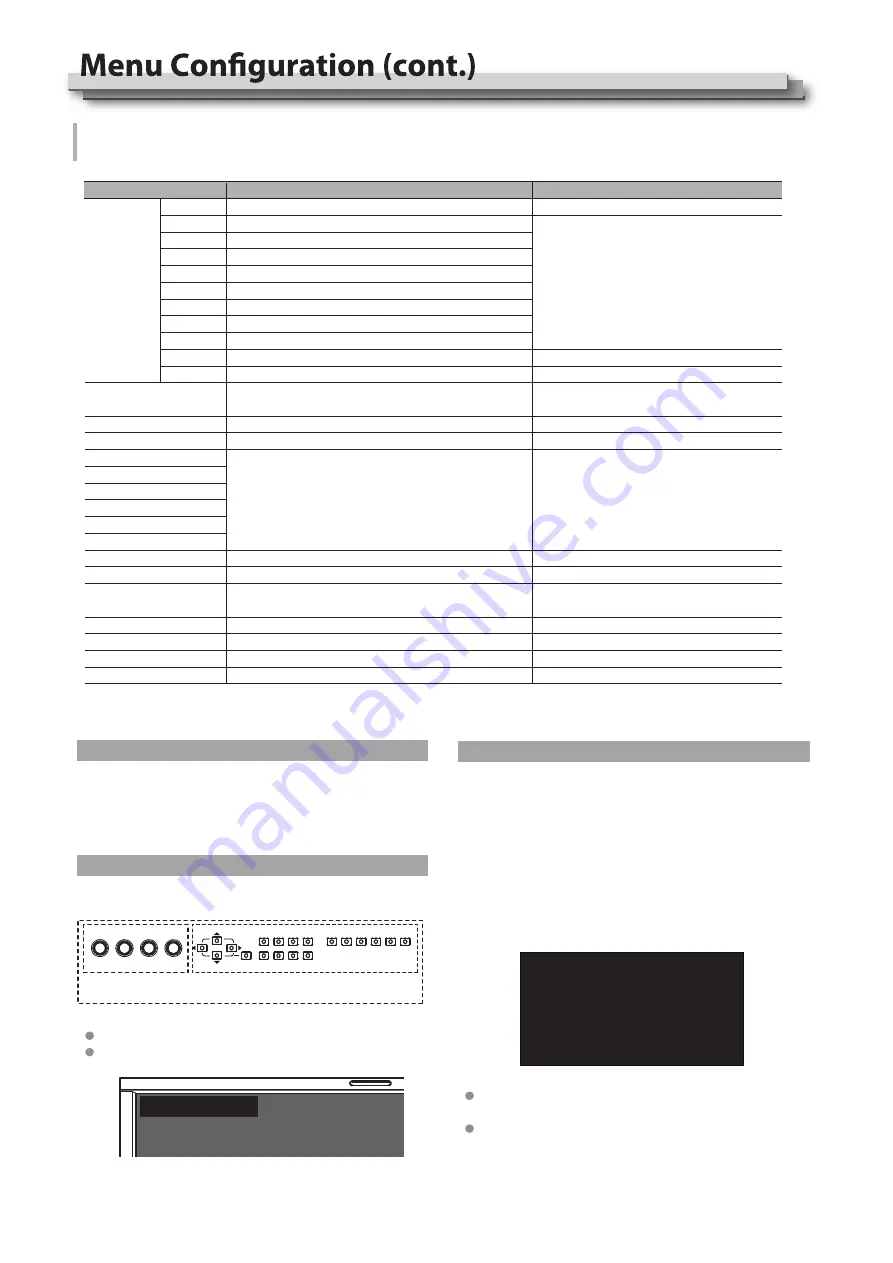
Exit Main Menu

Return to previous menu

Exit Main Menu

Set front key board light brightness
Select a time to quit menu if there’s no operation

Assign functions to the function

keys F1 - F6 on the front key board

Turn down or switch off the LCD backlight to save energy
Select a time to enter Green mode if there’s no operation

Select a key lock mode

Enter firmware update
Reset all the monitor settings

Black Backlight, Gray Backlight
30Sec, 1Hour, 2Hour, 4Hour, OFF
OFF, Lock All, 

Lock Rotary Knobs, Lock Key Buttons
NO, YES
NO, YES

Return to previous menu

Time code, Color Temp, Flip mode, 

Freeze Frame, WFM type, WFM Single Line,

UMD, Marker, H/V Delay, Blue Only, Audio bar, 

Zebra, Vector, Low Latency Mode, Histogram, 

Odd/Even Frame, Lissajous, Focus Assist, 

False color

To do

Select a user profile for all input sources

Save all the current menu settings to User profile, 

Support rename user profile when saving.

Select a user profile for SFP input only
Select a user profile for SDI 1 input only
Select a user profile for SDI 2 input only
Select a user profile for SDI 3 input only
Select a user profile for SDI 4 input only
Select a user profile for Quad split 4x3GSDI input only
Select a user profile for 2SI interleave 4x3GSDI input only
Select a user profile for HDMI input only

User 1-8, OFF

User 1-8

User 1-8

OFF, LOW, HIGH
5-180

Global
SFP
SDI1
SDI2
SDI3
SDI4
4xSDI(SQ)
4xSDI(2SI)
HDMI
Back
Exit

Setting value

Item

Load Profile 

*1

Save Profile

Key Brightness
OSD TIME (SEC)
F1
F2
F3
F4
F5
F6
Green Mode
Idel Duration

Key Lock   *2

Firmware Update  *3
System Reset
Back
Exit

System Setting

User profile saving, firmware update

*2 Key Lock

Select different keys to lock:

*1 Load Profile

Select “Global” to “User 1-8”, to assign the user profile to all 

the input sources; 

Select “Global” to “OFF”, the user profiles can be assigned to 

each input source individually.

*3 Firmware Update

The monitor firmware can be updated by front USB port.

Update steps:

(1) Download latest firmware file (DT-UXX Vxx YYMMDD.zip) 

to USB disk, root directory.

(2) Switch on the monitor, and plug USB disk into front USB 

port.

(3) Operate MENU - System Setting - Firmware Update, and 

the monitor will update automatically.

(4) When updating succeed, switch the monitor off by front 

POWER button and switch on again.

The MENU button can be operated when Key locked.

Press the locked buttons or knobs, the screen will display:

Rotary knobs

Key buttons

All

Please copy only 1 firmware for 1 model monitor into USB 

root directory.

Caution! DO NOT cut off power during firmware update.

Key Locked

UPDATE

Do you want to update now?

Select MENU to start!

MENU: OK                      INFO: Quit

Содержание DT-U27HB

Страница 1: ...Version B For Customer Use Please read the Instruction Manual carefully and retain this information for future reference MULTI FORMAT LCD MONITOR INSTRUCTIONS DT U31 DT U27HB DT U31PRO ...

Страница 2: ...ing power supply voltage and countries Use only the power cord designated to ensure safety and EMC regulations of each countries This plug will fit only into a grounded power outlet If you are unable to insert the plug into the outlet contact your electrician to install the proper outlet Do not defeat the safety purpose of the grounded plug This product should be operated only with the type of pow...

Страница 3: ...ld use a mount recommended by the manufacturer Do not use this product near water Be sure to install the product in the place where proper temperature and humidity are kept This product becomes hot during its use Take enough care when handling the product Do not attempt to service this product yourself as opening or removing covers may expose you to dangerous voltages and other hazards Refer all s...

Страница 4: ...hine fire or the like When discarding batteries environmental problems must be considered and the local rules or laws governing the disposal of these batteries must be followed strictly 1 2 3 4 5 6 7 8 9 10 11 12 13 14 15 16 17 The LCD panel and backlight have life expectancy Due to the basic characteristics of the LCD panel an afterimage or uneven display may occur It is recommended that you chan...

Страница 5: ...stallation 6 Index of Parts and Functions 7 Rear panel 7 Front panel 8 Showing Input Signals 9 On the Information Display 9 On the Status Display 9 10 The operation procedure 10 Menu Transition Diagram 10 Main Menu 11 20 General 20 LCD panel 20 Input output terminals 20 Dimensions 21 Available signals 22 ...

Страница 6: ... monitor Do not touch the LCD panel when installing the monitor Be sure to install the monitor securely to prevent the monitor from falling over which may cause damage to the monitor or injury The monitor package provides a U shape rotatable desktop stand to be installed Using the monitor on U stand 12 12 Fix 2 screws to the center screw holes of left and right side Fix the other 2 screws to the d...

Страница 7: ...ls accept also EMBEDDED AUDIO signals including up to 16 audio channels with a sampling frequency of 48 kHz E AUDIO SDI IN terminals BNC Input terminals for the SDI signals SDI IN1 12G 6G 3G HD SD SDI IN2 3 4 3G HD SD HDMI terminal Input Output terminal for HDMI signals Will not display or output HDCP protected contects 1000M high speed RJ45 ethernet port for webserver IP external control page 17 ...

Страница 8: ...gn monitor functions and switch on off quickly page 19 INPUT SELECTION keys Select input sources directly SDI 1 SFP Press to switch to the SDI IN 1 terminal input Press again to switch to SFP terminal input SDI 2 Press to switch to the SDI IN 2 terminal input SDI 3 Press to switch to the SDI IN 3 terminal input SDI 4 Press to switch to the SDI IN 4 terminal input 4x3G Press to switch to Quad link ...

Страница 9: ...B types and single line display mode selectable The waveform display positions colors background are adjust able page 14 Press MENU button the main menu will pop up from the left top of the screen and display the current working status including Channnel Display the current displayed input source Display the video format of current input source Format If no video detected in current input source i...

Страница 10: ...e YUV Color Matrix Processing Color Space Color Temperature Scanning Loaded Profile Firmware Version Contrast Brightness Chroma Sharpness Backlight Back Exit Video Lumina Range YUV Color Matrix Display Color Processing Gamma Log Mode Import LUT s Color Temperature User Adjustments Auto Calibration ColorChecker Back Exit Scanning Zoom Area Selection Freeze Frame Odd Even Mode H V Delay Flip Mode Lo...

Страница 11: ...s 0 255 LCD Panel DCI P3 Rec 709 Rec 2020 OFF J Log1 Log C S Log2 C Log V Log RedLogFilm S Log3 User Log None 3DLut cube J Log1 cube Log C cube S Log2 cube S Log3 cube C Log cube V Log cube RedLogFilm cube User Log cube PQ1000 csv HLG1000 csv Select a probe to use Set calibration time Start Calibration Measure current color Return to previous menu Exit Main Menu Return to previous menu Color Check...

Страница 12: ... probe and place the sensor probe onto the right position like calibration step Enter Auto Calibration Measure The monitor will generate several colors and finish measure within 30 seconds And display the result as 5 Enter Auto Calibration Start Calibration and the monitor will display information and probe position mark Color Gamut and Delta E Result of last calibration The color chart can be swi...

Страница 13: ...rames 2 frames 0 01 frame 0 1 frame Low latency mode ON 0 01 frame 0 1 frame 0 51 frame 0 6 frame 0 6 frame 0 01 frame 0 1 frame 0 51 frame 0 6 frame 0 6 frame 0 01 frame 0 1 frame 0 51 frame 0 6 frame 0 6 frame 0 01 frame 0 1 frame 0 51 frame 0 6 frame 0 6 frame 0 51 frame 0 6 frame 0 6 frame 0 01 frame 0 1 frame 0 01 frame 0 1 frame 7 Low Latency Mode Return to previous menu Exit Main Menu Panel...

Страница 14: ...e background transparency selection Vector scope pattern color setting Exit Main Menu Switch on Time code display Switch on the Waveform pattern Waveform type select Waveform on screen display position setting Waveform background transparency selection Waveform pattern color setting Switch on single line waveform mode Switch on vector scope pattern Select a line for the single line waveform OFF Bl...

Страница 15: ...r display Switch on the audio Lissajous pattern display Adjust the audio bar pattern background transparency Switch on the mark and alert info of audio meter pattern Setting value Bottom Right Top Left OFF Low High TYPE1 TYPE2 1 OFF ON OFF ON Top Right Bottom Left Top Left Top Right Bottom Left Bottom Right Left Channel Right Channel Audio Bar Bar Blending Channel 1 Channel 16 Channel 1 Channel 16...

Страница 16: ... terminals To do External Control Tally Position GPI 1 GPI Control 1 Pin 2 Pin 3 Pin 4 Pin 5 Pin 6 Pin Back Exit UMD 2 UMD Mode UMD Position UMD Size UMD Color UMD Blending Source ID TSL Address TSL Data Bits TSL Stop Bits IP 3 Net Mask Gateway Port 1024 65535 Back Exit TSL Baud Rate Setting value 16 1 GPI control Connect GPI remote controller with GPI port of the monitor rear panel Switch on the ...

Страница 17: ...on Please seek help from your webmaster for any network connections Monitor IP address Monitor port address 2 Launch any of a web browser on the computer and enter URL Monitor IP port for example 192 168 1 99 8080 The webserver control page will be displayed 17 2 UMD control Select UMD mode to External will enable TSL UMD control TallyMan system connection 3 Webserver IP Control Connect the monito...

Страница 18: ...18 Webserver page control interface After changing settings please click the Refresh button to see the new status ...

Страница 19: ...r 2SI interleave 4x3GSDI input only Select a user profile for HDMI input only User 1 8 OFF User 1 8 User 1 8 OFF LOW HIGH 5 180 Global SFP SDI1 SDI2 SDI3 SDI4 4xSDI SQ 4xSDI 2SI HDMI Back Exit Setting value Item Load Profile 1 Save Profile Key Brightness OSD TIME SEC F1 F2 F3 F4 F5 F6 Green Mode Idel Duration Key Lock 2 Firmware Update 3 System Reset Back Exit System Setting User profile saving fi...

Страница 20: ...Width 758 2mm 29 7 8 Height 504mm 19 7 8 Depth 150 mm 5 7 8 Width 758 2mm 29 7 8 Height 468mm 18 7 16 Depth 94 mm 3 11 16 External dimensions with the stand excluding protruding parts External dimensions without the stand excluding protruding parts Weight without the stand Weight with the stand 12 7 kg 28 lbs 16 5 kg 36 4 lbs 11 3 kg 24 9 lbs 12 2 kg 26 9 lbs Accessories AC power cord x 1 Monitor ...

Страница 21: ...ions cont Dimensions Unit mm 91 5 657 6 671 6 200 100 150 120 472 3 334 2 100 436 3 91 5 759 1 150 773 1 801 1 200 100 120 529 3 493 3 100 DT U27HB DT U31 DT U31PRO 91 5 120 504 468 758 2 772 2 800 2 150 200 100 100 ...

Страница 22: ...59 94 2048 1080P60 3840 2160P23 98 3840 2160P24 3840 2160p25 3840 2160P29 97 3840 2160P30 3840 2160P47 94 3840 2160P48 3840 2160P50 3840 2160P59 94 3840 2160P60 1 2 3 4 5 6 7 8 9 10 11 12 13 14 15 16 17 18 19 20 21 22 23 24 25 26 27 28 29 30 31 32 33 34 35 36 37 38 39 40 41 42 43 44 45 46 47 48 49 50 51 SDI 1 SFP SDI 2 3 4 Quadlink SDI HDMI Signal format shown in the Status Display as Input termin...

Страница 23: ...tore Solo EU JVCKENWOOD Italia S p A Via G Sirtori 7 9 20129 Milano ITALIA Importeur Alleen EU JVCKENWOOD Belgium N V Leuvensesteenweg 248J 1800 Vilvoorde BELGIQUE Importeur Alleen EU JVCKENWOOD Europe B V Amsterdamseweg 37 1422 AC Uithoorn NEDERLAND Manufacturer JVCKENWOOD Corporation 3 12 Moriya cho Kanagawa ku Yokohama shi Kanagawa 221 0022 JAPAN 2018 JVCKENWOOD Corporation Service Contacts ...

Страница 24: ... MONITOR DT U series The terms HDMI and HDMI High Definition Multimedia Interface and the HDMI Logo are trademarks or registered trademarks of HDMI Licensing Administrator Inc in the United States and other countries ...

Отзывы: