background image

30

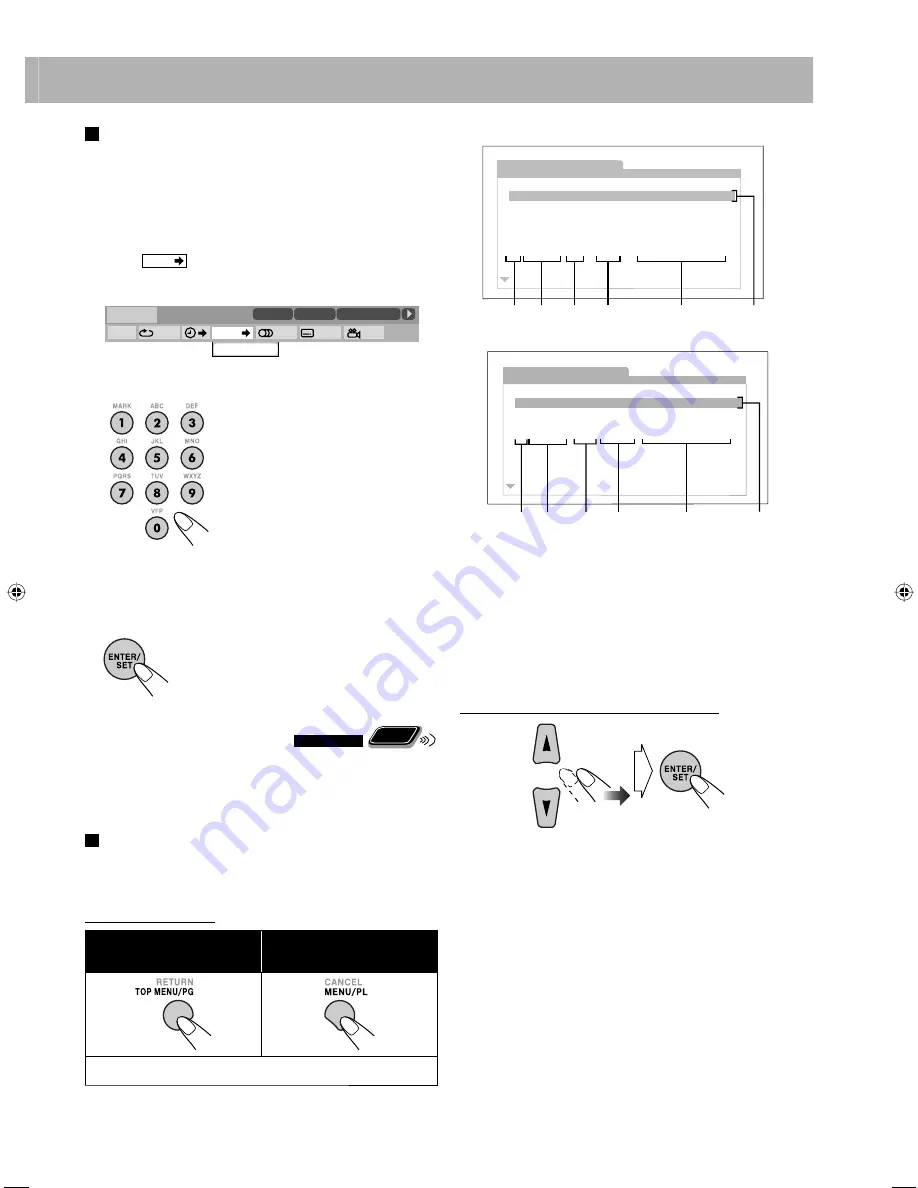
 Chapter Search

For DVD Video/DVD-VR:

 You can search for the chapter 

number to play.
•  This function is not available during Program Play and 

Random Play.

1

  While playing, display the entire on-screen bar.

2

 Select 

CHAP.

.

3

  Display the pop-up window.

4

  Enter the desired chapter number.

Examples:

To select chapter 5, press 5.
To select chapter 10, press 1, then 
0.
To select chapter 15, press 1, then 
5.
To select chapter 30, press 3, then 
0.

 • 

To correct a mis-entry,

 press the number buttons 

until the desired number is shown in the pop-up 
window.

5

  Confirm your entry.

The System starts playing the selected 
chapter.

Control Screen Operations 


Remote
ONLY

You can search for and play the desired items through the 
control screen for DVD-VR and MP3/WMA/WAV/JPEG/
MPEG-1/MPEG-2/DivX files.

 Control screen for DVD-VR

The control screen is superimposed onto the TV screen 
when you call up Original Program (PG) or Play List (PL).

To select playback type

To display the Original 
Programs:

To display the Play Lists:

To remove the list,

 press the same button again.

CHAPTER     _

1/3

1/3

1/3

TIME

TITLE


14

TOTAL

 1:25:58

CHAP


23

DVD-VIDEO

TITLE  2

TIME

OFF

CHAP.

1

/

3

1

/

3

1

/

1

TOTAL   

1:01:58

CHAP  3

Dolby D
3/2.1ch

Ex.: When Original Program is selected.

Ex.: When Play List is selected.

1

 Listed number

2

 Recording/creating date

3

 Recording channels

4

 Recording time

5

 Title

6

 Highlight bar (current selection)

7

 Chapters included

8

 Playback time

To select an item in the list and start playback

•  If you move the highlight bar while playing back, the 

selected item starts playback automatically.

ORIGINAL PROGRAM

No Date

Ch

Time

Title

1 08/12/03

12:15

L
L
L
L
L
L

2 08/12/09

23:05

3 08/12/18

08:17

4 08/12/20

07:47

5 08/12/25

19:38

Mr. Lawrence
Satisfy U

La fleur
The last struggle
free flyer
BOOM!

6 08/12/28

14:20

1 2

3

4

5

6

PLAY LIST

No Date

Chap Length

Title

1 08/12/03

002

0:23:24

Nebula G.
CDJ
Secret Garden
S. Walker

2 08/12/15

004

1:04:39

3 08/12/24

013

0:41:26

4 08/12/27

017

0:09:08

6

7

8

1 2

5

UX-G980V_U.indb   30

UX-G980V_U.indb   30

08.9.11   3:28:03 PM

08.9.11   3:28:03 PM

Содержание CA-UXG980V

Страница 1: ...MICRO COMPONENT SYSTEM UX G980V Consists of CA UXG980V and SP UXG980V SUPER VIDEO INSTRUCTIONS GVT0255 005A US UN UB UG UX A UH Regions other than Australia Australia only ...

Страница 2: ...Cautions and Others CAUTION The button in any position does not disconnect the mains line Disconnect the mains plug to shut the power off completely the STANDBY lamp goes off The MAINS plug or an appliance coupler is used as the disconnect device the disconnect device shall remain readily operable When the system is on standby the STANDBY lamp lights red When the system is turned on the STANDBY la...

Страница 3: ...sidered and local rules or laws governing the disposal of these batteries must be followed strictly Do not expose this apparatus to rain moisture dripping or splashing and that no objects filled with liquids such as vases shall be placed on the apparatus Caution Proper Ventilation To avoid risk of electric shock and fire and to prevent damage locate the apparatus as follows 1 Front No obstructions...

Страница 4: ...in the best possible performance from the System Precautions Installation Install the System in a location with adequate ventilation to prevent internal heat build up in the System DO NOT install the System in a location near heat sources or in a place subject to direct sunlight excessive dust or vibration Install in a place which is level dry and neither too hot nor too cold between 5 C and 35 C ...

Страница 5: ...roup Group Play 25 Playing Repeatedly 26 Prohibiting Disc Ejection Child Lock 26 On Screen Operations 27 On screen Bar Operations 27 Control Screen Operations 30 Setup Menu Operations 32 Initial Settings 32 Recording Operations 34 Setting up the Recording Modes 35 Recording from a Disc 36 Recording from the Radio 37 Recording from the External Component 38 To Give a Name to New Group 38 Editing Op...

Страница 6: ... DVD CD and USB mass storage class device Only when the maximum bit rate is less than 2 Mbps About color system This System is compatible with both of NTSC and PAL video formats You can play back discs files recorded in either format Note on Region Code DVD players and DVDs have their own Region Code numbers This System can play back only DVDs with Region Code numbers with an appropriate Region Co...

Страница 7: ... subwoofer See page 5 From the digital input of digital audio component See page 6 To a wall outlet Plug in the power cord only after all connections have been completed If the wall outlet does not match the AC plug use the supplied AC plug adapter not supplied for Australia Thailand Hong Kong region and the Middle East Front panel From the portable audio player See page 6 From the USB mass storag...

Страница 8: ...lied ŸSpeakers When connecting the speaker cords match the polarity of the speaker terminals red to and black to DO NOT connect more than one speaker to each terminal DO NOT push or pull the speakers as this will damage the foot spacers at the bottom of the speakers To connect the powered subwoofer The connected subwoofer can reproduce the bass sounds recorded in front left and right channels but ...

Страница 9: ...ce such as a USB flash memory device hard disk drive multimedia card reader etc to this System You cannot connect a computer or JVC Everio camcorder to USB MEMORY terminals of the System Noise and static electricity may stop the USB mass storage class device sound In this case disconnect and connect the USB mass storage class device again after turning off the System When connecting a portable aud...

Страница 10: ...nd is activated a A STBY Auto Standby indicator Lights when Auto Standby is activated Flashes when playback stops with Auto Standby activated 1 PRGR progressive indicator Lights when the progressive scanning mode is selected 2 S TURBO Sound Turbo indicator Lights when Sound Turbo II is activated 3 RESUME indicator Lights when the System memorizes the position where the playback is interrupted 4 Di...

Страница 11: ... 3 Adjust the volume To turn off standby the System The STANDBY lamp on the main unit lights in red A small amount of power is always consumed even while on standby For private listening Connect a pair of headphones to the PHONES jack on the main unit The sound will no longer come out of the speakers H PHONE appears on the display for a while Be sure to turn down the volume before connecting or pu...

Страница 12: ... restore the stereo effect press the button again The MONO monaural indicator disappears How to select a number Examples To select number 5 press 5 To select number 10 press 10 To select number 15 press 10 1 then 5 To select number 30 press 10 3 then 0 To select number 125 press 10 10 1 2 then 5 Listening to the Radio To select the AM tuner interval spacing Some countries space AM stations 9 kHz a...

Страница 13: ...ect the preset number for the station you stored To select a number see How to select a number on page 9 Playing Back a Disc USB Mass Storage Class Device INFO To load a disc When using an 8 cm disc place it on the inner circle of the disc tray To close the disc tray press 0 again If you press DVD CD 6 disc tray closes automatically and playback starts depending on how the disc is programmed inter...

Страница 14: ...ng multi angle views At the beginning of a scene containing multi audio sounds At the beginning of a scene containing multi subtitles The following icons will also be shown on the TV to indicate your current operation To deactivate the on screen guide icon see ON SCREEN GUIDE in OTHERS menu on page 33 To select the file type Remote ONLY For disc and USB mass storage class device connected to the U...

Страница 15: ...ource For USB mass storage class device connected to the USB MEMORY 2 terminal While playing The search speed changes in two steps To return to normal playback press USB MEMORY 2 6 for the current source To locate an item directly Remote ONLY You can select a title chapter track file directly and start playback For DVD Video you can select a title before starting playback while you can select a ch...

Страница 16: ...h Bluetooth connection pairing before you listen to the Bluetooth device connected to the Bluetooth USB adapter For details see page 44 For connecting the Bluetooth USB adapter see page 6 For details of Bluetooth operations see pages 44 to 50 For SVCD VCD with PBC While playing a disc with PBC PBC appears on the display When disc menu appears on the TV select an item on the menu Playback of the se...

Страница 17: ...es stronger To reinforce the heavy sound This boosts the low and high frequency sound Sound Turbo II When Sound Turbo II is turned on AHB Pro see below is automatically turned on and cannot be turned off The AHB PRO indicator does not light even though the function is turned on To reinforce the bass sound Remote ONLY While Sound Turbo II is off the richness and fullness of the bass sound is clearl...

Страница 18: ...u can adjust the bass and treble level from 3 to 3 To adjust the bass To adjust the treble Creating a Soothing Tone for Your Ears My Sound INFO Remote ONLY The sound tone you can hear is different in individuals My Sound creates an appropriate equalization pattern for your listening condition You can set up this function while DVD CD or USB MEMORY 1 is selected as the source and playback is stoppe...

Страница 19: ...rround effect while listening through headphones This only functions while listening to disc USB mass storage class device connected to the USB MEMORY 1 terminal This does not function for MPEG 1 MPEG 2 DivX files While playing If you plug in the headphones while 3D Phonic is in use Headphone Surround is turned on automatically When 3D Phonic is not in use and Headphone Surround is turned on unplu...

Страница 20: ... display during playback of picture video Dimmer effect is canceled when playback stops Canceled while holding Setting the ECO ecology Mode Setting the ECO mode allows you to reduce power consumption by turning the display off while on standby While the System is on standby You cannot use ECO Mode while using the Timer Changing the Color System and Scanning Mode Remote ONLY You can select the vide...

Страница 21: ...ESS Adjust if the picture is indistinct 8 to 8 3 Adjust the parameter 4 Repeat steps 2 and 3 to adjust other parameters To clear the screen press VFP again while holding SHIFT Changing the Picture Tone Remote ONLY While showing a playback picture on the TV you can select a preset picture tone or adjust it and store your own preference To select a preset picture tone 1 While playing display VFP set...

Страница 22: ...e in minutes 2 Wait until the set time disappears To check the time remaining until the shut off time press SLEEP A STBY once If you press the button repeatedly you can change the shut off time Setting the Clock INFO Remote ONLY Without setting the built in clock you cannot use Daily Timers see page 54 To exit the clock settings press CLOCK TIMER as required To correct a mis entry during the proce...

Страница 23: ...k using the on screen bar see page 27 While playing a DVD Video Ex While playing a DivX file While playing a DVD VR or SVCD VCD ST1 ST2 ST To listen to normal stereo 2 channel playback L1 L2 L To listen to the left audio channel R1 R2 R To listen to the right audio channel SVCD can have 4 audio channels SVCD usually uses these 4 channels to record two 2 channel recordings ST1 ST2 ENGLISH 1 3 3 3 F...

Страница 24: ...or SVCD While playing you can select the subtitles even if no subtitles are recorded on the disc For DVD Video DVD VR SVCD You can also select the subtitle language using the on screen bar see page 27 While playing a DivX file DVD Video 1 2 Ex 1 3 3 3 2 3 FRENCH JAPANESE ENGLISH 1 3 2 3 JAPANESE 3 3 ENGLISH FRENCH JAPANESE While playing a DVD VR While playing an SVCD To select multi angle view use...

Страница 25: ...ck press DVD CD 6 or USB MEMORY 1 6 USB mass storage class device Disc To replay the previous scenes One Touch Replay This function is only used while playing DVD Video DVD VR While playing The playback position moves back about 10 seconds before the current position only within the same title for DVD Video Zoom Remote ONLY 1 While playing While playing a DVD Video DVD VR SVCD VCD and MPEG 1 MPEG ...

Страница 26: ...sc 1 Select DVD CD as the source 2 Activate Program Play 3 Select chapters tracks files you want for Program Play using the number buttons To select a number see How to select a number on page 9 1 For DVD Video and MP3 WMA WAV files Select a title or group number 2 Select a chapter or track file number 4 Repeat step 3 until you complete your program 5 Start playback Playback starts in the order yo...

Страница 27: ... class device connected to the USB MEMORY 2 terminal while holding while holding In the reverse order In the programmed order For USB mass storage class device connected to the USB MEMORY 2 terminal 1 Select USB MEMORY 2 as the source 2 Select group track you want for Program Play using the number buttons then press ENTER SET To select a number see How to select a number on page 9 You can also use...

Страница 28: ...ks at random Random Play cannot be used for the USB mass storage class device connected to the USB MEMORY 1 terminal DVD VR and JPEG MPEG 1 MPEG 2 DivX files on a disc 1 Select the sources 2 Activate Random Play For disc For USB mass storage class device connected to the USB MEMORY 2 terminal RANDOM Plays all tracks chapters at random GRP RND Group random Plays all tracks in a group at random USB ...

Страница 29: ...les during slide show While playing or before playback REP CHAP 1 Repeats the current chapter REP TTL Repeats the current title REP TRK 1 Repeats the current track file REP GRP Repeats the current group REP PG Repeats the current Original Program REP PL Repeats the current Play List REP ALL Repeats all the contents or programmed tracks files During Program Play and Random Play REP STEP appears ins...

Страница 30: ...Y 1 terminal 1 Disc source 2 Playback information Dolby D Audio format 3 2 1ch 2 0 0 ch Channel number PROGRAM RANDOM Current play mode TITLE 2 Current title CHAP 3 Current chapter TRACK 14 Current track Current Original Program Current Play List TIME 0 00 58 Time indication 3 Operation modes Playback Forward Reverse search Forward Reverse slow motion Pause Stop 4 Function icons on the pull down m...

Страница 31: ...reen bar and the display on the main unit 1 While playing display the entire on screen bar 2 Make sure TIME is selected highlighted 3 Change the time indication TIME Elapsed playing time of the current chapter track not applicable for DVD VR REM Remaining time of the current chapter track not applicable for DVD VR TOTAL Elapsed disc time T REM Remaining time of title DVD Video program DVD VR disc ...

Страница 32: ...e end point using the button To cancel A B Repeat repeat steps 1 to 3 and select OFF in step 4 A B Repeat will also be canceled when you stop play or skip the chapter or track Time Search You can move to a particular point by specifying the elapsed playing time from the beginning This function is not available during Program Play and Random Play 1 While playing without PBC for SVCD VCD display the...

Страница 33: ...rogram PG or Play List PL To select playback type To display the Original Programs To display the Play Lists To remove the list press the same button again CHAPTER _ 1 3 1 3 1 3 TIME TITLE 14 TOTAL1 25 58 CHAP 23 DVD VIDEO TITLE 2 TIME OFF CHAP 1 3 1 3 1 1 TOTAL 1 01 58 CHAP 3 Dolby D 3 2 1ch Ex When Original Program is selected Ex When Play List is selected 1 Listed number 2 Recording creating da...

Страница 34: ...14 Track 6 14 Total 41 Spring Summer Fall Winter Track Information Cloudy mp3 Fair mp3 Fog mp3 Hail mp3 Indian summer mp3 Rain mp3 Shower mp3 Snow mp3 Thunder mp3 Typhoon mp3 Wind mp3 Winter sky mp3 Title Rain Artist Album 1 2 9 8 7 0 REPEAT STEP 3 RANDOM 6 4 5 To move the highlight bar between group list and file list To select an item in the list Move the highlight bar to the desired item If you...

Страница 35: ...e Setup Menu screen Press SET UP MENU LANGUAGE ENGLISH AUDIO LANGUAGE ENGLISH SUBTITLE OFF ON SCREEN LANGUAGE ENGLISH LANGUAGE Menu Item Contents LANGUAGE MENU LANGUAGE You can select the initial menu language for DivX files DVD Video For the language codes AA ZU see page 62 AUDIO LANGUAGE You can select the initial audio language for DivX files DVD Video For the language codes AA ZU see page 62 S...

Страница 36: ...d to the USB MEMORY 1 terminal AUDIO To play MP3 WMA WAV files PICTURE To play JPEG files VIDEO To play MPEG 1 MPEG 2 DivX files AUDIO DIGITAL AUDIO OUTPUT Set this item correctly when using the OPTICAL DIGITAL OUT terminal on the rear PCM ONLY When connecting to audio equipment which is compatible with only linear PCM signals DOLBY DIGITAL PCM When connecting to a Dolby Digital decoder or an ampl...

Страница 37: ...n on the display You cannot record tracks into the root folder When the USB mass storage class device does not have other folders the System creates a new folder MUSIC automatically Do not disconnect a USB mass storage class device while playing recording editing It may cause malfunction About SCMS Serial Copy Management System The System uses the Serial Copy Management System which allows only fi...

Страница 38: ...les LP REC Long Play 64 kbps for MP3 files 64 kbps for WMA files SP REC Standard Play 128 kbps for MP3 files 96 kbps for WMA files Canceled To select recording speed Only for discs CD DA Select the recording speed 1 2 Select a recording speed NORMAL Recorded at the same speed as playback You can listen to the sound while recording HIGH Recorded at up to 4 times normal speed depending on the file a...

Страница 39: ...elect a group to record the tracks into If FORM GRP is selected the System will automatically create the new group When you want to create a new group select FORM GRP If you want to give a name to the new group before recording see To Give a Name to New Group on page 38 on the main unit Continued on the next page To select track mark setting Only for radio and external component Select how track m...

Страница 40: ...Start recording To stop recording on the main unit on the main unit 5 Start recording Both recording and playback start at the same time When playback ends recording also stops You cannot change the source while recording If Program Play is activated and program is made see Programming the Playing Order Program Play on page 23 the tracks are recorded in the programmed order To stop recording manua...

Страница 41: ...e the new group When you want to create a new group select FORM GRP If you want to give a name to the new group before recording see also To Give a Name to New Group on the right column 4 Start recording To stop recording on the main unit on the main unit To Give a Name to New Group When you select FORM GRP Form group you can give a group title to the new group before starting recording 1 After se...

Страница 42: ... To select a group To select a track 3 Select the group track title editing mode xxx TTL For editing the track title Gxx TTL For editing the group title x number of the group track while holding while holding Canceled Editing Operations INFO You can execute editing operations only to the USB mass storage class device connected to the USB MEMORY 2 terminal You cannot edit the group GROUP01 root and...

Страница 43: ...rs refer to Available Characters on page 41 3 Confirm the entry 4 Confirm the selection If you select the root folder or MUSIC folder PROHIBIT appears on the display 5 Enter a title For entering a title see How to enter titles on the right column 6 Finish the procedure To give the titles to other groups tracks repeat steps 2 to 6 Ex When Gxx TTL is selected in step 3 Character type A character 1 n...

Страница 44: ... position to the right Move the entry position to the left Making a New Group You can make a new empty group An empty group can be used for recording or editing After recording or moving tracks into an empty group you can select that group to play back You can make up to 999 groups in the USB mass storage class device When you record a 1000th group GRP FULL Group full appears on the display and no...

Страница 45: ...n group for the target track 6 Start moving You cannot move tracks into the root folder Erasing the Tracks You can erase tracks Once tracks are erased you cannot restore them 1 Start and stop playback of the USB mass storage class device 2 Select TTL DEL Title delete 3 Select the track you want to delete You can select up to 15 tracks Repeat this step to select other tracks to delete 4 Confirm the...

Страница 46: ... the erasing 4 Confirm the erasing again 5 while holding Canceled Erasing the Groups You can erase a group and the tracks in it Once a group and the tracks in it are erased you cannot restore them 1 Start and stop playback of the USB mass storage class device 2 Select GRP DEL Group delete 3 Select the group you want to delete When you want to erase an empty group select a group while playback is s...

Страница 47: ...ADPT terminal on the front panel of the main unit What is pairing To use a Bluetooth audio player for the first time you need to register the Bluetooth audio player on the System pairing Once you have registered a device no pairing operation for the same device is required You can register up to five devices for the Bluetooth audio player and up to other five devices for the Bluetooth headphones I...

Страница 48: ...pairing on page 44 1 Connect the Bluetooth USB adapter then select BT Bluetooth as the source Wait until the Bluetooth indicator flashes 2 Set the System ready to be paired with the Bluetooth audio player 3 Operate the pairing procedure on the Bluetooth audio player UX G980V appears on the display of the Bluetooth audio player during the pairing Then enter your PIN code 0000 on the Bluetooth audio...

Страница 49: ...ile holding SHIFT to select RECEIVE then press ENTER SET while holding Exit setting To select a track To pause To stop To pause press once or hold one second It depends on Bluetooth audio player To release press the same button again You can operate the Bluetooth audio player by using the buttons above when the Bluetooth audio player supports AVRCP profile Some Bluetooth audio players may not be c...

Страница 50: ...ng to Music Using Bluetooth Headphones Pairing See What is pairing on page 44 1 Turn on the Bluetooth headphones and set it ready to be found by the System See the headphones manual for details 2 Select a source other than Bluetooth 3 Activate the Bluetooth transmitter The Bluetooth indicator of the System starts flashing 4 Select SRCH DV Search device to start searching for the headphones The Sys...

Страница 51: ...stem Set the volume of the headphones to the minimum Refer to the headphone manual for details 3 Activate the Bluetooth transmitter The System starts searching for the headphones Depending on the Bluetooth headphones the System will try to connect the player automatically if the pairing is successful 4 Start playback on the System 5 Adjust the volume on the Bluetooth headphones Some Bluetooth audi...

Страница 52: ...o delete the registration of Changing the Bluetooth Settings To change the name of a registered device 1 To change the name of a Bluetooth audio player To change the name of the Bluetooth headphones 2 Select CHNGNAME Change name 3 Select the device to change the name of 4 Enter a new name See How to enter titles on page 40 for the entry operation 5 Confirm the entry 2 sec while holding while holdi...

Страница 53: ...The name of the System UX G980V The address of the System Exit setting To change the sound quality Change the sound quality if the Bluetooth connection is unstable This setting is common for the Bluetooth audio player and the Bluetooth headphones 1 Select SND QLTY Sound quality 2 Select a setting HIGH Select this for a better sound quality NORMAL Select this if the Bluetooth connection is unstable...

Страница 54: ...ed in analog 1 Connect the microphone not supplied to the MIC jack To cancel Mic Mixing disconnect the microphone 2 Start playing a source For Karaoke discs Select a desired audio channel See Selecting the Audio Track on page 20 3 Sing into the microphone 4 Adjust the microphone level and volume To use only microphone Select DVD CD or USB MEMORY 1 in step 2 and stop the playback When connecting a ...

Страница 55: ...source 1 Select DVD CD or USB MEMORY 1 as the source 2 Connect the microphone not supplied to the MIC jack To cancel Mic Mixing disconnect the microphone 3 Start playback 4 5 Adjust the key To return to normal key select 0 The level of KEYCON is always return to 0 when you change a track or the source When the same track is repeated the level is maintained To apply an echo to your voice You can af...

Страница 56: ...les on the disc player You can program up to 12 tracks This function is not available for files in a USB mass storage class device When you change a disc or the source all reserved songs are cancelled 1 Select DVD CD as the source 2 Connect the microphone not supplied to the MIC jack To cancel Mic Mixing disconnect the microphone 3 Activate Karaoke Program Play The PRGM indicator flashes during th...

Страница 57: ... stops playback or recording and turns off on standby automatically The timer setting remains in memory until you change it 1 Select one of the timer setting modes you want to set DAILY 1 ON time DAILY 2 ON time or DAILY 3 ON time When the clock has not been set pressing CLOCK TIMER makes the System enter the clock setting mode see page 19 Ex When Daily Timer 1 setting mode is selected ON Time ON ...

Страница 58: ...turned off For USB2 REC If you select TUNER FM or TUNER AM select a preset channel Once settings are completed the timer setting information appears in sequence 3 Turn off the System on standby if you have set the timer with the System turned on You cannot select the 151st and more To turn on or off the Daily Timer Since Daily Timer is activated at the same time everyday you may need to cancel it ...

Страница 59: ...ich do not belong to any groups are recognized as files of group 1 For playback of files in the USB mass storage class device When connecting a USB mass storage class device refer also to its manual Connect one USB mass storage class device to each terminal of the System at a time Do not use a USB hub You cannot charge any USB mass storage class device through the USB terminals While playing back ...

Страница 60: ... Soothing Tone for Your Ears My Sound You cannot use My Sound for some discs Changing the Color System and Scanning Mode If you play back an NTSC disc file with the color system set to PAL PRG the disc file will be reproduced using PAL 60 format however if the TV does not support this format the screen may not display properly If you play back a PAL disc file with the color system set to NTSC PRG ...

Страница 61: ...nal language is used as the initial language PICTURE menu MONITOR TYPE Even if 4 3 PS 4 3 MULTI PS is selected the screen size may become 4 3 letter box while playing a disc file This depends on how the discs are recorded When you select 16 9 MULTI NORMAL 16 9 MULTI AUTO for a picture whose aspect ratio is 4 3 the picture changes slightly due to the process of converting the picture width OTHERS m...

Страница 62: ...intenance To get the best performance of the System keep your discs and mechanism clean Handling Discs Remove the disc from its case by holding it at the edge while pressing the center hole lightly Do not touch the shiny surface of the disc or bend the disc Put the disc back in its case after use to prevent warping Be careful not to scratch the surface of the disc when placing it back in its case ...

Страница 63: ...UDIO MPX while holding SHIFT after starting playback see page 20 The disc tray does not open or close The power cord is not plugged in Child Lock is in use LOCKED appears on the display see page 26 Recording Operations Unable to record into the USB mass storage class device You cannot record onto the USB mass storage class device connected to the USB MEMORY 1 terminal Connect the USB mass storage ...

Страница 64: ...uble D symbol are trademarks of Dolby Laboratories DTS is a registered trademark of DTS Inc and DTS2 0 Digital Out is a trademark of DTS Inc Official DivX Ultra Certified product Plays all versions of DivX video including DivX 6 with enhanced playback of DivX media files and the DivX Media Format DivX DivX Ultra Certified and associated logos are trademarks of DivX Inc and are used under licence M...

Страница 65: ...Bengali Bangla IW Hebrew OC Occitan TI Tigrinya BO Tibetan JI Yiddish OM Afan Oromo TK Turkmen BR Breton JW Javanese OR Oriya TL Tagalog CA Catalan KA Georgian PA Panjabi TN Setswana CO Corsican KK Kazakh PS Pashto Pushto TO Tonga CY Welsh KL Greenlandic PT Portuguese TR Turkish DA Danish KM Cambodian QU Quechua TS Tsonga DZ Bhutani KN Kannada RM Rhaeto Romance TT Tatar EL Greek KO Korean KOR RN K...

Страница 66: ... CD 44 1 kHz 16 bit Linear PCM 48 kHz 16 bit Linear PCM CD with DTS DTS bitstream 44 1 kHz 16 bit Linear PCM MP3 WMA WAV MPEG 1 MPEG 2 32 44 1 48 kHz 16 bit Linear PCM DivX with MP2 MP3 32 44 1 48 kHz 16 bit Linear PCM with Dolby Digital Dolby Digital bitstream 32 44 1 48 kHz 16 bit Linear PCM While playing some DVDs digital signals may be emitted at 20 bits or 24 bits at their original bit rate t...

Страница 67: ...ut notice Amplifier section CA UXG980V Output Power 160 W 80 W 80 W at 6 Ω 10 THD Audio Input AUDIO IN Stereo min 3 5 mm 500 mV 47 kΩ at IN_LVL1 250 mV 47 kΩ at IN_LVL2 125 mV 47 kΩ at IN_LVL3 Audio output SUBWOOFER OUT 500 mV 10 kΩ Digital input output OPTICAL DIGITAL OUT output only 21 dBm to 15 dBm 660 nm 30 nm USB MEMORY 1 VIDEO AUDIO PLAY input only USB MEMORY 2 AUDIO REC PLAY Bluetooth Video...

Страница 68: ...21 DIMMER 1 17 TITLE EDIT j 39 41 43 DISP CHARA h 19 40 TOP MENU PG 9 12 30 DVD AUDIO IN LEVEL i 13 17 TUNER PLAY MODE t 9 23 26 DVD CD 6 3 8 11 22 23 25 31 36 47 49 52 53 TV VIDEO f 63 ECO 1 17 TV CH UP DOWN r 63 ECHO 8 52 TUNER AUDIO IN g 8 10 13 37 38 47 49 FADE MUTING e 14 USB MEMORY 1 6 USB MEMORY 2 6 2 a 8 11 22 24 26 31 39 41 43 47 49 52 FILE TYPE e 11 VFP k 18 GROUP TITLE SKIP s 11 39 42 4...

Страница 69: ...66 Remote control Main unit This remote control can also operate JVC s TVs see page 63 ...

Страница 70: ... Thai Hong Kong regional and Saudi Arabian models CAUTION for mains AC line BEFORE PLUGGING IN do check that your mains AC line voltage corresponds with the position of the voltage selector switch provided on the outside of this equipment and if different reset the voltage selector switch to prevent from a damage or risk of fire electric shock ...

Отзывы: