background image

8

Basic setting for picture

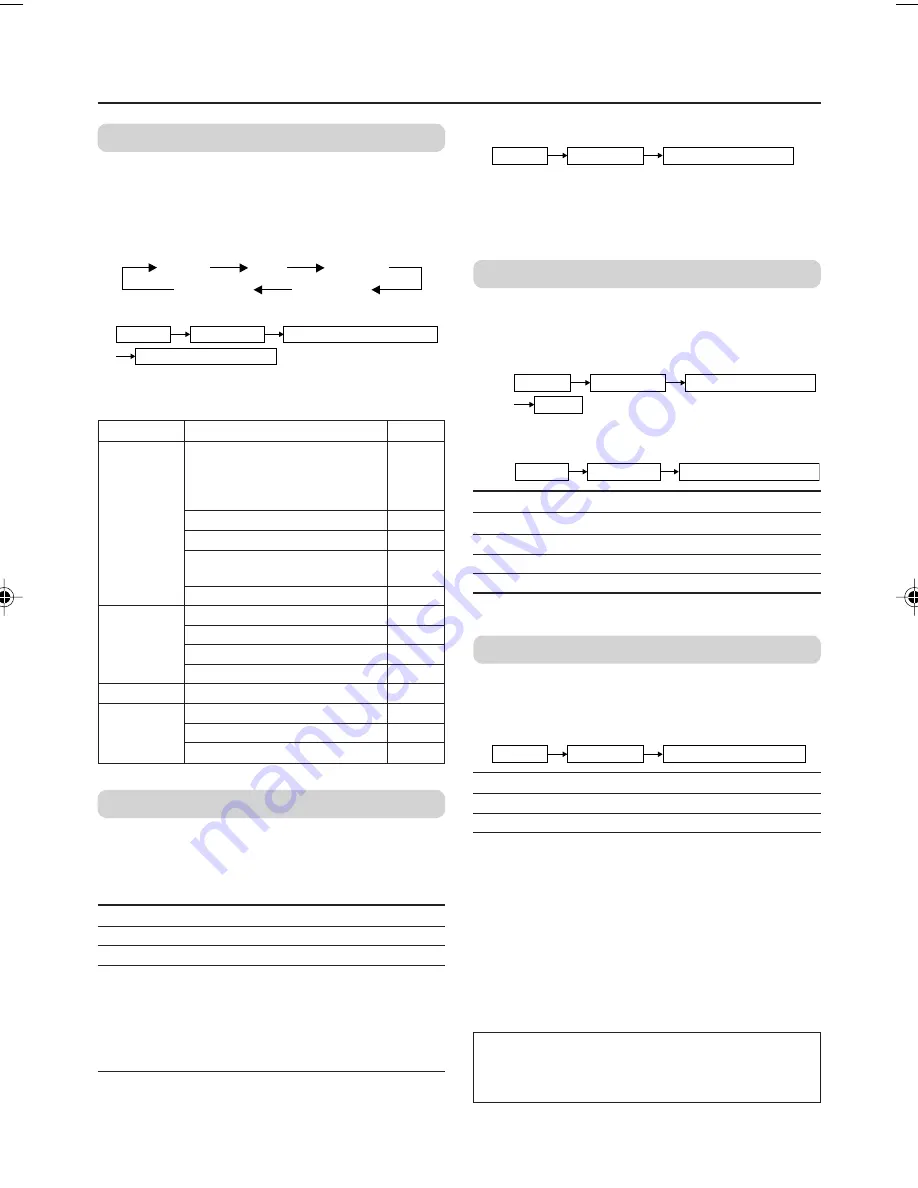
COLOUR SYSTEM

You can select the appropriate colour system
when the picture is not clear or no colour
appears.

Press the COLOUR SYSTEM button to select a
setting.

AUTO

PAL

SECAM

NTSC3.58

NTSC4.43

To operate this function with a menu:

MENU

PICTURE

PICTURE FEATURES

COLOUR SYSTEM

For the colour system in each country or region,
see the table below:

Area

Country or Region

System

Bahrain, Kuwait, Oman, Qatar,
United Arab Emirates, Yemen, etc.

PAL

Indonesia, Malaysia, Singapore,

Asia, Middle

Thailand, India, etc.

East

China, Vietnam, etc.

PAL

Hong Kong, etc.

PAL

Islamic Republic of Iran, Lebanon,

SECAM

Saudi Arabia, etc.

Philippines, Taiwan, Myanmar, etc. NTSC

Russia, etc.

SECAM

Europe

Czech Republic, Poland, etc.

PAL

Germany, Holland, Belgium, etc.

PAL

UK, etc.

PAL

Oceania

Australia, New Zealand, etc.

PAL

Republic of South Africa, etc.

PAL

Africa

Nigeria, etc.

PAL

Egypt, Morocco, etc.

SECAM

PICTURE MODE

You can choose the desired picture setting with
one-touch.

Press the PICTURE MODE button to select a
setting.

SOFT

Softens contrast and sharpness.

BRIGHT

Heightens contrast and sharpness.

STANDARD

Standard picture setting.

USER

You can change this picture setting
as you like.
Select USER and adjust following
items in the PICTURE SETTING menu.
(CONTRAST, BRIGHT, SHARP, COLOUR,
TINT*)

*TINT can only be adjusted in NTSC system.

To operate this function with a menu:

MENU

PICTURE

PICTURE MODE

To return the USER setting to the default, press
the blue button when the PICTURE SETTING
menu appears.

Adjusting the picture - USER

You can adjust the desired picture setting when
selecting USER in PICTURE MODE.

1

Select the USER in PICTURE MODE under
PICTURE menu.

❇ 

USER

MENU

PICTURE

PICTURE MODE

2

Select the PICTURE SETTING in PICTURE
menu, then adjust the setting.


MENU

PICTURE

PICTURE SETTING

CONTRAST

2

 : Lower contrast

3

 : Higher contrast

BRIGHT

2

 : Darker

3

 : Brighter

SHARP

2

 : Softer

3

 : Higher

COLOUR

2

 : Lighter

3

 : Deeper

TINT*

2

 : Reddish

3

 : Greenish

*TINT can only be adjusted in NTSC system.

WHITE BALANCE

You can change the white balance of the picture
to better match the type of video being viewed.
Select the WHITE BALANCE in the PICTURE
menu, then choose the desired setting.

MENU

PICTURE

WHITE BALANCE

NORMAL

Normal white balance.

COOL

Bluish white.

WARM

Reddish white.

About the basic operations of the menu,
please see the “How to operate menus
and menus locations” on page 4.

 GGT0077-001A-H_E_P02-15

1/13/05, 18:12

8

Содержание AV-21WMG5

Страница 1: ... buttons and functions 5 Setting up your TV 6 Basic setting for picture 8 Advanced setting for picture 9 Basic setting for sound 10 Advanced setting for sound 10 Favorite channel and video setting 11 Customized setting 12 TV channel presetting 13 Additional preparation 15 Troubleshooting 15 Specifications Back cover INSTRUCTIONS ...

Страница 2: ...it forcefully Never use any cleaner or detergent on it 7 If you are not going to use this TV for a long period of time be sure to disconnect the AC plug from the AC socket 8 The apparatus shall not be exposed to dripping or splashing and that no objects filled with liquids such as vases shall be placed on the apparatus 15 cm 10 cm 15 cm 10 cm Knowing your TV s functions Main features Function Desc...

Страница 3: ... 1 Press the DISPLAY button once to display the PR list 2 Press 5 2 3 button to choose a channel then press the MENU OK button You can confirm the favorite channels in the PR list The channels set to favorite channels are indicated with coloured mark On the other hand you can use this button to return to the previous menu 9 0 9 Select the programme number For two digits programme number press then...

Страница 4: ...t the effect level Display the sub menu Press 5 buttons 3 to choose a function of a function Then press MENU OK button 2 to display the sub menu The following chart shows locations of functions in menus In this manual location of a function is described as follows MENU Top menu 2nd menu MENU Top menu 2nd menu 3rd menu Note Some functions have the 4th menus as the sub menus To exit the menu the on ...

Страница 5: ... the desired channel 7 MENU Press to display the menu 8 IN VIDEO 2 Video and audio input jacks for VIDEO 2 mode 9 Headphone jack 0 Aerial socket OUTPUT Video and audio output jacks VIDEO 1 INPUT Video and audio input jacks for VIDEO 1 mode How to operate the menus with the TV button Work as same as the button on the TV button remote control unit Note MENU MENU OK button To display main menu and ex...

Страница 6: ...To audio video output To aerial input The illustration shown is just a sample It may not be same as your TV 3 Inserting batteries into the remote control Insert two batteries by following the ª and polarities and inserting the end first CAUTION Follow the cautions printed on the batteries Notes Use AA R6 UM 3 dry cell batteries If the remote control does not work properly fit new batteries The sup...

Страница 7: ... TOUR RESTART function EDIT PR CH CC 7 CH 09 8 CH 11 9 CH 13 10 11 12 13 3 Proceed to edit the channel list PR list For details see page 13 LANGUAGE ENGLISH FRAN AIS êìëëäàâ Press 5 button to select your desired language TV will start searching for the channels To stop AUTO PROGRAM press MENU OK button If the JVC logo does not appear use LANGUAGE and AUTO PROGRAM functions to make the initial sett...

Страница 8: ...sharpness STANDARD Standard picture setting USER You can change this picture setting as you like Select USER and adjust following items in the PICTURE SETTING menu CONTRAST BRIGHT SHARP COLOUR TINT TINT can only be adjusted in NTSC system To operate this function with a menu MENU PICTURE PICTURE MODE To return the USER setting to the default press the blue button when the PICTURE SETTING menu appe...

Страница 9: ...al is weak or absent or when there is no input from an antenna Select the BLUE BACK in the INSTALL menu then choose ON or OFF MENU INSTALL BLUE BACK If you wish to continue viewing the poor picture cancel the BLUE BACK function About the basic operations of the menu please see the How to operate menus and menus locations on page 4 ...

Страница 10: ...ngapore Asia Middle Thailand India etc East China Vietnam etc D K Hong Kong etc I Islamic Republic of Iran Lebanon B G Saudi Arabia etc Philippines Taiwan Myanmar etc M Russia etc D K Europe Czech Republic Poland etc D K Germany Holland Belgium etc B G UK etc I Oceania Australia New Zealand etc B G Republic of South Africa etc I Africa Nigeria etc B G Egypt Morocco etc B G AI VOLUME You can adjust...

Страница 11: ...esired favorite channel FAVORITE CHANNEL FAVORITE CH SETTING FAVORITE CH SETTING FAVORITE CHANNEL PR 01 CONTRAST BRIGHT SHARP COLOUR TINT EFFECT ON 3 Select EFFECT then press 2 3 button to choose ON To cancel the settings choose OFF 4 Select the desired item that you wish to adjust CONTRAST BRIGHT SHARP TINT COLOUR 5 Press the MENU OK button to exit the menu To adjust the video setting VIDEO SETTI...

Страница 12: ...od of time to a maximum of 120 minutes in 10 minutes step To operate this function with a menu MENU FEATURES OFF TIMER When the elapsed of time left one minute GOOD NIGHT appears on the screen You can display the OFF TIMER menu again to confirm or change the remaining time AUTO SHUTOFF You can set the TV to turn off automatically when no signal is received for about 15 minutes or longer after the ...

Страница 13: ...he blue button to activate the MANUAL function The sound system of the channel appears at the right of the CH CC number 5 Press the 3 button to choose an appropri ate sound system For details see SOUND SYSTEM on page 10 6 Press the green or red button to search for the TV channel Searching stops when a channel is found and displayed 7 Repeat step 5 until your desired TV channel appears If the rece...

Страница 14: ...4 CH 20 US 20 W 35 CH 21 US 21 W 36 E21 CH 22 US 22 W 37 E22 CH 23 US 23 W 38 E23 CH 24 US 24 W 39 E24 CH 25 US 25 W 40 E25 CH 26 US 26 W 41 E26 CH 27 US 27 W 42 E27 CH 28 US 28 W 43 E28 CH 29 US 29 W 44 E29 CH 30 US 30 W 45 E30 CH 31 US 31 W 46 E31 CH 32 US 32 W 47 E32 CH 33 US 33 W 48 E33 CH 34 US 34 W 49 E34 CH 35 US 35 W 50 E35 CH US CCIR OIRT AUSTRALIA CH 36 US 36 W 51 E36 CH 37 US 37 W 52 E3...

Страница 15: ...e COLOUR or BRIGHT setting Refer to Adjusting the picture USER on page 8 Inevitable phenomenon due to the nature of the picture tube This is not a malfunction This is due to the condition of the video signal whereby the image was not recorded properly This is not a malfunction Cannot operate the remote control Cannot operate the menus Cannot operate the front control buttons TV is turned off sudde...

Страница 16: ...quirements AC 110 to 240 V 50 60 Hz Power consumption 63 W External input output VIDEO 1 VIDEO input AUDIO input VIDEO 2 VIDEO input AUDIO input You can choose to connect one of AUDIO input jacks OUTPUT VIDEO output AUDIO output Headphone jack stereo mini jack 3 5 mm diameter sound is monaural Design and specifications are subject to change without notice Specifications 0205 NIC JMT 2005 Victor Co...

Отзывы: