


5
4
ASSEMBLY INSTRUCTIONS:
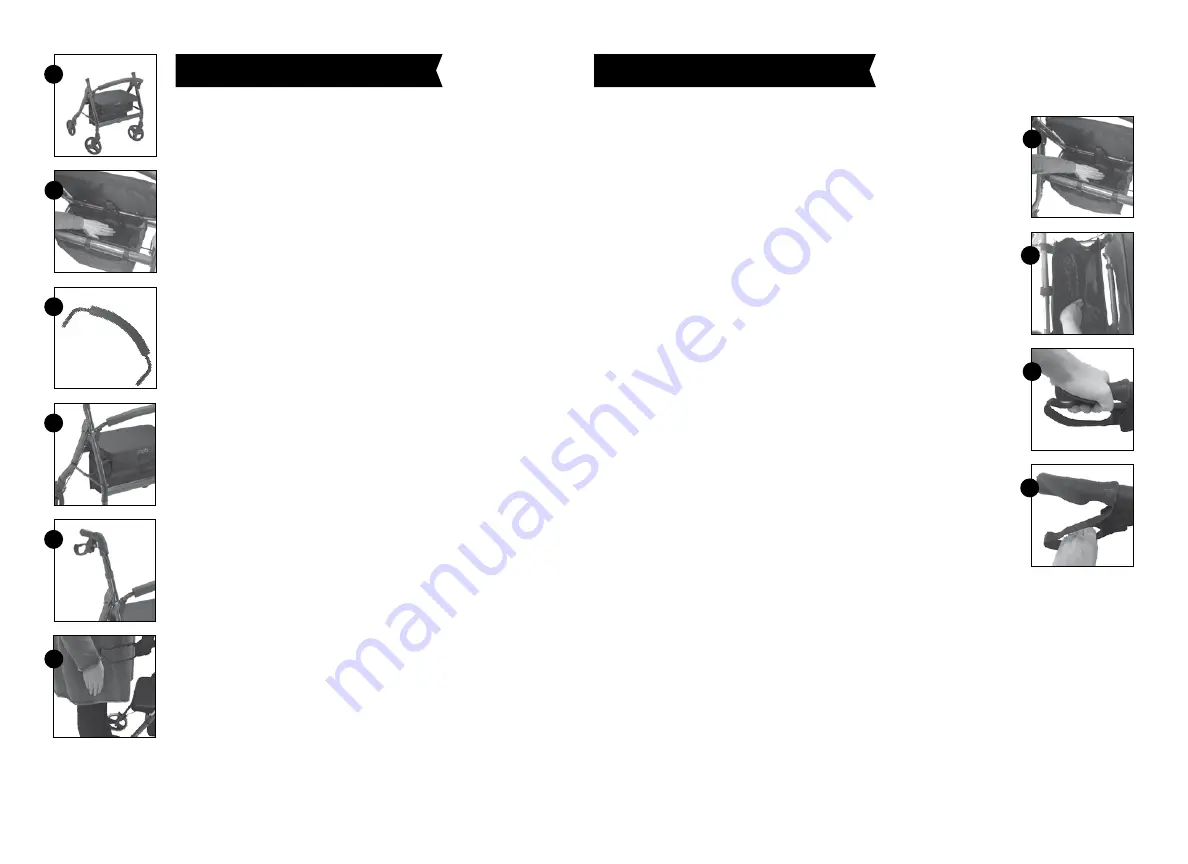
1. OPEN UNIT
• Place unit on the floor with top of seat facing up
(see image 1).
• Spread frame out, lift up padded seat and press
down on bottom of storage bag. User will feel
folding bar. Push down on folding bar until it
locks in place (see image 2).
2. INSERT PADDED BACKREST
• Depress push buttons on the backrest, (image 3)
and slide it into plastic backrest hinges, (image 4).
• Make sure that push buttons fully engage in the
hinge holes.
3. ATTACH HANDLES
• Place handles into the frame (see image 5).
Depress push buttons on the handles to allow
handles to slide into the frame. Make sure they
are the same height.
4. DETERMINE HANDLE HEIGHT
• User should stand behind the Rollator with arms
handing at side (see image 6).
• Handles should be even with user’s wrist
• Adjust handle height using push buttons on
side of handle arms.
• Make sure handle push buttons fully engage in
frame holes and handles are at the same height.
2
3
4
5
OPERATING INSTRUCTIONS:
1. TO OPEN ROLLATOR
• Place unit upright on floor.
• Lift up Padded Seat and press down on
bottom of Storage Bag. User will feel Folding
Bar. Push down on Folding Bar until it locks
in place. (see image 7).
2. TO CLOSE, FOLD ROLLATOR
• Lift up on Padded Seat.
• Lift up on the nylon handle at bottom of
Storage Bag. This engages the Folding Bar
(see image 8).
3. BRAKES
• Squeeze the brakes to stop the Rollator (See
image 9).
• Push the brakes straight down to the locking
position (see image 10).
• BRAKES MUST BE IN THE LOCKED POSITION
WHENEVER SITTING ON THE ROLLATOR.
ALWAYS ENGAGE, DISENGAGE BRAKES
SIMULTANEOUSLY.
4. CHECK HAND BRAKES
• Hand Brakes should be in working order
after assembly.
• Check Hand Brakes periodically for proper
function.
• Squeeze the Hand Brakes and check to ensure
that the metal brake shoes engage the wheels
and stop the Rollator (see image 9, plus 11, 12
next page).
9
8
10
7
6
1


