background image

1.

Have one person grasp the sides of the router, lift the router, and position it in
the rack.

2.

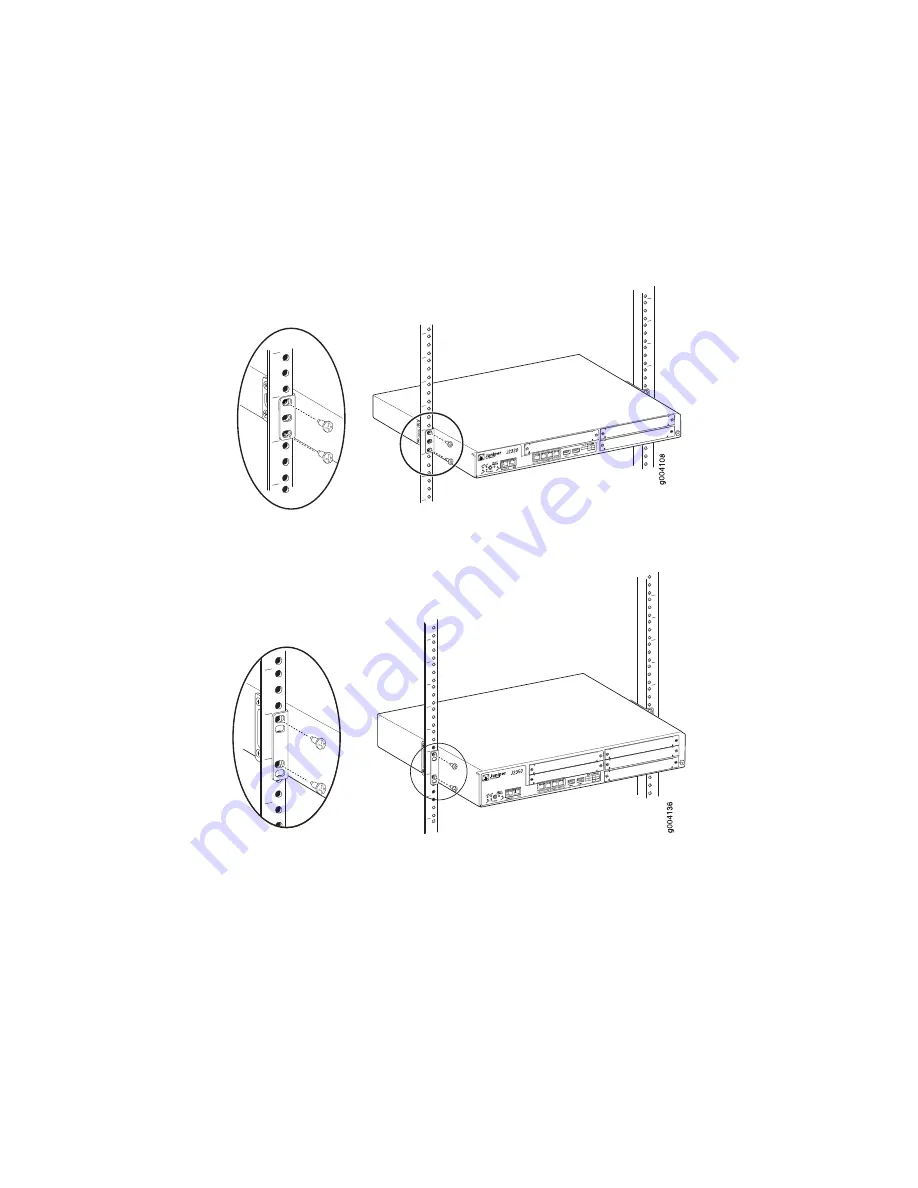
Align the top hole in each mounting bracket with a hole in each rack rail as shown
in Figure 3 on page 7 and Figure 4 on page 7, making sure the chassis is level.

Figure 3: Hanging a J2320 Router in a Rack

Figure 4: Hanging a J2350 Router in a Rack

3.

Have a second person install a mounting screw into each of the two aligned
holes. With a number 2 Phillips screwdriver, tighten the screws.

4.

Verify that the mounting screw on one side of the rack is aligned with the
mounting screw on the opposite side and that the router is level.

5.

Install the second screw in each mounting bracket.

Installing a Services Router

7

Installing a Services Router

Содержание J2300

Страница 1: ...ience but must have managed a network and configured other routers For more information see the J series documentation at http www juniper net techpubs Contents What You Need To Know 3 Management IP A...

Страница 2: ...Logging In and Starting the CLI 13 Step 2 Updating the JUNOS Software with the CLI 14 Step 3 Adding Licenses with the CLI 14 Step 4 Configuring Basic Settings with the CLI 14 J Web Basics 15 JUNOS CL...

Страница 3: ...gure the router with the Web interface you attach a PC or laptop to a built in Ethernet port The examples in this document use the first built in Ethernet port On J2300 routers the first built in Ethe...

Страница 4: ...bering starts with 0 For example On J2300 routers built in Fast Ethernet LAN PORT 0 and PORT 1 which are in slot 0 are named fe 0 0 0 and fe 0 0 1 On J2320 J2350 J4350 and J6350 routers the built in G...

Страница 5: ...ack not provided For wall installation four wall screws or anchors capable of supporting the full weight of the chassis up to 12 lb 5 4 kg Electrostatic discharge ESD grounding strap not provided For...

Страница 6: ...ch the brackets to the wall For instructions see the J2300 J4300 and J6300 Services Router Getting Started Guide To install a J2300 router in a rack 1 Attach an electrostatic discharge ESD grounding s...

Страница 7: ...nging a J2320 Router in a Rack Figure 4 Hanging a J2350 Router in a Rack 3 Have a second person install a mounting screw into each of the two aligned holes With a number 2 Phillips screwdriver tighten...

Страница 8: ...om the two screws Figure 5 Hanging the Router in the Rack 4 Install at least two mounting screws into each mounting bracket in addition to the center screws from which the router hangs Connecting Powe...

Страница 9: ...r cable lug to the 48 VDC terminal tightening the screw only until snug Do not overtighten f Replace the plastic cover 4 Repeat Step 2 or Step 3 for the second power supply if one is installed For com...

Страница 10: ...ttings with J Web Quick Configuration on page 11 NOTE You must manually configure the IP address for the management port you are using before you save your initial configuration When you save the conf...

Страница 11: ...ick Configuration When you click OK or Apply on J Web Quick Configuration pages the configuration is saved and activated automatically To configure basic settings with the J Web interface 1 If the Set...

Страница 12: ...ss or ge 0 0 0 Address Enables remote access to the router with Telnet Allow Telnet Access Allows JUNOScript to send unencrypted text to the router over a TCP connection Allow JUNOScript over Clear Te...

Страница 13: ...rn on power to the PC or laptop 4 On the PC or laptop start the terminal emulation program such as Microsoft Windows HyperTerminal select the COM port and configure the following port settings 9600 bi...

Страница 14: ...router you must add the license key You can add one or more license keys from the CLI To add a license key and enable a license 1 Follow the instructions in your license envelope to generate the lice...

Страница 15: ...a default route default gateway for IPv4 packets For example root set routing options static route 192 168 1 254 24 next hop 10 1 1 50 4 Configure one or more static routes root set routing options st...

Страница 16: ...uick Configuration pages the configuration is saved and activated automatically In contrast you must click Commit to apply changes on J Web configuration editor pages For complete information about J...

Страница 17: ...For example when you type the following partial command the system completes the command show chassis hardware and displays hardware information root sh tab ch tab h tab Hardware inventory Item Versio...

Страница 18: ...OSP or its wiring The intrabuilding ports on the router are suitable for connection to intrabuilding or unexposed wiring or cabling only The addition of primary protectors is not sufficient protection...

Страница 19: ...son secure the mounting screws To prevent injury keep your back straight and lift with your legs not your back Mount the Services Router at the bottom of the rack if it is the only unit in the rack Wh...

Страница 20: ...WARNING The attached power cable is only for this product Do not use the cable for another product 20 Safety Warnings Summary J series Services Router Quick Start...

Страница 21: ...Compliance Statements Compliance Statements 21 Compliance Statements...

Страница 22: ...22 Compliance Statements J series Services Router Quick Start...

Страница 23: ...eries Services Routers The guide explains how to prepare your site for installation unpack and install the router and its components install licenses and establish basic connectivity Use the Getting S...

Страница 24: ...es for several of the most complex features in the JUNOS software JUNOS Feature Guide Provides an overview of hardware and software resources that ensure a high level of continuous routing platform op...

Страница 25: ...bleshoot system basics including commands for real time monitoring and route or path tracing system software management and chassis management This guide also describes commands for monitoring and tro...

Страница 26: ...cope Release Notes Requesting Support For technical support open a support case with the Case Manager link at http www juniper net support or call 1 888 314 JTAC from the United States Canada or Mexic...

Отзывы: