Jung Smart Visu Server Скачать руководство пользователя страница 98

E-MAIL MESSAGING  11

!

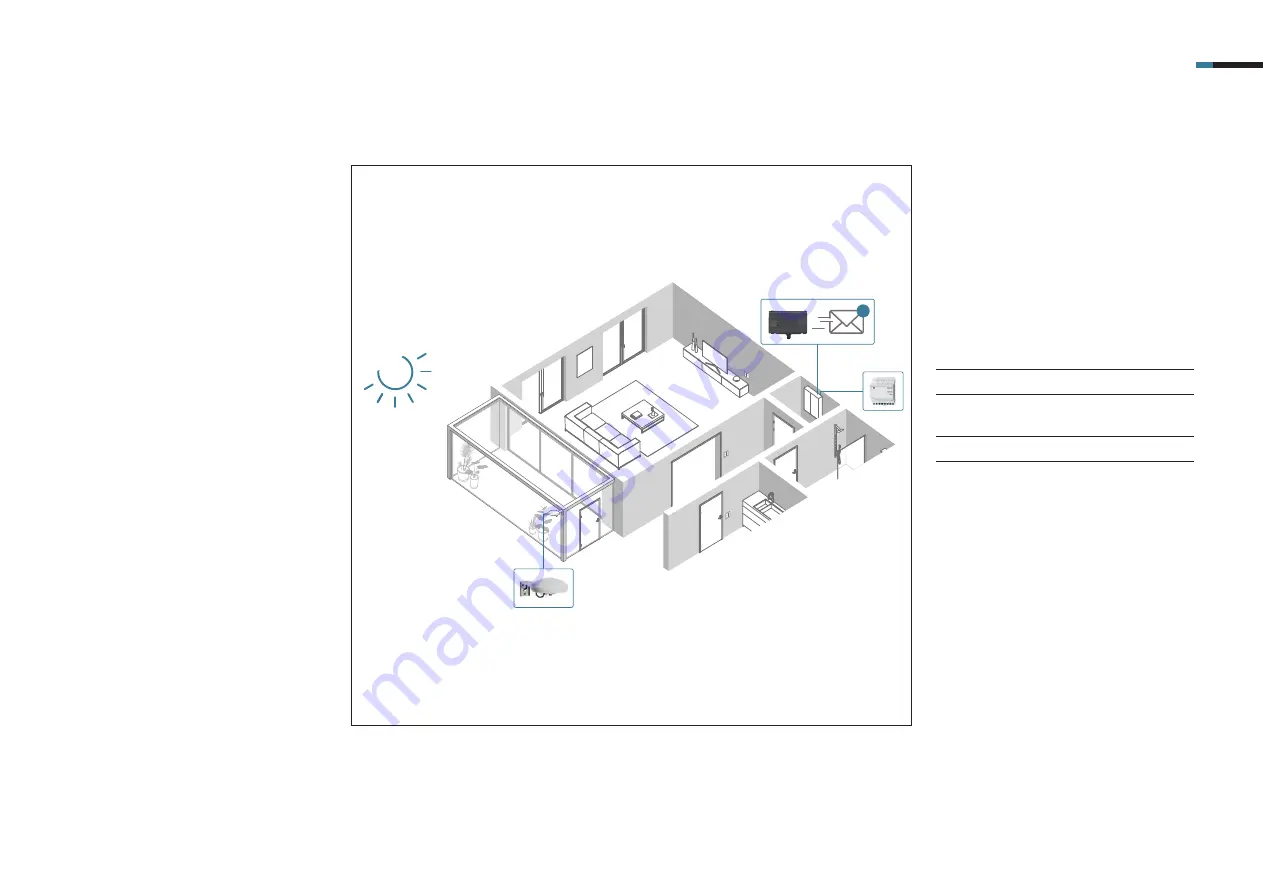
Using email messaging you will re-
ceive an email message about a 
range of different events, for example 
an upper or lower limit violation of a 
specifi ed temperature.

You decide which events inside your 
KNX equipment should be reported. 
You can either set up yourself or an-
other person/several people as recipi-
ents for the email. This enables you to 
detect unfavourable conditions (e.g. 
if there is a leak, temperature change 
or strong wind) in good time and mini-
mise the follow-on damage.

6.  Introduction

COMPONENTS
JUNG

PART NO.

QUAN-
TITY

Smart Visu Server

SV SERVER

1

KNX universal 
weather station

2225 WS U

1

Power supply

WSSV 10

1

Содержание Smart Visu Server

Страница 1: ...Quick Start Guide Smart Visu Server...

Страница 2: ...DO I ADJUST THE ASTRO FUNCTION Remote access HOW DO I SET UP REMOTE ACCESS Presence simulation HOW DO I SET UP THE PRESENCE SIMULATION Voice control HOW DO I CONNECT AMAZON ALEXA GOOGLE HOME Email me...

Страница 3: ...How do I connect Philips Hue Smart Visu Server...

Страница 4: ...n it can be controlled with the JUNG KNX push button modules These instructions explain the individual steps to commission it and to use it on the basis of an example 1 Introduction COMPONENTS JUNG IT...

Страница 5: ...4 2 Install the Philips Hue Bridge 4 3 Add the Philips Hue Bridge to the app 4 4 Make light setup 5 5 Make room setup 6 6 Set brightness and colours 7 7 Add additional lamps 8 8 Create more rooms and...

Страница 6: ...hilips Hue App on your smartphone and integrate the Hue Bridge to your home network 3 1 Initial operation For the initial operation in normal circumstances there is no configured Hue Bridge present Th...

Страница 7: ...up After you have connected the Bridge to the Hue app and you have accepted the terms of use first make the light and room setup 2 Select Search to open the network and to display the available lamps...

Страница 8: ...ou have confirmed the selected lamps you come automatically to the room settings 2 Name your room and specify the Room type Use to add lamps to your room 3 Save your configuration with Save 4 Setting...

Страница 9: ...7 1 Using the Home menu select the desired room 3 4 Setting brightness and colour You can now set the brightness and colour of the lamps for each room 2 Set the Brightness and the Colour of the select...

Страница 10: ...5 Adding additional lamps Check that all Philips Hue lamps are switched on 2 Use to add new lamps to the network 3 Select Search to open the network and to display the available lamps 4 All accessible...

Страница 11: ...d allocating lamps Now you can create one or more rooms where there are Philips Hue lamps 2 Add your new room using 3 Name your room and specify the Room type Use to add lamps to your room 4 Save your...

Страница 12: ...VISU SERVER PHILIPS HUE 10 4 The Smart Visu Server The Smart Visu SV Server gives you the choice of two different areas on the start page SV Home operation and visualisation SV Control editing and se...

Страница 13: ...llowing pages you will find out how to commission the SV Server make lamp settings and how to create actions In the SV Control you can search for Hue lamps and add them to the SV Server pair and also...

Страница 14: ...SV Server to your home network Call the SV Server in the web browser of your end device PC laptop tablet To do so enter the address http sv server local or the IP address of the SV Server allocated b...

Страница 15: ...Hue IP Gateway field 5 1 Configuration of a Hue application general configuration The following explains how to connect Philips Hue to the Smart Visu Server 2 If the Bridge is not automatically recog...

Страница 16: ...Functions 5 2 Editing the Hue lamps You can now set the brightness and colours of your Hue lamps with the SV Server 2 Create a Room 2 under Areas functions and add the Hue lamp 3 to the selected room...

Страница 17: ...schedule event or user basis Two application examples are described 6 1 Good morning Mo Fr action This action switches the lighting for your room at a specified time In addition a defined light colour...

Страница 18: ...te for triggering the action State OFF 2 3 Add the appropriate Functions here Hue lamps 3 to the action 6 2 Goodbye action This action is to switch off all Hue lamps when leaving the apartment by pres...

Страница 19: ...tulations Philips Hue has now been connected to the Smart Visu Server in accordance with the installation example and is set up Don t forget to save your project data and activate access protection 2...

Страница 20: ...How do I connect Sonos Smart Visu Server...

Страница 21: ...ly matched thanks to the KNX and Sonos coupling adjust the vol ume of Sonos via KNX rotary sensors or KNX push button modules This quick start guide explains the in dividual setting up steps using an...

Страница 22: ...y steps The individual steps are described in detail on the following pages STEP PAGE 1 Commissioning Sonos 4 2 Connect the Smart Visu Server to the IP network 6 3 Connect Sonos to Smart Visu Server 1...

Страница 23: ...C and then use the app to set up your Sonos devices The following pages are based on the Sonos app for smartphones with Android operating system Note No Sonos device has been set up in the normal case...

Страница 24: ...avourite music 1 Tap click on Search in the Sonos app to add a radio station 1 Then enter the name of the station 2 2 In this example you can see the play back of a radio station via Tune In You can a...

Страница 25: ...ART VISU SERVER SONOS 6 4 The Smart Visu Server The Smart Visu SV Server gives you the choice of two different areas on the start page SV Home operation and visualisation SV Control editing and settin...

Страница 26: ...overview of the functions of the SV Server On the following pages you will find out how to commission the SV Server to create areas and functions and to create a presence simulation with actions and g...

Страница 27: ...ver via the web browser of your terminal device PC laptop tablet To do so enter the address http sv server local or the IP address of the SV Server allocated by the router in the web browser If the SV...

Страница 28: ...can recognise a successful con nection by the green tick 5 1 KNX general configuration The individual steps for connecting your KNX system to the Smart Visu Server are explained below 2 Import the KNX...

Страница 29: ...tions You can now create and allocate rooms and create functions on the Areas and Functions tab Note The following is based on a configured system with already created functions and rooms 2 Allocate t...

Страница 30: ...KNX push button module 4194 TSM for the ETS to control your Sonos system with KNX control points The following examples show you how to prepare the control of volume as well as playback and pause of...

Страница 31: ...for a successful connection between KNX and Sonos Your SV Server automatically detects the available Sonos loudspeakers 7 1 Add loudspeakers group function and connect to KNX The following example sh...

Страница 32: ...here using the dynamic group func tion 7 2 Connect loudspeaker to KNX rotary sensor step 1 of 2 The following steps help you with the set up for controlling Sonos with the KNX rotary sensor 2 Create...

Страница 33: ...knob The list selection 2 on the right next to the input fields shows you all suitable group addresses of the installation 3 5 Navigate to the Coupling tab 4 6 Now connect couple the KNX group address...

Страница 34: ...X push button sensor step 1 of 2 The following steps help you with the set up for controlling Sonos with the KNX push button sensor 2 Select the function type Virtual Dim mer 3 3 Under Settings enter...

Страница 35: ...n operate your Sonos loudspeaker are now displayed under Coupling 2 6 Now add the function Virtual Dimmer or KNX Sonos Kitchen push button for control of the volume 3 7 Ensure that the Master button i...

Страница 36: ...for a party across rooms and supply them from one music source Create an individual multi room experience for your party 3 Add the functions to the action with Add function to action Select the Sonos...

Страница 37: ...o not forget to backup your project data and activate the access protection 1 Call SV Control to backup your project file Save the project and your configu ration under Backup 1 in the Project tab 2 T...

Страница 38: ...How do I adjust the astro function Smart Visu Server...

Страница 39: ...and sunset The set up in your JUNG Smart Visu Server is also quick and easy This quick start guide explains the individual steps of commissioning and operation using an example 1 Introduction COMPONE...

Страница 40: ...teps The table here gives an overview of the necessary steps The individual steps are described in detail on the following pages STEP PAGE 1 Connect the Smart Visu Server to the IP network 6 2 Set up...

Страница 41: ...U SERVER ASTRO FUNCTION 4 3 The Smart Visu Server The Smart Visu SV Server gives you the choice between two different areas on the start page SV Home operation and visualisation SV Control editing and...

Страница 42: ...of the SV Server On the following pages you will find out how to commission the SV Server and how to create ares functions and actions You create your rooms in SV Control you can also create function...

Страница 43: ...rk Call the SV Server via the web browser of your terminal device PC laptop tablet To do so enter the address http sv server local or the IP address of the SV Server allocated by the router If the SV...

Страница 44: ...1 Create areas and functions After you have established the connection to the KNX bus you now create areas and functions in the SV Server Note The following is based on a configured system with alread...

Страница 45: ...the current sun position 5 1 Enter location coordinates First enter the location coordinates latitude and logitude of your home system Note You can research the location coordinates using various serv...

Страница 46: ...realise automatic processes for the control of your home at sunrise or sunset You also have the possibility to move the switch on time or include conditions Two application examples are described for...

Страница 47: ...matically lower the blinds at the weekend at sunset put the lighting in the living room into a relaxed ambiance and switch on the outdoor lighting The action already starts half an hour before sunset...

Страница 48: ...the astro function to automatically and conveniently control your home depending on the sun position using the Smart Visu Server Before you start the visualisation do not forget to save your configur...

Страница 49: ...Smart Visu Server How do I set up remote access...

Страница 50: ...visualise control and adapt your home system to your requirements at any time and from any location This quick start guide explains the individual steps of commissioning and operation using an exampl...

Страница 51: ...steps are described in detail on the following pages STEP PAGE 1 Register at the MyJUNG portal 4 2 Purchase remote access for your Smart Visu Server 5 3 Call Smart Visu Server locally via web browser...

Страница 52: ...portal or register as a new user 1 3 Activation of the remote access using the MyJUNG portal First open the MyJUNG portal on the JUNG website 2 Select More Information 2 in the Software Licence Sales...

Страница 53: ...3 1 Licence purchase You see the products for which you can purchase additional software or licences in Software Licence Sales 2 Purchase remote access for 12 or 24 months or enter a voucher code Conf...

Страница 54: ...activate the remote access on your Smart Visu Server Call the SV Server in the web browser of your terminal device PC laptop tablet To do so enter the address http sv server local or the IP address of...

Страница 55: ...m the input by clicking on the Register device button 2 4 1 Register device Register your device in the Configuration Management tab Log in to MyJUNG with your user data for the final activation 2 In...

Страница 56: ...ctivate the remote access by clicking on the Activate Now button 1 4 2 Activate remote access The activation of remote access is performed in the following steps 2 There you see important information...

Страница 57: ...control of your home system via remote access is secure and platform independent The following pages describe how to set up remote access for your SV server with various terminal devices starting with...

Страница 58: ...oid Perform the following steps to set up remote access for your SV server using the Android app 2 Enter your access details for the remote access under REMOTE MyJUNG 2 3 Select the Automatic 3 connec...

Страница 59: ...ote and confirm your entries with OK You can now control your home system locally or remotely 4 5 Remote access using iOS Perform the following steps to set up remote access for your SV server using t...

Страница 60: ...y set up remote access for your Smart Visu Server With the SV Server remote access you now always have your home under control Your data will be treated securely and confidentially and are subject to...

Страница 61: ...How do I set up the presence simulation Smart Visu Server...

Страница 62: ...xtended absence Simply add a random delay to multiple actions and combine them clearly with the clever group function This quick start guide explains the individual setting up steps using an example 1...

Страница 63: ...overview of the necessary steps The individual steps are described in detail on the following pages STEP PAGE 1 Connect the Smart Visu Server to the home network 6 2 Make a connection to the KNX bus...

Страница 64: ...SERVER PRESENCE SIMULATION 4 3 The Smart Visu Server The Smart Visu SV Server gives you the choice between two different areas on the start page SV Home operation and visualisation SV Control editing...

Страница 65: ...n the following pages you will find out how to commission the SV Server to create areas and functions and to create a presence simulation with actions and groups You create your rooms in SV Control Yo...

Страница 66: ...eb browser of your terminal device PC laptop tablet To do so enter the address http sv server local or the IP address of the SV Server allocated by the router If the SV Server is protected by a passwo...

Страница 67: ...KNX tab You can recognise a successful connection by the green tick 4 1 KNX general configuration The individual steps for connecting your KNX system to the Smart Visu Server are explained below 2 Im...

Страница 68: ...eas functions You can now create and allocate rooms and create functions on the Areas and Functions tab Note the following assumes a configured system with functions and rooms already created 2 Alloca...

Страница 69: ...scribed below 5 1 Create actions The actions serve to switch move the lighting and blinds at 20 50 with a time delay of 30 minutes during the summer holiday The creation of the first action is explain...

Страница 70: ...mmer holiday 4 Select the activation Switching times 4 5 Specify the time period for the activation or deactivation 5 in this case the time of your absence during the summer holiday 6 Optionally you c...

Страница 71: ...iday group with the Copy function 2 All allocat ed actions and functions are copied you do not have to create them again 3 Rename the new group e g to Ski holidays 3 and set the de activa tion times 4...

Страница 72: ...you now know how you can quickly and easily create one or more presence simulations with your Smart Visu Server thanks to the action groups Do not forget to backup your project data and activate the a...

Страница 73: ...Smart Visu Server How do I connect Amazon Alexa Google Home...

Страница 74: ...skill for Smart Speaker such as Ama zon Alexa and Google Home you can control all functions and actions cre ated in the SV Server in your home via voice command This quick start guide explains the in...

Страница 75: ...necessary steps The individual steps are described in detail on the following pages STEP PAGE 1 Commissioning Smart Visu Server 4 2 Activation of the MyJUNG account in the SV Server 5 3 Activation of...

Страница 76: ...on your SV Server and regis ter at no charge with MyJUNG on the JUNG home page 3 Commissioning Smart Visu Server The first step is to install the current software version on your Smart Visu Server Th...

Страница 77: ...the SV Server using the web browser of your terminal device PC laptop tablet To do so enter the address http sv server local or the IP address of the SV Server allocated by the router If the SV Server...

Страница 78: ...the Areas Functions tab select the function that should be operated by voice control 5 Activation of the voice control Navigate in SV Control to Areas Functions to activate the voice function 2 Set th...

Страница 79: ...ation of JUNG Smart Visu Server skill for Amazon Alexa Finally if you use an Amazon Alexa connect the Smart Visu Server to your MyJUNG account 2 Activate the skill by entry of your MyJUNG login detail...

Страница 80: ...er connect the Smart Visu service to your MyJUNG account 2 Add available devices and services to the Smart Speaker 3 Select a service from the list of devices that you want to add to Google Home Smart...

Страница 81: ...h Dim light to 20 percent Increase light by 20 percent Decrease light by 20 percent Dim light brighter Dim light darker Switch on light Switch off light RGB W Set light to red Let light shine in blue...

Страница 82: ...How do I set up a staircase function Smart Visu Server...

Страница 83: ...r example if you want to fetch your bicycle from the cellar you only have to switch the light on The light simply stays on during the delay time pro grammed with the aid of the staircase function This...

Страница 84: ...ction on your Smart Visu Server in just a few steps The table here gives an overview of the necessary steps The individual steps are described in detail on the following pages STEP PAGE 1 Create stair...

Страница 85: ...se under Areas 1 2 Now create the staircase function under Function 2 3 Creating the staircase function You can now create the staircase function in the Areas Functions tab and in the next step you ca...

Страница 86: ...h as the delay time 1 First select switch dimmer and then staircase function for the function types in the pull down menu 1 2 Specify a description 2 3 Allocate the group address for the required ligh...

Страница 87: ...e staircase function You no longer have to switch the staircase light off thanks to the staircase function you have set Now if you have no hand free you don t have to go back to the light switch to sw...

Страница 88: ...How can I set up email messaging Smart Visu Server...

Страница 89: ...How can I set up email messaging for a leak Smart Visu Server...

Страница 90: ...ported You can either set up yourself or an other person several people as recipi ents for the email This enables you to detect unfavourable conditions e g if there is a leak temperature change or str...

Страница 91: ...seconds The table here gives an overview of the necessary steps The individual steps are described in detail on the following pages STEP PAGE 1 Set up email server settings 5 2 Create email messaging...

Страница 92: ...ettings for your email provider 2 In the email server settings tab you will find the preset email server settings for several providers under Email server 1 If you do not use any of the listed provide...

Страница 93: ...there was a leak 4 1 Creating the leakage sensor function First you have to create the leakage sensor under Functions 2 Now select Display 1 Bit Bool 2 as value status under Properties 3 Now enter th...

Страница 94: ...Functions select the leakage email message 3 you have just cre ated 4 Now under Properties specify a description 4 and a function type 5 For the function types use the pull down menu 5 to first selec...

Страница 95: ...he function you have just created 3 In the edit action 2 field allocate the action to an area 4 Now select an action type 3 in this case event dependent 5 Now select a symbol for the leakage email mes...

Страница 96: ...ulations you now know how to configure an email message for a leakage event Thanks to the leakage sensor and the warning given by the email message you can detect any malfunctions which occur in good...

Страница 97: ...How can I set up email messaging for a temperature limit value Smart Visu Server...

Страница 98: ...equipment should be reported You can either set up yourself or an other person several people as recipi ents for the email This enables you to detect unfavourable conditions e g if there is a leak te...

Страница 99: ...an be set in just a few steps The table here gives an overview of the necessary steps The individual steps are described in detail on the following pages STEP PAGE 1 Set up email server settings 13 2...

Страница 100: ...settings for your email provider 2 In the email server settings tab you will find the preset email server settings for several providers under Email server 1 If you do not use any of the listed provid...

Страница 101: ...g the temperature limit value function First under Functions specify the temperature limit value for whose upper or lower limit violation you will receive an email 4 2 Select Threshold 2 as a value st...

Страница 102: ...tempera ture limit value email message 3 you have just created 4 Now under Properties specify a description 4 and a function type 5 For the function types use the pull down menu 5 to first select mes...

Страница 103: ...new temperature limit value email message 1 action for the func tion you have just created 3 In the edit action 2 field allocate the action to an area 4 Now select an action type 3 in this case event...

Страница 104: ...nfigure an email message for an upper or lower limit violation of a temperature limit value Thanks to the temperature sensor and the warning given by the email message you can detect any temperature f...

Страница 105: ...How can I set up email messaging for a wind sensor Smart Visu Server...

Страница 106: ...d be reported You can either set up yourself or an other person several people as recipi ents for the email This enables you to detect unfavourable conditions e g if there is a leak temperature change...

Страница 107: ...n just a few steps The table here gives an overview of the necessary steps The individual steps are described in detail on the following pages STEP PAGE 1 Set up email server settings 21 2 Create wind...

Страница 108: ...settings for your email provider 2 In the email server settings tab you will find the preset email server settings for several providers under Email server 1 If you do not use any of the listed provid...

Страница 109: ...value email message Now you can specify the parameters whose exceedance would result in an email message 14 1 Creating the wind speed limit value function First specify the wind speed limit value for...

Страница 110: ...age 2 3 Under Functions select the wind speed limit value email message 3 you have just created 4 Now under Functions create the wind sensor email message 4 5 Select Display 2 byte floating point as t...

Страница 111: ...ate a new wind speed limit value email message 1 action for the func tion you have just created 3 In the edit action 2 field allocate the action to an area 4 Now select an action type 3 in this case e...

Страница 112: ...n email message for exceedance of a wind speed limit value A connected wind sensor can warn you in good time about damage to external facades to awnings or sunshades in the garden or on the balcony if...

Страница 113: ...JUNG GMBH CO KG P O Box 1320 58579 Schalksm hle Germany Telephone 49 2355 806 379 Telefax 49 2355 806 365 E Mail international jung de For sale contacts in your country see jung group com contact JUN...

Отзывы: