background image

EN

27

Operating the compressor without pre-set pressure

1. 

Set the pre-set pressure to zero by pressing the minus (-) pressure adjustment button (E) 
multiple times until the value reaches ”0”. When the pre-set pressure is “0”, it means that  
the compressor will work without the pre-set function. 

2. 

Pull out the 12V cord from the side compartment and connect the plug to the vehicle’s 
cigarette lighter socket.

3. 

Connect the quick connector to the tyre’s valve and press the locking connector down  
to secure the connection. 

4. 

Start the vehicle’s engine. The compressor is now ready for use.

5. 

Press unit selection button (F) to select the desired pressure unit. The display is always 
illuminated so the compressor is easy to use even when it is dark.

6. 

Press the compressor button (A) until the tyre has reached the correct pressure. 

7. 

Remove the quick connector from the tyre and disconnect the 12V plug.

BATTERY TEST 

Note:


• 

Do not turn on the vehicle’s engine when using this function.

• 

Different types of vehicles can have different battery voltages. Read the vehicle’s manual  
or contact the manufacturer for more information.

1. 

Pull out the 12V cord from the side compartment and connect the plug to the vehicle’s 
cigarette lighter socket.

2. 

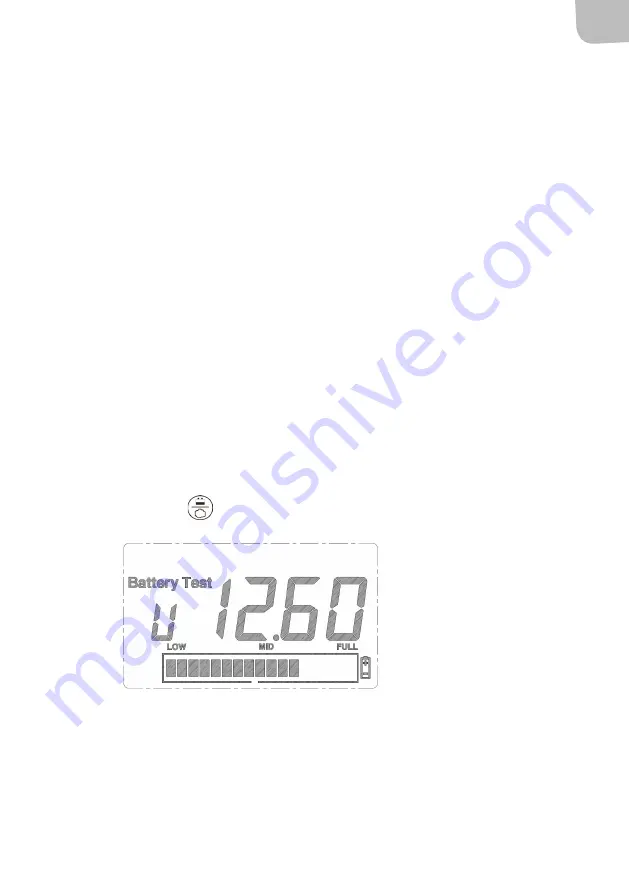
Press the button  

to activate the battery test mode. The actual battery voltage  

will now be shown in the display.


– LOW: the battery voltage is too low. The battery should be checked or replaced.


– MID: the battery voltage is moderate.


– FULL: the battery voltage is OK.

Содержание 604-195

Страница 1: ...Bruksanvisning f r kompressor 4 i 1 Bruksanvisning for kompressor 4 i 1 Instrukcja obs ugi kompresora 4 w 1 User instructions for 4 in 1 compressor 604 195...

Страница 2: ...PL Instrukcja obs ugi T umaczenie oryginalnej instrukcji Z zastrze eniem prawa do zmian W razie ewentualnych problem w skontaktuj si telefonicznie z naszym dzia em obs ugi klienta pod numerem 22 338 8...

Страница 3: ...n e g the local authority s recycling station Verne om milj et M ikke kastes sammen med husholdningsavfallet Dette produktet m inneholder elektriske eller elektroniske komponentersom skal gjenvinnes L...

Страница 4: ...LAR BALLONGER OCH LEKSAKER 8 BATTERITEST 9 GENERATORTEST 10 LAMPA 10 UNDERH LL 11 BYTA S KRING 11 NORSK 12 SIKKERHETSANVISNINGER 12 TEKNISKE DATA 12 BESKRIVELSE 13 BRUK 14 PUMPE OPP DEKK BALLER BALLON...

Страница 5: ...I ZABAWEK 20 TEST AKUMULATORA 21 TEST GENERATORA 22 LAMPKA 22 KONSERWACJA 23 WYMIANA BEZPIECZNIKA 23 ENGLISH 24 SAFETY INSTRUCTIONS 24 SPECIFICATION 24 DESCRIPTION 25 OPERATION 26 INFLATING TYRES BAL...

Страница 6: ...frost eller temperaturer ver 40 C eller under 30 C Skydda sladden fr n v rme olja och skarpa kanter Om kompressorn b rjar l ta konstigt eller blir mycket varm st ng omedelbart av den dra ut sladden oc...

Страница 7: ...RIVNING G A B F E E D H I C J A Kompressorknapp B Lampa C LCD display D Lampknapp E Tryckinst llning F Enhetsval G Omkopplare f r batteri generatortest H Snabbkoppling I 12 V kontakt J Nipplar f r bol...

Страница 8: ...ryck 1 Dra ut 12 V sladden fr n sidofacket och anslut kontakten till cigarrett ndaruttaget i bilen 2 Anslut sedan snabbkopplingen till d ckventilen och f ll ned l sspaken f r att s tta fast kopplingen...

Страница 9: ...v lja nskad tryckenhet Displayen r alltid belyst s att kompressorn r l tt att anv nda ven n r det r m rkt 6 Tryck p kompressorknappen A nda tills d cket f tt l mpligt tryck 7 Ta loss snabbkopplingen f...

Страница 10: ...f r att aktivera l get generatortestning Nu visas faktisk utsp nning fr n generatorn p displayen 3 Starta motorn och l t den g p runt 2 000 varv i ungef r en minut Den h gsta sp nningen under den h r...

Страница 11: ...tt byta s kringen i kabeln ppna f rst k pan med en skruvmejsel 2 Lossa den defekta s kringen genom att med en l dkolv sm lta loss l dtennet fr n s kringens anslutningsstift 3 L da fast den nya s kring...

Страница 12: ...for regn frost eller temperaturer over 40 C eller under 30 C Beskytt ledningen mot varme olje og skarpe kanter Hvis kompressoren begynner avgi rare lyder eller den blir sv rt varm skru den straks av t...

Страница 13: ...RIVELSE G A B F E E D H I C J A Kompressorknapp B P re C LCD display D Lysknapp E Innstilling av trykk F Enhetsvalg G Omkobler for batteri generatortest H Hurtigkobling I 12 V kontakt J Nipplar for ba...

Страница 14: ...sinnstilt trykk 1 Dra ut 12 V kontakten fra siderommet og sett kontakten inn i sigarettenneruttaket i bilen 2 S kobles hurtigkoblingen til dekkventilen og l sespaken felles ned for sette fast koblinge...

Страница 15: ...lge nsket trykkenhet Skjermen er alltid belyst slik at kompressoren er lett bruke selv n r det er m rkt 6 Trykk p kompressorknappen A helt til dekket har f tt riktig trykk 7 L sne hurtigkoblingen fra...

Страница 16: ...len 2 Trykk p knappen for aktivere generatortesting N vises faktisk utspenning fra generatoren p skjermen 3 Start motoren og la den g p rundt 2 000 omdreininger i ca ett minutt Den h yeste spenningen...

Страница 17: ...belen begynner du med pne dekselet med en skrutrekker 2 Bruk en elektrisk loddebolt til fjerne den sprengte sikringen ved smelte loddetinnet p sikring ens kontakter 3 Fest den nye sikringen ved lodde...

Страница 18: ...zu ani temperatur powy ej 40 C ani poni ej 30 C Chro kabel przed wysokimi temperaturami olejami i ostrymi kraw dziami Je eli kompresor zacznie wydawa dziwne d wi ki lub za bardzo si nagrzeje natychmia...

Страница 19: ...D H I C J A Przycisk kompresora B Lampka C Wy wietlacz LCD D Przycisk o wietlenia E Ustawianie ci nienia F Wyb r jednostki G Prze cznik testowania akumulatora generatora H Szybkoz czka I Wtyczka 12 V...

Страница 20: ...ym wcze niej ci nieniem 1 Wyjmij kabel 12 V z przegr dki bocznej i pod cz wtyczk do gniazdka zapalniczki w samochodzie 2 Pod cz szybkoz czk do wentyla opony i opu d wigni blokuj c aby zablokowa z czk...

Страница 21: ...jest zawsze pod wietlony aby u atwi u ytkowanie kompresora tak e w ciemno ci 6 Naciskaj przycisk kompresora A a opona osi gnie odpowiednie ci nienie 7 Zdejmij szybkoz czk z opony i wyjmij wtyczk 12 V...

Страница 22: ...cisk aby aktywowa tryb testowania generatora Na wy wietlaczu poka e si faktyczne napi cie wyj ciowe generatora 3 Uruchom silnik i pozostaw go na oko o 2000 obrotach przez oko o minut Zarejestrowane zo...

Страница 23: ...wymieni bezpiecznik na przewodzie najpierw otw rz os on rubokr tem 2 Usu uszkodzony bezpiecznik przy u yciu lutownicy elektrycznej stapiaj c cyn na ko c wkach bezpiecznika 3 Za nowy bezpiecznik przyl...

Страница 24: ...mpressor to rain frost or temperatures above 40 C or temperatures below 30 C Keep the cord away from heat oil and sharp edges If the air compressor emits abnormal sounds or overheats turn it off immed...

Страница 25: ...RIPTION G A B F E E D H I C J A Compressor button B Light C LCD display D Light button E Pressure adjustment F Unit selection G Battery Alternator test switch H Quick connector I 12V plug J Ball Ballo...

Страница 26: ...om the side compartment and connect the plug to the vehicle s cigarette lighter socket 2 Connect the quick connector to the tyre s valve and press the locking connector down to secure the connection 3...

Страница 27: ...e unit The display is always illuminated so the compressor is easy to use even when it is dark 6 Press the compressor button A until the tyre has reached the correct pressure 7 Remove the quick connec...

Страница 28: ...socket 2 Press the button to activate the alternator test function The actual alternator voltage will now be shown in the display 3 Start the engine and rev it up at around 2 000 rpm for approximately...

Страница 29: ...e first open the cover with a screwdriver 2 Use the electric soldering iron to remove the faulty fuse by melting the soldering tin on the pins of the fuse 3 Use the electric soldering iron to fix the...

Страница 30: ......

Отзывы: