23
19. 針と釜の関係 /
NEEDLE-TO-HOOK RELATIONSHIP
/
ࠖᆓთ࿏෯ܸ֬༩
/
NADEL-GREIFER-BEZIEHUNG
/
RELATION ENTRE L'AIGUILLE ET LE CROCHET
/
RELACION DE AGUJA A GANCHO
/
RELAZIONE FASE AGO-CROCHET
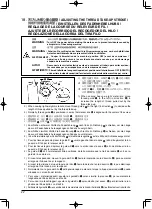
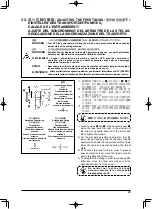
(1)針と釜は次のように合わせます。
1) はずみ車を回して針棒を最下点にし、針棒抱き
止めねじ
1
をゆるめます。
(針棒の高さを決めます。)
2)
[DB, DP 針の場合]
針棒
2
の刻線
A
を針棒下メタル
3
の下端に
合わせ、針棒抱き止めねじ
1
を締め付けます。
[DA 針の場合]
針棒
2
の刻線
C
を針棒下メタル
3
の下端に
合わせ、針棒抱き止めねじ
1
を締め付けます。
(釜
a
の取付位置を決めます。)
3)
[DB, DP 針の場合]
3 本の釜止めねじをゆるめ、はずみ車を回して
針棒
2
が上がる方向で刻線
B
を針棒下メタル
3
の下端に合わせます。
[DA 針の場合]
3 本の釜止めねじをゆるめ、はずみ車を回して
針棒
2
が上がる方向で刻線
D
を針棒下メタル
3
の下端に合わせます。
4) こ の 状 態 で 釜 剣 先
5
を 針
4
の 中 心 に 合 わ
せ、 針 と 釜 の す き ま が、0.04 〜 0.1 mm
(DDL-8700H-7, DDL-8700J-7:0.06 〜
0.20mm)(目安)になるようにして釜止めね
じを固く締めてください。
すきまが狭すぎると、釜の剣先を傷めます。
すきまが広すぎると目とびします。
0.04 - 0.1 mm
1
2
5
4
3
B
C
D
A
B
A
a
注意
: ミシンの不意の起動による事故を防ぐため、電源を切ってから行ってください。
WARNING :
Turn OFF the power before starting the work so as to prevent accidents caused by
abrupt start of the sewing machine.
ሆၰ
" ເਛ٤ᆿၰບ֬ఖᄶӵ֬ൠܪƗ౯ܸלჾޱ࣐ྡྷҧቛè
WARNUNG :
Schalten Sie vor Beginn der Arbeit die Stromversorgung aus, um durch plötzliches
Anlaufen der Nähmaschine verursachte Unfälle zu verhüten.
AVERTISSEMENT :
Couper l’alimentation de la machine (position OFF) avant de commencer l’
opération afin de prévenir les accidents éventuels causés par un démarrage
soudain de la machine à coudre.
AVISO
:
Desconecte la corriente eléctrica antes de comenzar el trabajo para evitar acciden-
tes causados por un arranque brusco de la máquina de coser.
AVVERTIMENTO :
Prima di effettuare le seguenti operazioni, posizionare l’interruttore su OFF (SPENTO)
onde evitare incidenti causati dall’avviamento accidentale della macchina per cucire.
(1) Adjust the timing between the needle and the
hook as follows :
1) Turn the handwheel to bright the needle bar
down to the lowest point of its stroke, and
loosen setscrew
1
.
(Adjusting the needle bar height)
2)
[For a DB or DP needle]
Align marker line
A
on needle bar
2
with the bottom end of needle bar
lower bushing
3
, then tighten setscrew
1
.
[For a DA needle]
Align marker line
C
on needle bar
2
with the bottom end of needle bar lower
bushing
3
, then tighten setscrew
1
.
(Adjusting position of the hook
a
)
3)
[For a DB or DP needle]
Loosen the three hook setscrews, turn the handwheel and align marker line
B
on ascending needle bar
2
with the bottom end of needle bar lower bushing
3
.
[For a DA needle]
Loosen the three hook setscrews, turn the handwheel and align marker line
D
on
ascending needle bar
2
with the bottom end of needle bar lower bushing
3
.
4) After making the adjustments mentioned in the above steps, align hook blade point
5
with the center of
needle
4
. Provide a clearance of 0.04 mm to 0.1 mm (DDL-8700H-7 and DDL-8700J-7 : 0.06 to 0.20
mm) (reference value) between the needle and the hook, then securely tighten setscrews in the hook.
If the clearance between the blade point of hook and the needle is smaller than the speci
fi
ed val-
ue, the blade point of hook will be damaged. If the clearance is larger, stitch skipping will result.


