Juiced Bikes SCORPION 2021 Скачать руководство пользователя страница 17

26

27

JBP-SCRP-MANUAL |  

©

2021 JUICED BIKES

JBP-SCRP-MANUAL  |  

©

2021 JUICED BIKES

RESETTING THE TRIP COUNTER

The LCD display has a trip counter function to keep track of the 

distance of your ride over time. The Amp-hours (Ah) and Watt-

hour (Wh) drawn from the battery pack are also linked to the 

trip counter data. You can reset the trip data to zero at any time.

TO RESET THE TRIP, AH, AND WH COUNTER TO ZERO

Push and hold both the power button and “assist down” button 

for 3 seconds, then release both buttons. The trip and Ah 

counter will reset to zero.

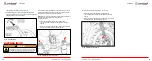
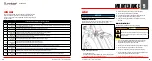
ACTIVATING THE ADVANCE DISPLAY SCREEN

Fig. 28 - Data on the Advanced Display Screen

In some instances it is useful to see additional ride statistics. 

The display can be switched into the advanced display mode. 

This function will allow you to see expanded real-time data on 

one screen.

THIS DATA INCLUDES

Voltage, Power, Amps, Assist Level, Speed, Watt-hours, Amp-

hours, Controller Temperature and Trip Distance

TO TOGGLE BETWEEN THE MAIN SCREEN AND THE ADVANCED DISPLAY 

SCREEN

Push the power button and the “assist up” button at the 

same time for 1 second. The display screen will change to the 

advanced mode.

NOTE: 

The default display is the standard screen. This is the first 

display that will appear when you turn on the e-bike.

UNDERSTANDING THE ADVANCED DISPLAY 

MODE

VOLTAGE

The voltage displayed is the voltage of the pack. When the 

battery is charged, the voltage will be higher (around 54V). 

When the battery pack is depleted, the voltage will be lower 

(around 43V). Voltage fluctuates when the battery is under load.

NOTE: 

The voltage display is only accurate to about +/- 0.3 Volts 

and should not be used for any scientific measurements.

AMPS

The amperage is the current flow through the wires. In this 

case we measure the current flow through the controller. The 

average will not be non-zero, as the system needs some small 

amount of current to operate. When the motor is under load, 

the Amp value will increase. The maximum value should be 20-

22A on the nine-transistor controller.

OPERATION

NOTE: 

The Amperage display is only accurate to about +/- 1 A and 

should not be used for any scientific measurements.

POWER

Power is the Voltage x Amperage and appears in Watts. This 

is the power output at any moment of your e-bike. The more 

power used to propel the e-bike, the higher this value will be.

NOTE: 

Do not use the power display for any scientific 

measurements.

AMP-HOURS

The amp-hour figure measures the amount of current flowing 

out of the battery for a given hour. Reset the amp-hour and 

watt-hour value by resetting the trip counter.

WATT-HOURS

The watt-hour is the measurement of how many watts are 

sustained for a given hour. The watt-hour is the energy 

consumed by the system. You can get a good indication of how 

much energy remains inside the battery by subtracting the total 

watt-hours consumed by the total “Wh” available in the battery.

NOTE: 

Because there is a small error rate in the Amp and Voltage 

measurements, the Watt-hour value will also have some degree of 

error. Use the measurement for informational purposes and not for 

scientific measurements.

ASSIST LEVEL

The assist level indicator shows the assist level you are in at 

any given moment. It appears in both the advanced and the 

standard display modes.

SPEED

The speed indicator measures the speed of the bike. This value 

is measured from the motor’s internal speed sensor. If you have 

changed to a new tire with a larger or smaller diameter than the 

included tire, you may need to manually adjust the wheel  

speed setting.

CONTROLLER TEMPERATURE

The controller temperature is measured by a temperature 

sensor mounted inside of the controller near the transistors. 

The temperature displays on the screen in Celsius. When the 

e-bike is under load, the controller’s temperature will increase. 

The bike’s performance will begin to decrease when the 

temperature exceeds 80 degrees Celsius.

TRIP DISTANCE

The trip distance counts up from zero. The distance is calculated 

by each rotation of the rear wheel. To reset the trip distance, 

refer to 

“Resetting the Trip Counter” on page 26

.

ADJUSTING PARAMETERS IN THE SETUP MENU

Adjust some of the parameters to control the behavior of your 

e-bike.

TO ENTER THE SETTINGS MENU

Hold the “assist up” and “assist down” buttons for about 3 

seconds, then release. You will now enter the setup menu. Here 

you can adjust a few settings to control the behavior of the 

e-bike.

OPERATION

Содержание SCORPION 2021

Страница 1: ...2021 SCORPION OWNER S MANUAL JBP SCRP MANUAL...

Страница 2: ...ght Riding 4 Extreme and Aggressive Riding 4 Electric Bicycle Safety 4 10 Safety Topics from the U S Government 5 General Information 6 Features 6 Electronic Modules 11 Specifications 11 Assembly 12 I...

Страница 3: ...6 This Data Includes 26 To Toggle Between the Main Screen and the Advanced Display Screen 26 Understanding the Advanced Display Mode 26 Voltage 26 Amps 26 Power 27 Amp Hours 27 Watt Hours 27 Assist Le...

Страница 4: ...c rules Even in an evolving technology your e bike is a bike at heart so it will require basic maintenance and care to always perform properly Preventive maintenance is the name of the game We invite...

Страница 5: ...e shoelaces cannot become caught in moving parts Never ride barefoot or wear sandals Wear eye protection to prevent dirt bugs and other airborne objects from entering your eyes Wear tinted eye protect...

Страница 6: ...eme stunt and competition riding increases the risks of death and serious injury If you choose to ride extremely and aggressively at least Take lessons from a competent instructor Start easy and slowl...

Страница 7: ...cated under the seat Fig 1 Controller Throttle The throttle allows the rider to ride the bike control the bike s speed without pedaling It sends a signal to the controller telling it how much power to...

Страница 8: ...conditions Try the low gear for pedaling during starts uphill or loaded riding Choose the higher gears when pedaling downhill or during faster riding The gear shifter is located on the left handlebar...

Страница 9: ...arged from the battery pack the longer the charger will take to recharge GENERAL INFORMATION ELECTRONIC MODULES SPECIFICATIONS Top Speed Up to 28 mph Range 40 100 miles Weight 75 5 lbs with battery 64...

Страница 10: ...caliper Do not squeeze the front brake handle Squeezing the front brake handle will cause the pads to move and it may be difficult to position the front brake disc within the pads Fig 10 Removing Shi...

Страница 11: ...1 Point the headset towards the front of the bike 2 Center the handlebar in the headset taking care not to damage any wires 3 Install the clamp and screws Alternately tighten the screw side to side u...

Страница 12: ...nd rear shocks will not require adjustment But if you desire a softer or stiffer ride adjust the forks and rear shocks as follows NOTE Always adjust the forks and rear shocks in small increments Adjus...

Страница 13: ...the motor when either brake is being used This feature prevents undue wear on the electric motor and battery Your new brakes will undergo a bedding in period and will wear down after the first 40 50...

Страница 14: ...ry and the controller See Using the Pedal Assist Control System on page 19 OPERATION 2 Set the LCD to the desired setting If you select 0 the pedal assist control system is unavailable 3 Rotate the th...

Страница 15: ...ton Located on the front face of the display OPERATION MAIN DISPLAY SCREEN OVERVIEW Fig 25 Advanced Matrix Display Screen The main display shows several important metrics BATTERY VOLTAGE VOLTS This is...

Страница 16: ...s the motor will begin to turn at walking speed TO STOP USING THE WALK MODE To stop using the WALK mode release the assist down button The motor will stop turning and resume normal operation Using eit...

Страница 17: ...for any scientific measurements POWER Power is the Voltage x Amperage and appears in Watts This is the power output at any moment of your e bike The more power used to propel the e bike the higher th...

Страница 18: ...POWER OFF DELAY The power off delay timer lets you set the duration that bike will remain inactive before the electronics system will automatically shut down to conserve power NDW The NDW is the pedal...

Страница 19: ...onnect and reconnect the motor cable 9 Motor Phase Line Fault At least one of the motor s phase wires has been disconnected or damaged 10 High Temperature Fault The controller has reached the highest...

Страница 20: ...a long trip Be sure the e bike is powered off Be sure to use the proper 48 VDC or 52 VDC charging profile if using the Cycle Satiator charger The battery pack can be charged while connected to the e...

Страница 21: ...of a manufacturing flaw in materials or workmanship in accordance with the Scope of Warranty Service and subject to any and all exclusions limitations and procedures explained below This warranty is n...

Страница 22: ...discretion of JUICED by JUICED an authorized JUICED dealer or by a third party with the approval of JUICED Replacement parts may not be identical to those being replaced Any additional non warranty w...

Страница 23: ...ience Your help will always be appreciated We value your time and attention immensely Our goal is to be the friend you call when you have a doubt or when you need to move the way you desire Always fee...

Страница 24: ...JUICED BIKES 1669 BRANDYWINE AVE STE A CHULA VISTA CA 91911 888 303 8889 JUICEDBIKES COM...

Отзывы: