


20
21
JBP-SCRP-MANUAL |
©
2021 JUICED BIKES
JBP-SCRP-MANUAL |
©
2021 JUICED BIKES
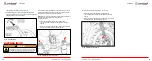
3.
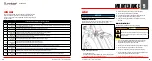
Use the “+” or “–” buttons to select the desired pedal assist
level.
Fig. 22 - Selecting Pedal Assist Level
The levels are between:
0
Throttle Operation Only
ECO
Battery Efficiency
1, 2, 3
Speed Ranges
S
Sport / Off-Road
R
Race Track Mode
The LCD will indicate the pedal assist level that you select.
Once you start pedaling, the controller will make the motor turn
accordingly. Use the ECO mode for your first test ride to get
used to your e-bike.
The e-bike will now maintain a constant pedal assist until:
•
The brakes are applied
•
The “+” or “-” buttons are pressed to adjust the pedal
assist level
•
You stop pedaling
•
The battery pack runs down completely
NOTE:
If the battery pack level is low, we recommend selecting
a lower assist level. Keep in mind that the battery management
system can deactivate the pedal assist support to protect the
battery pack level from getting too low. Be sure to charge the
battery pack fully before each ride.
4.
To turn the headlight and taillight on or off, press and hold
the “+” button for 3 seconds.
5.
Press and hold the controller power button to turn off the
controller.
6.
Turn off the battery power button after each ride to avoid
draining the battery pack.
THROTTLE OPERATION
Use the throttle and pedal assist at the same time or you can
just use the throttle feature to ride the e-bike. The throttle
control is located on the right-side handlebar next to the LCD
screen.
To use the throttle feature:
1.
Turn on the battery and the controller. See
“Using the Pedal
Assist Control System” on page 19
.
OPERATION
2.
Set the LCD to the desired setting. If you select “0,” the
pedal assist control system is unavailable.
3.
Rotate the throttle control to increase the e-bike speed.
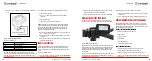
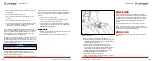
READING THE BATTERY PACK LEVEL
The LCD display indicates the battery pack’s voltage. The
voltage can vary greatly depending on a variety of conditions.
Fig. 23 - Battery Level Indicator
The voltage will decrease temporarily when using the throttle
and/or pedal assist. The voltage may drop when going uphill
regardless of the charge state. This is normal operation. The
voltage will be lower if the battery pack has been in a cold
environment.
To more accurately read the battery pack’s charge state, let off
the throttle. The display lights will stabilize after 1 second to
indicate the battery pack’s level.
When the battery pack level is low and it reaches:
•
2 Bars - Recharge battery pack soon. Select a lower pedal
assist level.
•
1 Bar - Stop using the throttle; recharge the battery pack.
UNDERSTANDING THE BATTERY PACK RANGE
All electric bicycles have a riding range that can vary greatly
depending on riding style, terrain, tire pressure, temperature,
payload and wind. After a few rides, you will get a sense of the
electric bicycle’s range capability.
FACTORS THAT WILL DECREASE YOUR RANGE
•
Rapid accelerations using the motor
•
Uphill riding
•
Heavy payloads
•
Headwinds
•
Underinflated tires
•
Extreme hot or cold weather
HOW TO INCREASE YOUR RANGE
•
Start by pedaling instead of only using the motor.
•
Avoid rapidly accelerating using the throttle.
•
Pedal to help the motor up steep hills. Use the gears.
•
Reduce your average pedal assist level and pedal along with
the motor.
OPERATION


