background image

36

139467_03  GF 370 DV II  June 2015

   This warranty policy applies to gas products identified 

by Jøtul, Scan, and Atra trade names, as set forth below.

A. LIMITED FIVE YEAR WARRANTY - Cast Iron, Steel 

Doors, Surround Components, Firebox:

Jøtul North America Inc. (JØTUL) warrants, to the 

original retail purchaser, that those components 

of the Jøtul, Scan, or Atra Gas Stove or Fireplace 

specified above will be free of defects in material and 

workmanship for a period of five (5) years from the 

date of purchase.  This warranty is subject to the terms, 

exclusions and limitations set forth in the following 

text.

B.  LIMITED TWO YEAR WARRANTY - Burner, Burner 

Treatments, Firebox Panels: 

JØTUL warrants, to the original retail purchaser, that 

those components of the Jøtul, Scan, or Atra Gas Stove 

or Fireplace specified above will be free of defects in 

material and workmanship for a period of two (2) years 

from the date of purchase.  This warranty is subject to 

the terms, exclusions, and limitations set forth in the 

following text.

C. LIMITED TWO YEAR WARRANTY - Enamel Finish: 

JØTUL warrants, to the original retail purchaser, the 

enamel finish on cast iron components of the Jøtul 

Stove or Fireplace Insert specified above against peeling 

or fading for a period of two (2) years from the date of 

purchase. This warranty is subject to the terms, exclusions 

and limitations set forth below.

D. LIMITED ONE YEAR WARRANTY - Gas & Electrical 

Components (controls, plumbing, valve, blower): 

JØTUL warrants, to the original retail purchaser, that 

those components of the Jøtul, Scan, or Atra Gas Stove 

or Fireplace specified above will be free of defects in 

material and workmanship for a period of one (1) year 

from the date of purchase. This warranty is subject to 

the terms, exclusions, and limitations set forth in the 

following text.

JØTUL will repair or replace (including parts & labor), at its option, 

any of the above components determined by JØTUL to be covered 

by this warranty. You must, at your own expense, arrange to deliver 

or ship the component to an authorized Jøtul, Scan, or Atra dealer 

and arrange for pickup or delivery of the component after repairs 

have been made.  If, upon inspection, JØTUL determines that the 

component is covered by this warranty, the repair or replacement 

will be made as set forth above. This warranty is not transferable 

and is extended only to, and is solely for the benefit of, the original 

retail purchaser of the Jøtul, Scan, or Atra Gas Stove or Fireplace. 

This paragraph sets forth the sole remedy available under this 

warranty in the event of any defect in the Jøtul, Scan, or Atra Gas 

Stove or Fireplace.
The warranty period for any replaced component will be the 

remaining unexpired portion of the warranty period for the original 

component.
Please retain your dated sales receipt in your records as proof of 

purchase. 
EXCLUSIONS AND LIMITATIONS
NOTICE: This warranty is void if installation or service is performed 

by someone other than an authorized installer, service agency 

or gas supplier, or if installation is not in conformance with the 

installation and operating instructions contained in this owner’s 

manual or local and/or national fire and building regulations.  A 

listing of local authorized installers, service agencies and gas 

suppliers can be obtained from the National Fireplace Institute at 

http://www.nficertified.org/.  
This warranty does not cover the following:
1)   Repair or replacement of parts that are subject to normal wear 

and tear during the warranty period or to parts that may require 

replacement in connection with normal maintenance. These parts 

include gaskets and glass (except to the extent such parts suffer 

damage from thermal stress).
2)  Damage due to incorrect installations not in conformance with 

the installation instructions contained in this owner’s manual or 

local and/or national fire and building regulations.
3)  Damage due to service performed by an installer, service agency 

or gas supplier, unless otherwise agreed to in writing by JØTUL. 
4)  Labor or other costs associated with the repair of gas controls, 

plumbing, burners, log set, or sheet metal firebox beyond the warranty 

period.
5)  Damage caused by unauthorized modification, use or repair.
6)  Damage to enameled surfaces caused by improper operation or 

misuse, including use that is not in conformance with the operating 

instructions contained in this owner’s manual. Such damage can 

typically be identified by bubbling, cracking, or discoloration of the 

enamel finish.
7)  Costs incurred by travel time and/or loss of service.
8)  Damage incurred while the Jøtul, Scan, or Atra Gas Stove or 

Fireplace is in transit.
IN NO EVENT SHALL JØTUL, ITS PARENT COMPANY, SHAREHOLDERS, 

AFFILIATES, OFFICERS, EMPLOYEES, AGENTS OR REPRESENTATIVES 

BE LIABLE OR RESPONSIBLE TO YOU FOR ANY SPECIAL, INDIRECT, 

INCIDENTAL, CONSEQUENTIAL, PUNITIVE OR OTHER SIMILAR 

DAMAGES, INCLUDING, BUT NOT LIMITED TO, LOST PROFITS, 

LOST SALES, INJURY TO PERSON OR PROPERTY, OR DAMAGES TO 

A STRUCTURE OR ITS CONTENTS, ARISING UNDER ANY THEORY 

OF LAW WHATSOEVER.  ALL IMPLIED WARRANTIES, INCLUDING 

THE IMPLIED WARRANTIES OF MERCHANTABILITY AND FITNESS 

FOR A PARTICULAR PURPOSE, OR OTHERWISE, ARE LIMITED IN 

DURATION TO THE LENGTH OF THIS WRITTEN WARRANTY.  EXCEPT 

AS EXPRESSLY SET FORTH HEREIN, JØTUL MAKES NO ORAL, WRITTEN 

OR OTHER WARRANTY WITH RESPECT TO JØTUL, SCAN OR ATRA GAS 

STOVES OR FIREPLACES.

Jøtul GF 

370

 DV II Limited Lifetime Warranty 

Effective January 1, 2013

Содержание GF 370 DV

Страница 1: ...tion and service must be performed by a qualified installer service agency or the gas supplier In the Commonwealth of Massachusetts a carbon monoxide CO detector shall be installed in the same room as the appliance WARNING If the information in these instructions is not followed exactly a fire or explosion may result causing property damage personal injury or loss of life Thisappliancemaybeinstall...

Страница 2: ...duct approved air intake must be used Installation shall be in strict compliance with the manufacturer s instructions A copy of the installation instructions must remain with the appliance or equipment at the completion of the installation Suggested Tools for Installation and Service External regulator for Propane only Piping which complies with local code Manual shut off valve T Handle required i...

Страница 3: ...ing the installation inspect the stove for shipping damage and immediately report any evidence of damage to your dealer 2 Confirm stove contents The Jøtul GF 370 DV II includes the following loose items shipped in the Miscellaneous Hardware bag 4 mm hex key used to remove the front glass panel for access to the firebox Remote Control Transmitter Remote Control Wall Mount Bracket AA Batteries 4 Pro...

Страница 4: ...ries 3 AAA 1 5v RemoteControlReceiverbatteries 4 AA FanControlModule 120V 60Hz Jøtul GF 370 DV II Direct Vent Gas Stove Manufactured and Distributed by Jøtul North America Gorham Maine USA Jøtul AS Fredrikstad Norway Test Standards This appliance complies with National Safety standards and is tested and listed by Intertek Testing Services of Middleton Wisconsin In addition the Jøtul GF 370 DV II h...

Страница 5: ...g air passageways of the appliance be kept clean 3 This appliance may be installed in an aftermarket permanently located manufactured home USA only or mobile home where not prohibited by local codes This appliance is only for use with the type s of gas indicated on the rating plate This appliance is not convertible for use with other gases unless a certified kit is used 4 The installation must con...

Страница 6: ...s Maintain proper clearance to combustible mantels and fireplace trim Children and adults should be alerted to the hazards of high surface temperatures and should stay away to avoid burns or clothing ignition Young children should be supervised while they are in the same room as the appliance Toddlers young children and others may be susceptible to accidental contact burns A physical barrier such ...

Страница 7: ...aterial is anything that can burn i e sheet rock wall paper wood fabrics etc These surfaces are not limited to those that are visible and also include materials that may be located behind non combustible materials If you are not sure of the combustible nature of a material consult your local fire officials Fire resistant materials are considered to be combustible They may be difficult to ignite bu...

Страница 8: ...nation Whenever possible use 45 elbows instead of 90 elbows as they offer less restriction to the flow of flue gases and intake air A listed firestop is required at any floor penetration The opening should be framed in according to the manufacturer s instructions Always maintain a minimum 1 clearance from all sides of the vertical vent system to any combustible material Minimum vertical terminatio...

Страница 9: ...onry chimney a fireclay liner or listed steel liner must be contained within the entire length of the chimney 3 Overall venting should not exceed 35 ft 10 67 m 4 The liner must have an inside dimension of 6 round or greater 5 Prefabricated chimneys must be UL 103 or ULC S 629 listed and have a minimum INSIDE diam eter of 6 inches 150 mm Prefabricated chimneys must be listed for the specific manufa...

Страница 10: ...nation cap with any type of insulation Wall Cut out A minimum 10 X 10 square hole is adequate for proper pipe clearance through a wall provided the vent is positioned to maintain 2 minimum clearance at the top A 1 minimum clearance must be maintained to combustible material around the other sides See fig 11 Any horizontal run of vent must have a 1 4 rise for every foot of run toward the terminatio...

Страница 11: ...ft 91 cm within a height 15 ft above the meter regulator assembly I Clearance to service regulator vent outlet 3 ft 91 cm J Clearance to nonmechanical air supply inlet to building or the combustion air inlet to any other appliance 12 in 30 cm 9 in 23 cm K Clearance to a mechanical air supply inlet 6 ft 1 83 m 3 ft 91 cm above if within 10 ft 3 m horizontally L Clearance above paved sidewalk or pav...

Страница 12: ...II features adjustment controls for both intake air and exhaust to accommodate a variety of conditions that result from variables inherent in the vent configuration and environment Both controls can be accessed from outside the firebox to allow the burner to be dialed in under operation See figures 14 and 16 Use the Vent Termination Diagram fig 17 to determine which zone your vent termination fall...

Страница 13: ...ximum of two 90 or four 45 elbows may be used Whenever possible use 45 elbows instead of 90 elbows as these offer less restriction to the flow of flue gases and intake air Use of elbows may adversely affect IPI functionality In such cases CPI mode should be used Reduce the overall horizontal run by 5 feet for each additional 45 and 90 elbow When two or more elbows are used in a horizontal run a le...

Страница 14: ...ne within 6 feet of the appliance This allows for the disconnection of the stove for servicing and maintenance See Fig 19 A T HANDLE GAS SHUT OFF VALVE IS RE QUIRED IN MASSACHUSETTS IN COMPLIANCE WITH CODE 248CMR THIS PRODUCT MUST BE INSTALLED BY A LICENSED MASTER OR JOURNEYMAN PLUMBER OR GAS FITTER WHEN INSTALLED IN THE COMMONWEALTH OF MASSACHUSETTS The stove and gas control valve must be discon ...

Страница 15: ...g to the valve A for manifold pressure the amount of gas that is coming out of the valve to the burner WARNING DO NOT ALLOW THE INLET GAS PRESSURE TO EXCEED 14 0 WC OR 1 2 PSIG AS SERIOUS DAMAGE TO THE VALVE MAY RESULT NEVER USE AN OPEN FLAME TO CHECK FOR GAS LEAKS ALWAYS REFER TO THE LIGHTING INSTRUCTIONS ON THE INSIDE BACK COVER OF THIS MANUAL WHEN LIGHTING THE STOVE Figure 20 Pressure test poin...

Страница 16: ...lessure personnelle de vie L agence qualifiée do service est esponsable de l installation propre de cet équipe metn L installation n est pas propre et complète jusqu à l operation de l appareil converi est chéque suivant les critères établis dans les instruction de propriétaire provi sion nées avel l équipement Fuel Conversion Procedure 1 Turn off gas supply to the stove and disconnect from electr...

Страница 17: ...oned and tighten screws securely Connect the wire lead 12 Applytheidentificationlabelstothestovesothattheycan beseenbyanypersonthatmaybeservicingthestove Label A Applytofrontlipofthevalvecompartment Label B Apply to the Rating Plate Small valve sticker Apply to valve 13 Install the accessory panels and burner media as appropriate See pages 19 21 14 Apply anti seize lubricant to the socket head gla...

Страница 18: ...r use at an altitude of___________ Orifice Size __________ Manifold Press _______ Input Btu Hr _________ Fuel Type ___________ Date ___ ___ ___ Converted by _____________ Cet appreeil a été converti au _____ Injecteur_____ Pression à la tubulure d alimentation ___________ Déoit calorifique ___________ 7 Firebox Panel Installation Skamol Panels and optional Reflective Glass Kit 156817 Skamol Panels...

Страница 19: ...lot must remain clear for proper pilot ignition See figs 29 and 65 for examples StarFire Glass Embers Do not use more than the four pounds in two 2 lb bags of glass media provided For best results evenly spread the contents of the bag over the entire burner plate and rear skirt mounding a crown toward the center DO NOT COVER THE AREA IMMEDIATELY IN FRONT OF THE PILOT ASSEMBLY The carry overportsdi...

Страница 20: ...Log up against the upper right corner of the firebox and engage its toe with the indentation in the Bottom Log Figure 30 Engage the Left Log with the rear burner plate pin Figure 31 Evenly disperse the Ember Stones evenly over the burner plate around the log parts DO NOT ALLOW EMBER STONES TO BLOCK THE PILOT ASSEMBLY AREA The carry over ports directly in front of the pilot must remain clear for pr...

Страница 21: ...lot operation or Proflame 2 Remote functionality IPI for intermittent operation 4 Once the pilot is lit burner operation is controlled by the rocker switch located on the front panel See fig 32 ON OFF use for manual control of the burner It remains in the ON position for use with the Proflame 2 remote transmitter T STAT use for optional wall thermostat 5 PILOT FLAME The pilot flame should be stead...

Страница 22: ...st setting for 20 30 minutes before making any adjustments Always make adjustments in 1 8 increments and allow the burner to settle in for 10 15 minutes between additional adjustments Figure 38 Proper flame picture Traditional Logs Figure 37 Air Shutter location Operation Notes 1 For the first several hours of operation it is common to detect some odor as the metal and manufacturing materials cure...

Страница 23: ...This valve has the ability to be stepped down in six increments between high and low It can be done manually or by setting the remote control to the Smart thermostat modulation mode Automatic modulation means that as the room temperature approaches the limit set for shut down the valve gradually decreases or steps down the fire intensity Conversely as room temperature cools the valve gradually inc...

Страница 24: ...range fan speed and flame height MODE Key used to select the component to be controlled CPI IPI Burner Fan and Accent Lamp The Wall Mount Bracket can be used for convenient Transmitter storage Initializing the System 1 Press the Controls Access Door to release the magnetic catch and swing the panel down Switch the Burner to OFF 2 Install three AAA batteries into the Transmitter 3 Press the black o...

Страница 25: ...th the system ON and the burner flame level at maximum press the Down Arrow Key once to reduce the flame height by one step Each time the Down Key is pressed the flame will step down until the burner is finally turned off Fig 44 The Up Arrow Key will increase the flame height each tim it is pressed If the U Arrow Key is pressed while the system is on but the flame is off the flame will come on in ...

Страница 26: ...unsupervised operation To activate the Lock press the Mode key and UP Key at the same time Fig 56 To de activate the Lock press the Mode Key and UP Key at the same time Low Battery Detection The life span of the batteries depends on various factors battery quality the frequency of ignition calls the frequency of changes to Set Points etc When Transmitter batteries are low the Battery icon will be ...

Страница 27: ... Power SIT Proflame 2 IFC Proflame 2 IFC Wiring Diagram CAUTION LABEL ALL WIRES PRIOR TO DISCONNECTION WHEN SERVICING THE CONTROLS WIRING ERRORS CAN CAUSE IMPROPER AND DANGEROUS OPERATION ALWAYS VERIFY PROPER OPERATION AFTER SERVICING THE APPLIANCE ATTENTION AU MOMENT DE L ENTRETIENDES COMMANDES ÉTIQUETEZ TOUS LES FILS AVANT LE DÉBRANCHEMENT DES ERREURS DE CÂBLAGE PEUVENT ENTRAÎUN FONCTIONNEMENT I...

Страница 28: ...28 139467_03 GF 370 DV II June 2015 This page is intentionally blank ...

Страница 29: ...F THE MAIN GAS SUPPLY AND DISCONNECT THE POWER SUPPLY TO THE APPLIANCE BEFORE REPLACING BATTERIES Glass Panel or Gasket Replacement 1 Use the 4 mm hex key to remove the four socket screws that attach the Glass Frame to the firebox Remove the lower screws first and be sure to adequately support the frame against the firebox while you remove the upper screws 2 Lay the assembly upside down on a flat ...

Страница 30: ...ch time you replace the batteries you will need to initialize communication between the Receiver and the Transmitter 1 Place the slider switch in the REMOTE position 2 Insert the end of a paper clip into the hole marked PRG on the Receiver cover The Receiver will beep three 3 times to indicate that it is ready to syn chronize with the Transmitter 3 Install 3 AAA batteries in the Transmitter bay an...

Страница 31: ...x Cover GF 370 MB 38 225402 Outer Rod Exhaust Restrictor 39 223224 Skamol Rear Panel 40 223235 Skamol Side Panel 2 not illustrated No Part Number Description 1 9911 Bolt Hex Cap M6x45 DIN 933 Class 8 8 Blk 2 9962 Bolt Hex Cap M6x10 DIN 933 8 8 Ser Flange Blk 3 117917 Screw HWH SMA 8 x 1 2 SL Blk Oxide 4 117967 Screw Pan Head 7 x 3 8 PH SMA Zinc 5 117968 Nut M6 Serrated Flange plain 6 117978 Screw ...

Страница 32: ...V II June 2015 Figure 64 GF 37 DVII Spud assembly parts identification For stoves with serial numbers after 10000 BURNER ProFlame 2 Remote OPI IPI ON T STAT OFF PILOT MODE RED YEL GRN ORG YEL WHT BLU BLK GRN 40 41 39 42 43 ...

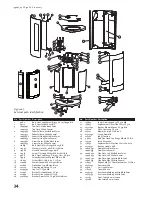
Страница 33: ... 222280 Gasket Drop In Orifice Holder 24 223235 Flex tube w connectors 3 8 OD x 48 25 117922 Nut Hex M4 DIN 934 Plain 26 225562 Battery Heat Shield 27 157265 Replacement IPI Back up Battery Box 4 AA 28 118257 Hook Loop Tape 1 wide self adhesive 29 120517 Rocker Switch SPST Blk Plain 30 223201 Rocker Switch SPDT Center OFF Blk Plain 31 224781 Conrol Face Plate Silkscreened IPI Stoves 32 117917 Scre...

Страница 34: ...2998 Bracket Firebox Mount GF 370 19 222999 Bracket Side Support GF 370 20 22320792 Bracket Door Catch GF 370 Matte Black Figure 65 External parts identification No Part Number Description 21 156843 Lower Door Hinge Asy GF 370 MB 22 156835 Replacement Outer Side Glass GF 370 23 22321692 Bracket Blower Mount GF 370 MB 25 223220 Plate Centering GF 370 26 223227 Blower Axial 40 CFM 120 V 27 22323292 ...

Страница 35: ... IN A MANUFACTURED MOBILE HOME AND MUST BE INSTALLED IN ACCORDANCE WITH THE MANUFACTURER S INSTRUCTIONS AND THE MANUFACTURED HOME CONSTRUCTION AND SAFETY STANDARD TITLE 24 CFR PART 3280 STANDARD FOR MANUFACTURED HOME INSTALLATION ANSI NCBCS A255 1 OR STANDARD FOR CANADA CSA Z240 4 THIS APPLIANCE IS ONLY FOR USE WITH THE TYPE OF GAS THAT IS INDICATED ON THE STOVE S RATING PLATE THIS APPLIANCE MAY B...

Страница 36: ...tove or Fireplace This paragraph sets forth the sole remedy available under this warranty in the event of any defect in the Jøtul Scan or Atra Gas Stove or Fireplace The warranty period for any replaced component will be the remaining unexpired portion of the warranty period for the original component Please retain your dated sales receipt in your records as proof of purchase EXCLUSIONS AND LIMITA...

Страница 37: ...component with substitute components determined by JØTUL to be of substantially equal quality and price The dollar value of JØTUL s liability for breach of this warranty shall be limited exclusively to the cost of furnishing a replacement component JØTUL shall not in any event be liable for the cost of labor expended by others in connection with any defective component Any costs or expenses beyond...

Страница 38: ...38 139467_03 GF 370 DV II June 2015 Figure 66 Remove top plate Remove temporary spacers and replace top plate ...

Страница 39: ...explosion D Do not use this appliance if any part has been under water Immediately call a qualified ser vice technician to inspect the appliance and to replace any part of the control system and any gas control which has been under water 1 Set the thermostat to the lowest setting 2 Set the Burner Control Switch to the OFF position TO TURN OFF GAS TO THE APPLIANCE PILOT LIGHT FLAME PATTERN 1 STOP R...

Страница 40: ...re beginning the installation it is important that the these instructions be carefully read and understood Jøtul maintains a policy of continual product development Consequently products may differ in specification color or type of accessories from those illustrated or described in various publications Jøtul vise sans cesse a ameliorer ses produits C est pourquoi il se reserve le droit de modifier...

Отзывы: