JOINT MAKING OPERATIONS
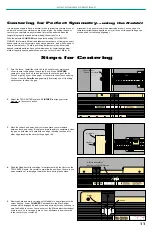
1.
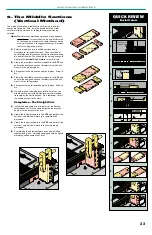
Zero the fence: Install the router bit to be used for your project and
orient its outer cutting edge toward the fence. Move CLINCHER
carriage to bring fence up to and just touch the outer edge of the bit.
You can sight by eye or use a paper or foil shim to cover fence opening.
You can close the SmartFence gap simply by moving one of its sliding
sections over to close the gap.
2.
Adjust the TRU-CENTER scale on CLINCHER to align your cutter
diameter to the cursor hairline.
3.
Move fence back and away from cutter and place your workpiece
between fence and cutter. Bring fence forward again to completely close
the gap on both sides of board with one edge touching fence and it’s
other edge touching the outer cutting edge of bit.
4.
Slide the
Rabbit until its centerline is in alignment with the Carrot on the
TRU-CENTER scale. Be careful to maintain the position of board, fence
and orientation of cutter edge toward the fence during these steps.
5.
Remove board and move carriage until
Rabbit is in near alignment with
cursor hairline. Lower CLINCHER Cam-handle to the Micro-adjust
position which engages it’s lead screw and micro adjust as necessary to
zero the Rabbit to cursor. You can now set the Micro-adjust thumbwheel
scale to zero. Lock carriage in place. Your workpiece is now centered
to the center of your router bit.
Centering for Perfect Symmetry
...using the
Rabbit
It is always desirable to have a dovetail or box joint pattern centered to your
workpiece so that the outside pins are of equal size. By finding the exact
center of your workpiece, a symmetrical joint will be assured when the
template is properly aligned before making the series of cuts.
With the patented CLINCHER and its patent pending
TRU-CENTER
FINDER, this formerly difficult and laborsome procedure of finding the exact
board center is now very simple and nearly automatic - and, with no need to
remove the router bit. To aid in achieving perfect symmetry, all variably
spaced template patterns have yellow diamonds for centering alignment
while all equally spaced patterns can use any cut line (Red or Black) for
alignment. As a general rule, when diamonds are only on one edge of a
template (variably spaced patterns only), all lines on its opposite edge can
also be used for centering alignment.
Steps for Centering
Edge of bit just
“kissing” face of fence.
Workpiece
Router Bit
Pointer on rabbit aligned
with carrot on TRU-CENTER scale.
Hairline
Rabbit
11


