background image

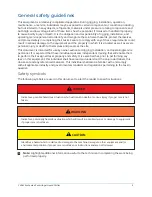
 WARNING

External wiring, unless specified as an optional connection in the manufacturer’s product line, is not to

be connected inside the OptiView

TM

 cabinet.

Devices such as relays, switches, transducers and controls and any external wiring must not be installed

inside the cabinet. All wiring must be in accordance with Johnson Controls’ published specifications

and must be performed only by a qualified electrician. Johnson Controls will NOT be responsible for

damage/problems resulting from improper connections to the controls or application of improper

control signals. Failure to follow this warning will void the manufacturer’s warranty and could cause

serious damage to property or personal injury.

Changeability of this document

In complying with Johnson Controls’ policy for continuous product improvement, the information

contained in this document is subject to change without notice. Johnson Controls makes no

commitment to update or provide current information automatically to the manual or product

owner. Updated manuals, if applicable, can be obtained by contacting the nearest Johnson

Controls Service office or accessing the Johnson Controls Knowledge Exchange website at 

https://

docs.johnsoncontrols.com/chillers/

.

It is the responsibility of rigging, lifting, and operating/service personnel to verify the applicability

of these documents to the equipment. If there is any question regarding the applicability of these

documents, rigging, lifting, and operating/service personnel should verify whether the equipment

has been modified and if current literature is available from the owner of the equipment prior to

performing any work on the chiller.

Associated literature

Table 1: Associated literature

Manual description

Form number

Equipment Pre-Startup and Startup Checklist

160.88-CL1

Unit Startup Checklist

160.88-CL2

Installation, Operation, and Maintenance

160.88-OM1

Unit Power Wiring

160.88-PW1

Field Control Wiring

160.88-PW2

Liquid Chiller Log Sheet

160.88-MR1

Centrifugal Chiller Long Term Storage

50.20-NM5

Screw and Scroll Chiller Long Term Storage

50.20-NM7

Shipping Damage Claims Form

50.15-NM

All Products - Replacement Parts Electrical Connectors

50.20-RP1

All Products - Replacement Parts Fittings

50.20-RP2

YVAM Air-Cooled Centrifugal Liquid Chiller

6

Содержание YORK YVAM

Страница 1: ...28539 000 Form Number 160 88 N1 122 New Release Installation Guide Issue Date 2022 01 21 YVAM Air Cooled Centrifugal Liquid Chiller Field Installation Procedure for YVAM Units with 20 Fans HFC 134A 60...

Страница 2: ...2 YVAM Air Cooled Centrifugal Liquid Chiller...

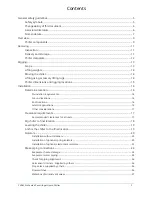
Страница 3: ...ns 16 Roof locations 16 Seismic applications 16 Other considerations 17 Clearance requirements 17 Recommended clearances for all units 17 Rig chiller to final location 18 Leveling the chiller 19 Ancho...

Страница 4: ...sulation 27 Unit heater operation verification 28 Reassembly 29 Refrigerant tubing reassembly 30 Assembly of straight thread O ring port fittings 30 Assembly of O ring face seal fittings 32 Dimensions...

Страница 5: ...that these individuals possess independent training that will enable them to perform their assigned tasks properly and safely It is essential that prior to performing any task on this equipment this i...

Страница 6: ...licable can be obtained by contacting the nearest Johnson Controls Service office or accessing the Johnson Controls Knowledge Exchange website at https docs johnsoncontrols com chillers It is the resp...

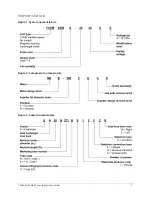
Страница 7: ...Nomenclature Figure 1 System nomenclature Figure 2 Compressor nomenclature Figure 3 Vessel nomenclature 7 YVAM Air Cooled Centrifugal Liquid Chiller...

Страница 8: ...Figure 4 Variable speed drive nomenclature YVAM Air Cooled Centrifugal Liquid Chiller 8...

Страница 9: ...connections Chiller components See Figure 5 Figure 6 and Figure 7 for the major components of the YVAM chiller Figure 5 Control panel side view Callout Component Callout Component A Control panel B Si...

Страница 10: ...pansion valve D Cooling piping for variable speed drive E Eaton surge suppressor F Direct drive motor and MBC G Compressor Figure 7 Variable speed drive end view Callout Component Callout Component A...

Страница 11: ...capped Do not store where exposed to ambient air temperatures exceeding 43 3 C 110 F The condensers must be covered to protect the coils and fins from potential damage and corrosion particularly where...

Страница 12: ...tem Do not run hot water 110 F or 43 3 C maximum or steam through the evaporator at any time Chiller data plate A unit data plate is mounted on the outside of the right side door of the Variable Speed...

Страница 13: ...method to be used It is beyond the scope of this manual to specify rigging and lifting details Scope This procedure covers the rigging locating and final assembly of the YVAM units with total fan quan...

Страница 14: ...the respective holes in the base frame Turn the lugs so that the spring loaded pin engages into the hole and the flanges on the lug lock behind the hole The lugs must be attached to the cables or chai...

Страница 15: ...ent the chains from hitting the chiller and causing damage Never lift the chiller using a forklift or by hooking to the top rails Use only the lifting holes provided Lifting instructions are placed on...

Страница 16: ...talled on a suitable flat and level concrete base that extends to fully support the two side channels of the unit base frame A one piece concrete slab with footings that extend below the frost line is...

Страница 17: ...uneven unit airflow The results of the restricted airflow or hot air recirculation can diminish performance as outlined in Form 150 12 AD2 Air Cooled Chiller Derating Due to Airflow Restrictions John...

Страница 18: ...acid rain is prevalent and when paired with adiabatic cooling solutions At installations where winter operation and snow accumulations are expected additional elevation must be provided to ensure nor...

Страница 19: ...nts Anchor the chiller to the final location See the following mounting options before moving the chiller to its final location When spring isolators are used the unit must be supported in a safe mann...

Страница 20: ...e recommended 1 Set the isolators on the floor housekeeping pad or subbase ensuring that all isolator centerlines match the equipment mounting holes 2 VMC Group recommends that the isolator base B be...

Страница 21: ...g adjusting bolt E Non skid elastomeric pad F Lower housing G Upper housing H Positioning pin Figure 15 One inch deflection spring isolators Table 3 Spring isolator dimension data in Mount type W D L...

Страница 22: ...are designed for 50 over travel See Installation of optional spring isolators for installation instructions Isolators with 1 in deflection must be of the same class for the entire unit That is C2Ps m...

Страница 23: ...r rectangular in appearance Figure 17 Elastomeric isolator cross reference Type A isolators Table 6 Elastomeric isolator dimension data in mm Model P N L W HF AL AD BT CD DW Type A 029 25335 001 43400...

Страница 24: ...tion while connecting and hanging the piping adjusting the connections and checking for correct alignment Compressor refrigerant piping and system external piping are factory installed on all units On...

Страница 25: ...be cleaned or flushed before being connected to the chiller pumps or other equipment The evaporator must not be exposed to flushing velocities or debris released during flushing Install a suitably siz...

Страница 26: ...ermanent strainers are required in the evaporator water circuit to protect the chiller and the pumps the chilled water air handler coils and controls and similar components The strainer must be instal...

Страница 27: ...Field Control Modifications Manual Form 160 88 PW2 All wiring to the control panel is completed by the factory A control power transformer is factory furnished with the Variable Speed Drive Power wir...

Страница 28: ...OM1 for the instructions to test each device WARNING All appropriate electrical safety measures must be followed when testing these heaters since these circuits will be energized CAUTION The evaporato...

Страница 29: ...139 189 M30 M30 x 2 167 226 M33 M33 x 2 194 263 M42 M42 x 2 265 359 M48 M48 x 2 302 410 M60 M60 x 2 359 487 Table 9 Assembly torque values for SAE tube fittings Tube size SAE straight thread size O ri...

Страница 30: ...d O ring ports have UN UNF or metric straight threads An elastomeric O ring is fitted to the male end During assembly the O ring is firmly sandwiched between the angular sealing surface of the female...

Страница 31: ...amount but not more than one full turn More then one turn makes the locknut push the O ring into the machine threads beyond the fitting land area during Step 7 7 Use two wrenches to hold the fitting...

Страница 32: ...hreads An elastomeric O ring is fitted into the grooved male end During assembly the O ring is firmly sandwiched between the sealing surfaces As a result sealing is affected and maintained by the O ri...

Страница 33: ...nozzle arrangements and weights The following figure shows the detail of the evaporator 150 psi compact two pass waterboxes Figure 23 Two pass waterbox detail mm in 33 YVAM Air Cooled Centrifugal Liqu...

Страница 34: ...ngements Two pass nozzle arrangements Three pass nozzle arrangements In Out In Out Lower rear side Upper rear side Lower rear side Upper front side Rear opposite VSD end Front VSD end Table 12 Two pas...

Страница 35: ...4G microchannel 700 318 1680 762 Table 14 Waterbox weights Approximate evaporator and waterbox weights Evaporator Compact waterbox weights lb kg Code Weight lb kg One pass Two pass Three pass EB2514...

Страница 36: ...ers mm Weight Pounds lb 0 4536 Kilograms kg Velocity Feet second fps 0 3048 Meters second m s Feet of water ft 2 989 Kilopascals kPa Pressure drop Pounds square inch psi 6 895 Kilopascals kPa Temperat...

Отзывы: