background image

TEC2245-4 L

ON

W

ORKS

® Network Thermostat Controller with Single Proportional Output and One-Speed 

Fan Control Installation Instructions

6

Connecting the L

ON

W

ORKS

 Network

The wiring rules for the L

ON

W

ORKS

 network differ from 

the wiring rules for the Metasys® N2 Bus and the 
BACnet® MSTP Bus. For more details on wiring the 
L

ON

W

ORKS

 network, refer to the 

L

ON

W

ORKS

 Network 

Layout Technical Bulletin (LIT-1162150)

.

To connect the thermostat controller to the L

ON

W

ORKS


network:

1.

Connect the L

ON

W

ORKS

 network wires to the 

L

ON

W

ORKS

 network terminal block on the 

thermostat controller (Figure 6).

Note:

There is no polarity when connecting the 

L

ON

W

ORKS

 network wires to the thermostat 

controller; however, we recommend keeping the 
polarity consistent throughout the network. 

2.

After the L

ON

W

ORKS

 network wires are connected 

to the first thermostat controller, continue in a 
daisy-chained fashion to the next device.

Note:

The L

ON

W

ORKS

 network wiring must be 

twisted-pair lines.

Do not run the L

ON

W

ORKS

 network wiring in the same 

conduit as line voltage wiring (30 VAC or above) or 
other wiring that switches power to highly inductive 
loads (such as contactors, coils, motors, or 
generators).

The L

ON

W

ORKS

 network requires proper termination 

and biasing at the end of a segment (a segment is a 
physically continuous length of wire). The thermostat 
controller is not equipped with the ability to provide this 
termination; therefore, it cannot be located at the 
physical end of a L

ON

W

ORKS

 network segment unless 

a terminator is attached. Refer to 

L

ON

W

ORKS

 Network 

Layout Technical Bulletin (LIT-1162150)

 for end-of-line 

solutions.

Setup and Adjustments

Thermostat Controller User Interface Keys

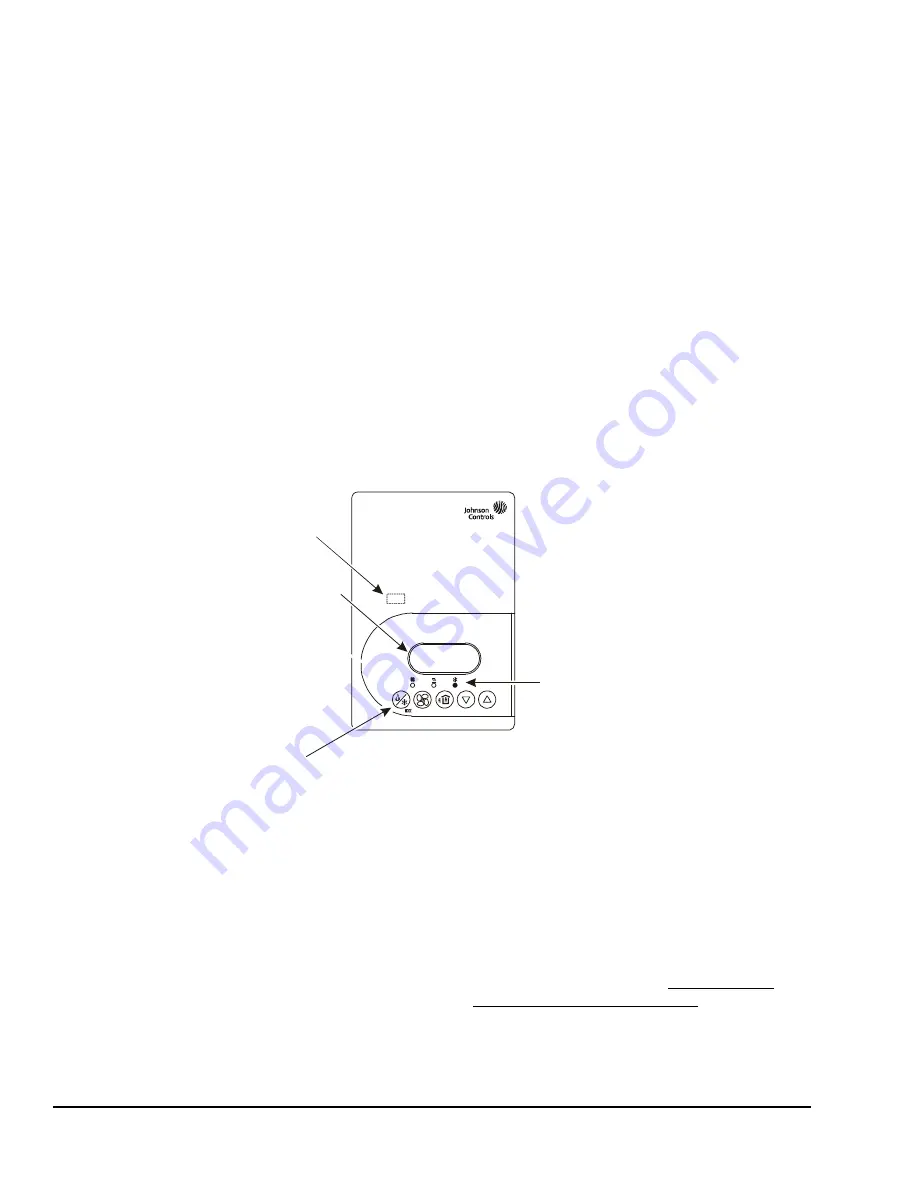
The TEC2245-4 Thermostat Controller UI consists of 
five keys on the front cover (Figure 7). The function of 
each key is as follows:

MODE

 key toggles among the system modes 

available, as defined by selecting the appropriate 
operation sequence in the Installer Configuration 
Menu (Off, Heat, Cool, Auto).

FAN

 key toggles between ON and AUTO for fan 

control. ON energizes the fan constantly and 
AUTO operates the fan only on a call for heating or 
cooling, for both occupied and unoccupied periods.

OVERRIDE

 key overrides the unoccupied mode to 

occupied at the local user interface for the 
specified TOccTime. (TOccTime is defined by 
selecting the appropriate time period in the Installer 
Configuration Menu.) If one of the binary inputs is 
configured to operate as a remote override contact, 
this 

OVERRIDE

function is disabled. The 

OVERRIDE

 key also allows access to the Installer 

Configuration Menu. See the 

Configuring the 

TEC2245-4 Thermostat Controller

 section.

UP/DOWN

 arrow keys change the Configuration 

parameters and activate a setpoint adjustment.

Figure 7: Front Cover of Thermostat Controller

70.0ºF

Room Temp

FI

G

:T

E

C224

5_f

rn

tv

w

Status LED beneath cover 

indicates network status.

Five keys on the thermostat controller
make operation easy and intuitive.

Backlit, plain text

Liquid Crystal Display (LCD)

is easy to read in any condition.

Light-Emitting Diodes (LEDs)
indicate system activity.

Содержание TEC2245-4

Страница 1: ...tion to the TEC2245 4 Thermostat Controller IMPORTANT The TEC2245 4 Thermostat Controller is intended to provide an input to equipment under normal operating conditions Where failure or malfunction of the thermostat controller could lead to personal injury or property damage to the controlled equipment or other property additional precautions must be designed into the control system Incorporate an...

Страница 2: ...e thermostat controller mounting base so that the arrow on the base points upward to indicate the top of the thermostat controller Note If you need to install the thermostat on an electrical junction box use 2 1 2 x 4 in 63 x 101 mm square boxes with mud ring covers and avoid smaller 1 1 2 x 4 in 38 x 101 mm or 3 x 2 in 76 x 51 mm square boxes This procedure ensures that you have enough space for ...

Страница 3: ...e screw terminal blocks onto the PCB 4 Reattach the LONWORKS communication wires to the LON terminal block Note If inserting multiple wires into the terminals be sure to properly twist wires together prior to inserting them in the terminal connectors 5 Reattach the thermostat controller cover to the mounting base top side first 6 Use a Phillips head screwdriver to reinstall the security screw on t...

Страница 4: ...abel Function 1 Not used N A 2 Not used N A 3 Fan Fan 4 24V Hot 24 VAC from Transformer 5 24V Common 24 VAC Common from Transformer 6 BO5 Aux BO5 Auxiliary Output 7 BO5 Aux BO5 Auxiliary Output 8 N A N A 9 Not used N A 10 AO1 Cool 11 Not used N A 12 BI1 Configurable Binary Input 1 13 RS Remote Sensor 14 Scom Sensor Common 15 BI2 Configurable Binary Input 2 16 UI3 COS COC SS Not labeled N A LON Net...

Страница 5: ... Fan BO5 Aux BO5 Aux 24 VAC Thermostat Power Fan 24 V Com 0 to 10 VDC 24 VAC Com Analog Output and Valve 24 V Hot AO1 Fan Power and Fan Aux Load BI2 UI3 BI1 Scom OR Remote Inputs SS Supply Sensor COS Change Over Sensor Voltage Free Contact COC NH Normally Heat Closed Contact Cold Water COC NC Normally Cool Closed Contact Hot Water Voltage Free Contact Door Remote Override Filter Alarm Service Alar...

Страница 6: ...ated at the physical end of a LONWORKS network segment unless a terminator is attached Refer to LONWORKS Network Layout Technical Bulletin LIT 1162150 for end of line solutions Setup and Adjustments Thermostat Controller User Interface Keys The TEC2245 4 Thermostat Controller UI consists of five keys on the front cover Figure 7 The function of each key is as follows MODE key toggles among the syst...

Страница 7: ...controller display indicating that the configured password is required to proceed Use the UP DOWN arrow keys to indicate the configured password then press the MODE key to proceed through the Installer Configuration Menu parameters 2 Once the Installer Configuration Menu begins press and release the OVERRIDE key to scroll through the parameters listed in Table 4 3 When the desired parameter is dis...

Страница 8: ...ose 0 Cooling Only Changeover occurs between Cooling Only and Heating Only Table 3 Selection Options for Sequence of Operation Selection Option Control Curve Terminal Numbers Used See Table 1 and Figure 6 0 Cooling Only See Figure 8 10 Proportional Cooling 1 Heating Only See Figure 9 10 Proportional Heating 2 Cooling and Reheat See Figure 10 6 and 7 Reheat 10 Proportional Cooling 3 Heating and Reh...

Страница 9: ...larm is displayed indicating that the window needs to be closed to resume heating or cooling These settings disable any local override function When this setting is selected the heating and or cooling outputs are enabled only when the contact is closed If the fan is set to Auto it is enabled only when the contact is closed If the fan is set to On it is not affected by this setting BI2 Configuratio...

Страница 10: ...ables the Auto function if Option 2 is chosen in the SeqOpera parameter to be visible within the MODE key menu The MODE key is the key at the far left of the thermostat controller cover Default off on The Auto function is active Off Auto Heat Cool Provides automatic changeover between heating and cooling off The auto function is inactive Off Heat Cool C or F Provides temperature scale options for ...

Страница 11: ... temperature in 5 0F 5 0C increments St By CL1 Sets Stand by cooling setpoint limit value is between occupied and unoccupied cooling setpoints Default 78 0 F 25 6 C Range 54 0 F 12 0 C to 100 0 F 37 5 C Unocc HT Sets the Unoccupied Heating setpoint value Default 62 0 F 16 5 C Range 40 0 F 4 5 C to 90 0 F 32 0 C Unocc CL Sets the Unoccupied Cooling setpoint value Default 80 0 F 26 5 C Range 54 0 F ...

Страница 12: ...other use the MODE key to toggle between the two setpoints TOccTime Sets the duration of the Temporary Occupancy Time when the heating or cooling setpoints in the Occupied mode are established by an Override Function enabled in the Main User Menu when the thermostat controller is in the Unoccupied mode a temporary heating or cooling setpoint Default 2 0 hrs Range 0 0 to 24 0 hrs in 1 hour incremen...

Страница 13: ... Used as a diagnostic service help to troubleshoot and diagnose sensor operation Default 40 F 40 C Not applicable 1 This parameter functions only when the TEC is used in conjunction with an onboard occupancy sensor or a remote occupancy sensor Table 4 Installer Configuration Menu Part 5 of 5 Parameter Appearing on Display Description and Default Selection Options Table 5 Accessories Order Separate...

Страница 14: ...tiple Symptoms section of this table A thermostat controller may be connected to the wrong bus TEC2245 4 LONWORKS Network Thermostat Controller with Single Proportional Output and One Speed Fan Control Part 1 of 2 Power Requirements 19 to 30 VAC 50 60 Hz 2 VA Terminals 4 and 5 at 24 VAC Nominal Class 2 or Safety Extra Low Voltage SELV Analog Output Rating 0 to 10 VDC into 2k ohm Resistance Minimum...

Страница 15: ... Part 15 Subpart B Class A LONMARK Certification 3 4 Canada UL Listed File E27734 CCN XAPX7 Under CAN CSA C22 2 No 24 Temperature Indicating and Regulating Equipment Industry Canada ICES 003 Europe CE Mark EMC Directive 2004 108 EC Australia and New Zealand C Tick Mark Australia NZ Emissions Compliant Shipping Weight 0 75 lb 0 34 kg The performance specifications are nominal and conform to accepta...

Отзывы: