background image

RXF ROTARY SCREW COMPRESSOR UNITS

INSTALLATION

070.410-IOM (JAN 12)

Page 5

Installation

FOUNDATION

NOTE: Allow space for servicing both ends of the unit. A 

minimum of 24 inches is recommended.

The first requirement of the compressor foundation is that 

it  must  be  able  to  support  the  weight  of  the  compressor 

package including coolers, oil, and refrigerant charge. Screw 

compressors are capable of converting large quantities of 

shaft power into gas compression in a relatively small space 

and a mass is required to effectively dampen these relatively 

high frequency vibrations.

Firmly  anchoring  the  compressor  package  to  a  suitable 

foundation by proper application of grout and elimination of 

piping stress imposed on the compressor is the best insur-

ance  for  a  trouble  free  installation.  Use  only  the  certified 

general arrangement drawings from Frick

®

 to determine the 

mounting foot locations and to allow for recommended clear-

ances around the unit for ease of operation and servicing.  

Foundations must be in compliance with local building codes 

and materials should be of industrial quality.

The floor shall be a minimum of 6 inches of reinforced con-

crete and housekeeping pads are recommended.  Anchor 

bolts are required to firmly tie the unit to the floor. Once the 

unit is rigged into place (See 

HANDLING and MOVING

), the 

feet must then be shimmed in order to level the unit. The 

shims should be placed to position the feet roughly one inch 

above the housekeeping pad to allow room for grouting. An 

expansion-type epoxy grout must be worked under all areas 

of the base with no voids and be allowed to settle with a 

slight outward slope so oil and water can run off of the base.

When  installing  on  a  steel  base,  the  following  guidelines 

should be implemented to properly design the system base:
 1. Use I-beams in the skid where the screw compressor will 

be attached to the system base.  They shall run parallel to 

the package feet and support the feet for their full length.
2. The compressor unit feet shall be continuously welded to 

the system base at all points of contact.
3. The compressor unit shall not be mounted on vibration 

isolators in order to hold down package vibration levels.
4. The customer’s foundation for the system base shall fully 

support the system base under all areas, but most certainly 

under the I-beams that support the compressor package.

When installing on the upper floors of buildings, extra precau-

tions should be taken to prevent normal package vibration 

from being transferred to the building structure. It may be 

necessary to use rubber or spring isolators, or a combination 

of both, to prevent the transmission of compressor vibration 

directly to the structure. However, this may increase package 

vibration levels because the compressor is not in contact with 

any  damping  mass.  The  mounting  and  support  of  suction 

and discharge lines is also very important. Rubber or spring 

pipe supports may be required to avoid exciting the build-

ing structure at any pipe supports close to the compressor 

package. It is best to employ a vibration expert in the design 

of a proper mounting arrangement.  

In any screw compressor installation, suction and discharge 

lines shall be supported in pipe hangers (preferably within 

2 feet of vertical pipe run) so that the lines won’t move if 

disconnected from the compressor. See table for Allowable 

Flange Loads.

ALLOWABLE fLANGE LOADS

NOZ.

MOMENTS (ft-lbf)

LOAD (lbf)

SIZE

AXIAL VERT.

LAT. AXIAL VERT.

LAT.

NpS

M

R

M

C

M

L

p

V

C

V

L

1

25

25

25

50

50

50

1.25

25

25

25

50

50

50

1.5

50

40

40

100

75

75

2

100

70

70

150

125

125

3

250

175

175

225

250

250

4

400

200

200

300

400

400

5

425

400

400

400

450

450

6

1,000

750

750

650

650

650

8

1,500 1,000 1,000 1,500

900

900

10

1,500 1,200 1,200 1,500 1,200 1,200

12

1,500 1,500 1,500 1,500 1,500 1,500

14

2,000 1,800 1,800 1,700 2,000 2,000

Proper foundations and proper installation methods are vital; 

and even then, sound attenuation or noise curtains may be 

required to reduce noise to desired levels.

For more detailed information on Screw Compressor Founda-

tions, please request Frick publication S70-210 IB.

HANDLING and MOVING

This screw compressor package may 

be top-heavy. Use caution in rigging 

and handling.

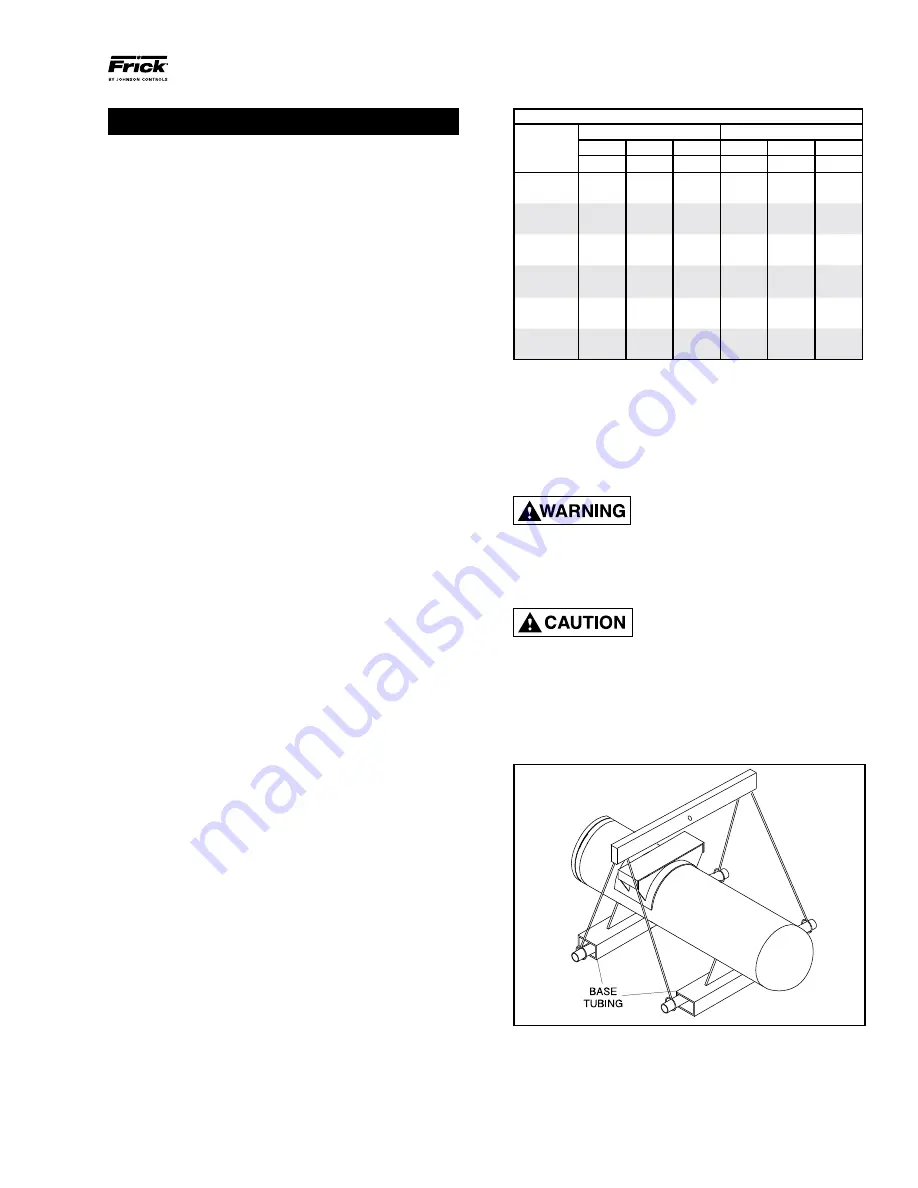
RXF 12–50 units can be moved with a forklift or with rigging 

and a crane. The recommended method is to insert lengths 

of 2" pipe through the base tubing (see Figure 1 below).

Spreader  bars  should  be  used  on 

both  the  length  and  width  of  the 

package to prevent bending oil lines 

and damage to the package. CAUTION must also be used 

in locating the lifting ring. Appropriate adjust ment in the 

lifting  point  should  be  made  to  compensate  for  motor 

weight. Adjustment of the lifting point must also be made 

for  any  additions  to  the  standard  package  such  as  an 

external oil cooler, etc., as the center of balance will be 

effected.

Figure 1 - RXF 12 – 50

The  unit  can  be  moved  with  a  forklift  by  forking  through 

the  base  tubing. 

NEVER  MOVE  THE  UNIT  BY  PUSHING 

OR  FORKING  AGAINST  THE  SEPARATOR  SHELL  OR  ITS 

MOUNT ING SUPPORTS.

Содержание Frick 101

Страница 1: ...10 IOM JUL 2011 Dist 3 3a 3b 3c Please check www johnsoncontrols com frick for the latest version of this publication THIS MANUAL CONTAINS RIGGING ASSEMBLY START UP AND MAINTENANCE INSTRUCTIONS READ THOROUGHLY BEFORE BEGINNING INSTALLATION FAILURE TO FOLLOW THESE INSTRUCTIONS MAY RESULT IN PERSONAL INJURY OR DEATH DAMAGE TO THE UNIT OR IMPROPER OPERATION ...

Страница 2: ...DURE 21 VFD SKIP FREQUENCIES 21 MAINTENANCE NORMAL MAINTENANCE OPERATIONS 22 GENERAL MAINTENANCE 22 COMPRESSOR SHUTDOWN and START UP 22 COMPRESSOR MOTOR SERVICING 22 GENERAL INSTRUCTIONS FOR REPLACING COMPRESSOR UNIT COMPONENTS 23 OIL FILTER SPIN ON RXF 12 50 23 OIL FILTER SINGLE ELEMENT 58 101 23 COALESCER OIL RETURN STRAINER 24 LI Q UID INJECTION STRAINER 24 OIL PUMP STRAINER Optional 24 SUCTION...

Страница 3: ...compressor be superheated to 10 F above the refrigerant saturation temperature to ensure that all refrigerant at the compressor suction is in the vapor state DESIGN LIMITATIONS The compressor units are designed for operation within the pressure and temperature limits as shown in Frick Publica tion 070 410 SED JOB INSPECTION Immediately upon arrival examine all crates boxes and exposed compressor a...

Страница 4: ...otor Max Swept Volume Compressor Diameter Rotor Speed Drive Shaft End Cfm M H Model mm L D Rpm Ft Rev M Rev 3550 Rpm 2950 Rpm XJS XJF 95M 95 1 4 5 772 0 02513 0 000711 89 126 XJS XJF 95L 95 1 4 4 661 0 03112 0 000881 110 156 XJS XJF 95S 95 1 4 3 600 0 04086 0 001156 145 205 XJS XJF 120M 120 1 4 5 772 0 05065 0 001433 180 254 XJS XJF 120L 120 1 4 4 661 0 06272 0 001775 223 314 XJS XJF 120S 120 1 4 ...

Страница 5: ...uildings extra precau tions should be taken to prevent normal package vibration from being transferred to the building structure It may be necessary to use rubber or spring isolators or a combination of both to prevent the transmission of compressor vibration directly to the structure However this may increase package vibration levels because the compressor is not in contact with any damping mass ...

Страница 6: ...vacuated and charged with dry nitrogen to ensure the integrity of the unit during shipping and short term storage prior to installation RXF 58 101 units can be moved with rigging using a crane or forklift by hooking into three lifting points on the oil sepa rator See Figure 2 Spreader bars may be required on both the length and width of the package to prevent bending oil lines and damage to the pa...

Страница 7: ... in the sight glass Oil distillers and similar equipment which trap oil must be filled prior to unit operation to normal design outlet levels The same pump used to charge the unit may be used for filling these auxiliary oil reservoirs The sight glass located near the bottom of the separator shell at the discharge end should remain empty when the unit is in operation The presence of oil in this end...

Страница 8: ...r suited to a specific installation Refer to publication E70 900E for additional information on Thermosyphon Oil Cooling WATER COOLED OIL COOLING The plate type water cooled oil cooler is mounted on the unit complete with all oil piping The customer must supply adequate water to the oil cooler Frick recommends a closed loop system for the waterside of the oil cooler Careful attention to water trea...

Страница 9: ...Vi liquid injection oil cooling due to the typically lower compression ratios The control system on high stage units with dual port liquid injection oil cooling switches the liquid refrigerant supply to the high port when the compres sor is operating at higher compression ratios 3 5 Vi and above for best efficiency Where low compres sion ratios low condensing pressures are anticipated thermo sypho...

Страница 10: ...t suction pressure In cases where wide swings in pressure are anticipated in the flash econo mizer vessel it may be necessary to add an outlet pressure regulator to the flash vessel outlet to avoid overpressurizing the economizer port which could result in motor overload Example A system feeding liquid to the flash vessel in batches The recommended economizer systems are shown in Figures 8 11 Noti...

Страница 11: ...stem providing shutdown protection for the Quantum LX the panel may not see the loss of the 3 phase voltage on the motor because the UPS could prevent the motor starter contactor from dropping out With the starter contactor still energized the compressor auxiliary will con tinue to feed an Okay signal to the panel This will allow the motor to be subjected to a fault condition on the 3 phase bus So...

Страница 12: ...Figure 12 Figure 13 Point to Point Wiring Diagram 5 The compressor motor Current Transformer CT can be installed on any one phase of the compressor leads NOTE the CT must see all the current on any one phase there fore in wye delta applications BOTH leads of any one phase must pass through the CT CURRENT TRANSFORMER SIZE Calculate CT size using the following formula where SF is Service Factor and ...

Страница 13: ...ure appli cations will require the demand pump option The lubrication system on an RXF screw compressor unit performs several functions 1 Lubricates the rotor contact area allowing the male rotor to drive the female rotor on a cushioning film of oil 2 Provides lubrication of the bear ings and shaft seal 3 Serves to remove the heat of compression from the gas keeping discharge temperatures low and ...

Страница 14: ...lter element then coalesces the oil mist into droplets the droplets of oil fall to the bottom of the coalescer section of the oil separator The return of this oil to the compressor is controlled by a hand expansion valve HV1 See Figure 16 NOTE Open HV1 only enough to keep the coalescer end of the separator free of oil The sight glass located near the bottom of the coales cer section of the oil sep...

Страница 15: ...presented by YY3 and YY4 control the Volumizer II volume ratio control Oil is internally ported to apply hydraulic pressure to two stepping pistons in order to move the moveable slide stop to the optimum position The following chart shows the logic of solenoid operation to adjust the volume ratio Vi SOLENOID 3 YY3 SOLENOID 4 YY4 2 2 Energized Energized 3 5 Deenergized Energized 5 0 Deenergized Dee...

Страница 16: ...the single port system with the addition of a double acting solenoid valve and operates as outlined The liquid injection solenoid valve is energized by the micro processor when the temperature sensor in stalled in the compressor discharge exceeds the setpoint Liquid refrigerant is then passed through the motorized expansion valve to the doub le acting solenoid valve Depending on the compressor s o...

Страница 17: ...he influence the Integral component exerts on the PID Output value The Integral component works to push the Control Input toward the Control Setpoint by tracking the difference between the Control Input and the Control Setpoint over time Derivative Gain This setpoint controls the influence the Derivative component exerts on the PID Output value The Derivative component reacts to rapid changes in t...

Страница 18: ...utton activated for 2 seconds A Parameter list example is shown below parameter i08 Figure 25 Figure 25 Gives access to change a value once the Parameter list has been accessed Acknowledge and save change of value of a parameter To exit from the Parameter list and return to the display of Opening Degree OD keep the push button activated for 2 seconds Display Figure 26 Normally the Opening Degree O...

Страница 19: ... is initially powered A1 and CA will be flashing on the LED display Hold the enter button down for two seconds until these values stop flashing 4 Push the down arrow button and scroll until j10 is displayed and push the enter button Using the up arrow scroll until j11 is displayed and push the enter button This step must be completed within 20 seconds or the valve will reset 5 Push the down arrow ...

Страница 20: ...1 4 1 Define condition at power cut when fail safe is installed 1 Close valve 2 Open valve 3 Maintain valve position 4 Go to OD given by j12 Digital Input function j09 1 2 1 Define function when Dl is ON short circuited Dl terminals when j02 2 1 Open ICM valve Dl OFF Close ICM valve 2 Close ICM valve Dl OFF Open ICM valve Password j10 0 199 0 Enter number to access password protected parameters j2...

Страница 21: ...licable If unit has water cooled oil cooling adjust water control valve to cooler if applicable 2 The compressor slide valve should be calibrated 3 Pull and clean suction strainer after 24 hours operation If it is excessively dirty repeat every 24 hours until system is clean Otherwise follow the Maintenance Schedule See the RECOMMENDED MAINTENANCE PROGRAM section NORMAL START UP PROCEDURE 1 Confir...

Страница 22: ...dumping liquid refrigerant into com pressor suction Keep liquid injection valves properly adjusted and in good condition to avoid flooding compressor with liquid Liquid can cause a reduction in compressor life and in extreme cases can cause complete failure 5 Protect the compressor during long periods of shut down If the compressor will be setting for long periods without run ning it is advisable ...

Страница 23: ... separator to low side system pressure using the suction check valve bypass NOTE Recover or transfer all refrigerant vapor in accor dance with local ordinances before opening to atmo sphere The separa tor MUST be equal ized to atmo spher ic pres sure Oil entrained refriger ant may vapor ize causing a separa tor pressure increase Repeat transfer and recov ery procedure if neces sary 3 Remove spin o...

Страница 24: ...pped refrigerant has been relieved carefully remove loosened capscrews as liquid refrigerant is some times caught in the strainer strain er cover and strainer basket 7 Wash the strainer basket and cover in sol vent and blow clean with air 8 Reassemble the strainer 9 Open the service valve between the compressor and the liquid injection thermal expansion valve purge entrained air and check for leak...

Страница 25: ...edure if neces sary 5 Open drain valve s located on the underside of the sepa rator and drain the oil 6 Drain oil filter strainers and oil cooler if applicable 7 Remove and install new oil filter element 8 Remove clean and reinstall strainer ele ments in strainers 9 Evacuate unit to 29 88 Hg 1000 microns 10 Open suction service valve and pressurize the unit to system suction pressure Close the suc...

Страница 26: ...me out with the rotor and shaft 10 AS AK AL Remove the bearing retainer washer The washer may have stayed with rotor and shaft when removed or is against ball bearing See Figure 30 11 Remove the mechanical seal rotary member and spring from the rotor and shaft assembly 12 GG HJ HL Remove inner snap ring and single row ball bearing from the casing AS AK AL Remove single row ball bearing from casing...

Страница 27: ... contact surface facing away from the spring over installation sleeve on shaft until just con tacting the spring Do not compress the spring Re move the installa tion sleeve 7 Coat the rotor shaft with refrigeration oil Install the rotor and shaft into the casing slowly pushing until the ends of the rotor teeth are just below the face of the casing Take care not to damage the seal seat 8 Leave the ...

Страница 28: ...pumps and 0 005 for AS AK and AL size pumps Pump Distance in on O D End Clearance Size of Bearing Housing in GG 7 16 003 HJ HL 9 16 003 AS AK AL 1 2 003 INSTALLATION OF CARBON GRAPHITE BUSHINGS When installing carbon graphite bushings extreme care must be taken to prevent breaking Carbon graphite is a brittle material and easily cracked If cracked the bushing will quickly disinte grate Using a lub...

Страница 29: ...ect 5 Pump takes too much power a Running too fast is correct motor speed reducer ratio sheave size etc being used b Liquid more viscous than unit sized to handle heat the liquid increase the pipe size slow the pump down or get a bigger motor c Discharge pressure higher than calculated check with pressure gauge Increase size or reduce length of pipe reduce speed capacity or get bigger motor d Pump...

Страница 30: ... pressures and temperatures Calibration should be conducted with NIST certified devices d Verify tightness of bolts on suction and discharge flanges See table below for torque requirements e Vibration measurement must be carried out continuously to obtain optimum preventative control on bearings If not continuously controlled then every 6 months more frequently if levels increase f Units with vari...

Страница 31: ...gh or low temperature coolant to the oil cooler 7 Liquid return from system carryover 8 Refrigerant underfeed or overfeed to evapor ators 9 Blocked tubes or plates in water cooled oil cooler from high mineral content of water 10 Insufficient evaporator or condenser siz ing MOTOR BEARINGS Lubricate motor bearings properly before start up Maintain subse quent lubrication as recommended by the motor ...

Страница 32: ...24 83 4 48 19 74 10 30 7 0 19 10 4 10 41 60 1 4 19 74 0 30 9 57 15 30 4 10 26 60 16 60 54 10 1 5 14 65 2 80 0 30 20 30 11 60 34 10 29 10 66 60 1 6 9 57 5 30 5 30 25 30 19 10 41 60 41 60 79 10 1 7 4 48 7 8 10 3 30 30 26 60 49 10 54 10 91 60 1 8 0 30 10 30 15 30 35 30 34 10 56 60 66 60 104 10 1 9 2 80 12 80 20 30 40 30 41 60 64 10 79 10 116 60 2 0 5 30 15 30 25 30 45 30 49 10 71 60 91 60 129 10 2 1 ...

Страница 33: ...hange the discharge pressure transducer PE 3 it will be necessary to depressurize the entire compressor package Follow General Instructions For Replacing Compressor Unit Components section before going to step 3 3 Remove DIN connector screw then remove DIN connector from the transducer TRANSDUCER CONNECTION Suction Pressure PE 4 Discharge Pressure PE 3 Oil Pressure PE 1 PE 2 4 Unscrew the transduc...

Страница 34: ...ate the compressor for replacement This transmitter is dedicated to oil level control and has no user adjustments If it is necessary to replace the well the separator must be purged and the oil drained Refer to the section CHANGING OIL 1 Shut off control power 2 Remove DIN connector plug from transmitter 3 Loosen set screws 4 Remove transmitter unit 5 Install new transmitter unit 6 Tighten set scr...

Страница 35: ...ents not seated properly Replace oil charge and coalescers Oil viscosity too low Verify correct oil replace if incorrect High system CFM System operating out of design conditions High suction and Low discharge pressures Refrigerant flood back Correct system problem Two or more compressors piped to a single economizer vapor port Verify check valves are in working order TROUBLESHOOTING THE LIQUID IN...

Страница 36: ... valve preventing valve from operating both ways Clean valve Solenoid may be mechanical ly actuated by inserting a piece of 3 16 rod against armature pin and pushing spool to opposite end Push YY1 valve to confirm unload capability If valve works problem is electrical Slipper seals worn out or damaged Replace Check valve in slide valve piston sticking Remove and clean check valve SLIDE VALVE WILL ...

Страница 37: ...age 37 COMPRESSOR PORT LOCATIONS RXF 12 19 PORT CONNECTION SIZE 1 3 4 14 NPTF 3 3 8 18 NPTF 4 3 8 18 NPTF 5 3 4 14 NPTF 7 1 4 18 NPTF 8 3 8 18 NPTF 10 1 4 18 NPTF 11 1 4 18 NPTF 12 1 4 18 NPTF 16 3 4 14 NPTF 18 1 2 14 NPTF 20 1 4 18 NPTF 21 3 4 14 NPTF 22 1 4 18 NPTF ...

Страница 38: ...TIONS RXF 24 50 PORT CONNECTION SIZE 1 1 11 NPTF 2 1 4 18 NPTF 3 3 8 18 NPTF 4 3 8 18 NPTF 5 1 11 NPTF 6 1 2 14 NPTF 7 1 4 18 NPTF 8 1 4 18 NPTF 10 1 4 18 NPTF 11 1 4 18 NPTF 12 1 4 18 NPTF 15 3 8 18 NPTF 16 3 4 14 NPTF 18 1 8 27 NPTF 19 1 4 18 NPTF 20 1 8 27 NPTF 21 3 8 18 NPTF 22 1 4 18 NPTF ...

Страница 39: ...170 10 14 1 0 5 1 2 20 260 15 22 1 0 6 9 16 18 320 20 27 2 0 8 3 4 16 500 25 42 2 0 10 7 8 14 720 30 60 2 5 12 1Z zn 12 960 50 80 5 0 16 1B zn 12 1380 75 115 6 0 20 1B 12 2700 150 225 12 0 24 1M 12 3000 160 250 12 0 When performing maintenance or replacing the compres sor the hydraulic tubing may need to be removed and re installed The following procedure outlines the proper installation of SAE st...

Страница 40: ...01 PORT CONNECTION SIZE 1 1Z zn 12UN 2B 2 7 16 20UNF 2B 3 1Z zn 12UN 2B 4 1Z zn 12UN 2B 5 1M 12UN 2B 6 9 16 18UNF 2B 7 1Z zn 12UN 2B 8 7 16 20UNF 2B 9 9 16 18UNF 2B 10 9 16 18UNF 2B 11 3 4 14 NPTF 12 1Z zn 12UN 2B 13 1 4 18 NPTF 14 1 8 27 NPTF 15 1 2 14 NPTF 16 9 16 18UNF 2B 17 1Z zn 12UN 2B 18 9 16 18UNF 2B ...

Страница 41: ...ID VALVE MOTORIZED EXPANSION VALVE SIGHT GLASS LIQUID LINE TUBING LINE COMPRESSOR LOW VI ECONOMIZER OR CLOSED THREAD COMPRESSOR HIGH VI BOOSTER ONLY TUBING LINE LIQUID LINE SIGHT GLASS MOTORIZED EXPANSION VALVE SOLENOID VALVE STRAINER S 9 YY COMPRESSOR LOW VI COMPRESSOR HIGH VI TO SEPARATOR COMPRESSOR SUCTION PRESS LIQUID REFRIGERANT FROM RECEIVER S RXF COOLING OPTIONS See P I Diagrams PLATE OIL C...

Страница 42: ...PAH HIGH PRESSURE ALARM PAHH HIGH PRESSURE SHUTDOWN PAL LOW PRESSURE ALARM PALL LOW PRESSURE SHUTDOWN PCV PRESSURE CONTROL VALVE PDSLL LOW DIFFERENTIAL PRESS SHUTDOWN PE PRESSURE ELEMENT PI PRESSURE INDICATOR PIC TIC PRESS TEMP INDICATING CONTROLLER PM PUMP MOTOR PS AUTO CYCLE PRESSURE SWITCH PSV PRESSURE SAFETY VALVE SP SUCTION PRESSURE STR STRAINER TAH HIGH TEMPERATURE ALARM TAHH HIGH TEMP SHUTD...

Страница 43: ...RESSURE 8 CLOSED THREAD 10 DISCHARGE PRESSURE 11 LIQ INJ BLEED LINE 12 COALESCER BLEED LINE 15 VENT UNLOADING 16 THERMOWELL 19 SUCTION PRESSURE NOTES 1 PRESSURE TRANSDUCERS INDICATE PE 1 OIL PRESSURE PE 3 DISCHARGE PRESSURE PE 4 SUCTION PRESSURE 2 TEMPRERATURE PROBES INDICATE TE 1 SUCTION GAS TEMPERATURE TE 2 DISCHARGE GAS TEMPERATURE TE 3 LUBE OIL TEMPERATURE TE 4 SEPARATOR OIL TEMPERATURE 3 TERM...

Страница 44: ...AH HIGH PRESSURE ALARM PAHH HIGH PRESSURE SHUTDOWN PAL LOW PRESSURE ALARM PALL LOW PRESSURE SHUTDOWN PCV PRESSURE CONTROL VALVE PDSLL LOW DIFFERENTIAL PRESS SHUTDOWN PE PRESSURE ELEMENT PI PRESSURE INDICATOR PIC TIC PRESS TEMP INDICATING CONTROLLER PM PUMP MOTOR PS AUTO CYCLE PRESSURE SWITCH PSV PRESSURE SAFETY VALVE SP SUCTION PRESSURE STR STRAINER TAH HIGH TEMPERATURE ALARM TAHH HIGH TEMP SHUTDO...

Страница 45: ...READ 8 DISCHARGE PRESSURE 9 LIQ INJ BLEED LINE 10 COALESCER BLEED LINE 11 THERMOWELL SUCT TEMP NOTES 1 PRESSURE TRANSDUCERS INDICATE PE 1 OIL PRESSURE PE 3 DISCHARGE PRESSURE PE 4 SUCTION PRESSURE 2 TEMPRERATURE PROBES INDICATE TE 1 SUCTION GAS TEMPERATURE TE 2 DISCHARGE GAS TEMPERATURE TE 3 LUBE OIL TEMPERATURE TE 4 SEPARATOR OIL TEMPERATURE 3 TERMINATIONS A THROUGH C REFER TO CONNEC TION POINTS ...

Страница 46: ...RXF ROTARY SCREW COMPRESSOR UNITS MAINTENANCE 070 410 IOM JAN 12 Page 46 WIRING HARNESS External for Analog Devices ...

Страница 47: ...RXF ROTARY SCREW COMPRESSOR UNITS MAINTENANCE 070 410 IOM JAN 12 Page 47 WIRING HARNESS AC to Heaters and Valves External WIRING HARNESS AC Conduit Quantum to DBS Panel ...

Страница 48: ...ry important to read the installation instruc tions thoroughly before beginning the project Make sure you have drawings and instructions with your equipment If not call the manufacturer and request the proper in structions and drawings Every manufacturer of electronic equipment should have a knowledgeable staff willing to answer your questions or provide additional information Following correct wi...

Страница 49: ...rcuits This conduc tor must also be insulated to avoid inadvertent contact at multiple points to ground which could create Ground Loops In many installations that are having electronic control prob lems this essential wire is usually missing is not insulated or improperly sized NEC size ratings are for safety purposes and not necessarily for adequate relaying of noise EMI to earth ground to avoid ...

Страница 50: ...equirements Due to the level of EMI that can be induced onto lower voltage lines when running multiple feeders in a trench control power communications analog or signal wiring cannot be run in trenches that house multiple conduits electrical ducts carrying 3 phase power to starters vfd or motors Control power communications analog or signal wiring should be run overhead preferred or in a separate ...

Страница 51: ...he enclosure This is extremely important in outdoor applications Note It is simply NEVER a good practice to enter through the top of an electronic control panel or starter panel that does not already have knockouts provided If knockouts are not provided for this purpose it is obvious this is not recommended and could VOID WARRANTY Never add relays starters timers transformers etc in side an electr...

Страница 52: ...roviding shutdown protection for a Quantum panel the panel may not see the loss of the 3 phase voltage on the motor because the UPS may prevent the motor starter contactor from dropping out With the starter contactor still energized the compres sor auxiliary will continue to feed an okay signal to the Quantum LX panel This may allow the motor to be subjected to the fault condition on the 3 phase b...

Страница 53: ...RXF ROTARY SCREW COMPRESSOR UNITS FORMS 070 410 IOM JAN 12 Page 53 ROTARY SCREW COMPRESSOR OPERATING LOG SHEET FORMS ...

Страница 54: ...iring __ Confirm no high voltage wiring enters the micro panel at any point __ Check current transformer for correct sizing and instal lation __ Check all point to point wiring between the micro and motor starter __ Confirm all interconnections between micro motor starter and the system are made and are correct __ Ensure all electrical panels are free from installation debris METAL PARTICLES and m...

Страница 55: ...e_______________ Voltage Range____________ Phase______________ Hz______________ Current_____________ Output Voltage_________ Phase_________ Hz _ _______ Max FLA _ ________Max LRA ______ Min Load FLA_____ Job FLA_ _____ Logic Board Serial ___________________ U33 Prog Ver _________ Date____________P N ________________________ U34 Prog Ver _________ Date____________P N ________________________ U45 Pr...

Страница 56: ...w _______ Force Unload _____ PSIG _____ PSIG Override Discharge Pressure ________ Warning _____ PSIG _____ PSIG Port Value ________ Warning Delay _____ Sec _____ Sec Pressure Input __________________ Shutdown _____ PSIG _____ PSIG Fixed Pressure Setpoint __________________ Shutdown Delay _____ Sec _____ Sec Maximum Discharge Pressure _______________ PSIG Highest Cap To Permit Start _______________...

Страница 57: ... Temp Alarm______ Delay_ ______ Shutdown_______ Delay_________ High Temp Alarm______ Delay_ ______ Shutdown_______ Delay_________ PHD Monitoring Setpoints Condenser Control Compressor Bearing _ ____________ Condenser Control Setpoint ______________ Suction End Delay Discharge End Delay Digital Controls Step Order High Warning_ ______ gF_ _____ Sec High Warning______ gF_ _____ Sec Module A ________...

Страница 58: ..._________ ____________ Integral Gain ____________ ____________ ____________ ____________ Communications Compressor ID_______ Comm 1 Comm 2 Comm 3 Baud Rate_ _________ Baud Rate ___________ Baud Rate_ ___________ Data Bits __________ Data Bits_ ____________ Data Bits_ ____________ Stop Bits __________ Stop Bits ____________ Stop Bits_ ____________ Parity _____________ Parity _______________ Parity_...

Страница 59: ...Coupling _ ____________________ Motor Manufacturer RAM_ ____________________________ Motor Serial Number _ ________________________________ RPM _________ Frame Size ____________ H P ___________ Refrigerant Ambient Room Temperature _ ____________ F Operating Conditions VIBRATION DATA SHEET SUCTION DISCHARGE OIL SEPARATOR Slide Valve Position Press Press Press Temp F V I Ratio Temp F Temp F Temp F F...

Страница 60: ... Troubleshooting 28 Air leak 28 29 alignment 29 cavitation 28 Cavitation 29 discharge port 28 Discharge Port 29 Discharge pressure 29 end clearance 29 Filter 29 foot valve 28 gate valve 28 Gate valve 29 head 28 misalignment 28 29 Motor 29 motor speed 29 pressure gauge 28 Pressure Gauge 29 Pump 29 Pump 28 Relief valve 29 sheave size 29 Strainer 29 Suction 28 Suction line 28 suction pipe 29 suction ...

Страница 61: ...e Transducers 32 Conversion Data 32 Replacement 33 Testing 32 P I Diagram 41 refrigerant vapor 23 25 Safety Equipment 22 service valves 23 sole noid valves 23 spin on oil filter element 23 starting torque 24 strainer ele ments 25 strainer service valves 24 suction check valve bypass 23 25 suction service valve 25 suction strainer 22 suction valve bypass 24 superheat 22 Troubleshooting See Index Tr...

Страница 62: ... safety valve 8 vapor mixture 21 Thermosyphon Oil Cooling 16 Thermosyphon oil cooling 8 drain valve 8 liquid refrigerant 8 thermo statical ly controlled mixing valve 8 Welding 8 threaded metallic 50 threaded PVC coated metallic 50 Troubleshooting 35 Excessive Noise And Vibration 35 High Oil Temperature 35 Low Oil Temperature 35 Oil Temperature Fluctuates 35 Rapid Oil Loss 35 Slide Valve 36 U unint...

Страница 63: ...RXF ROTARY SCREW COMPRESSOR UNITS NOTES 070 410 IOM JAN 12 Page 63 ...

Страница 64: ...ge 64 Johnson Controls 100 CV Avenue Waynesboro PA 17268 1206 USA Phone 717 762 2121 FAX 717 762 8624 www johnsoncontrols com frick Form 070 410 IOM 2012 01 Supersedes 070 410 IOM 2011 07 Subject to change without notice Published in USA 0312 PDF 2012 Johnson Controls Inc ALL RIGHTS RESERVED ...

Отзывы: