02
Product assembly
1
3
2
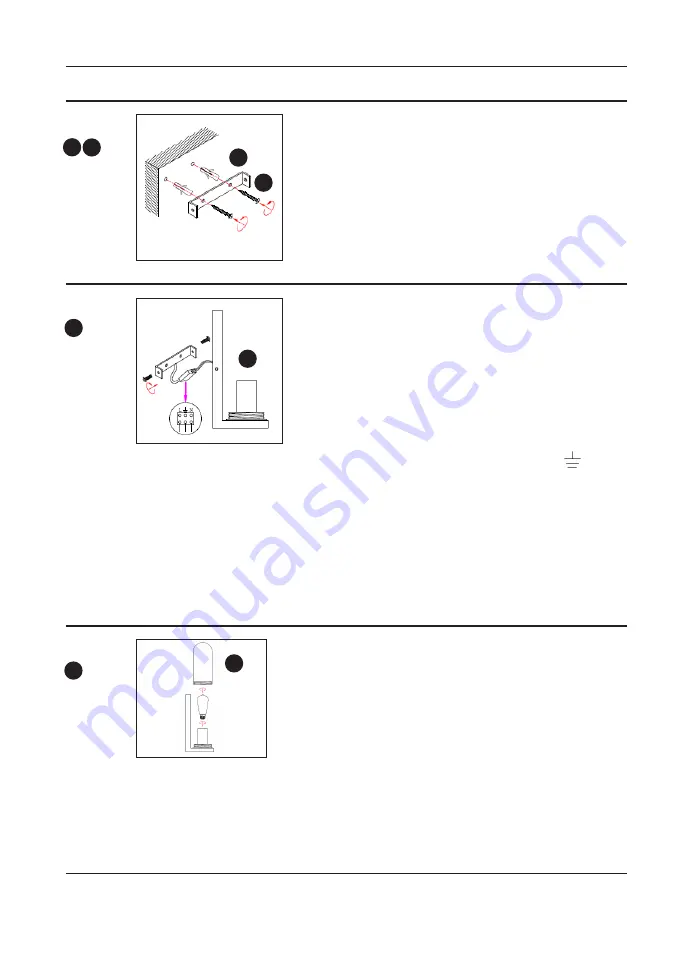
Lever open the terminal block box cover with a small
screwdriver, pierce a hole in the black rubber
seal
of the
terminal block
and make sure this creates a tight seal
then
feed supply cable through.
Make electrical connections as follows:
Fit the bulb, type and wattage as indicated on the fitting (bulb
not supplied). The wattage indicated must not be exceeded.
To fit the shade
(
D
)
: Offer the shade glass over the lamp
holder section, align the treads and carefully screw into place.
If cross-threading occurs, undo and start again. Take care not
to over-tighten as this may cause damage to the the glass or
the fitting.
Remove mounting bracket
(
A
)
from fitting by removing
there
re
taining screws and washers, retain for later. Using
the mounting bracket as a template, mark and then drill
the fixing holes in the wall (ensure the screws
(
B
)
are
firmly fixed into a solid or other suitable mounting and
not just the plasterboard.).
Take care not to damage
wiring.
Attach mounting bracket to the mounting surface
using suitable fixings. Do not attach fitting to mounting
bracket at this stage. Make sure no wires are trapped in
the process.
- Connect supply live to fitting live (marked “L”) on the
terminal block.
- Connect supply neutral to fitting neutral (marked
“N”) on
the terminal block.
- Connect the supply earth to the earth (marked “
”) on
the
terminal block.
NOTE: Ensure electrical connections are tight and no loose
strands of wire are left out of the connector block. Ensure
terminals and rubber
seal
are correctly seated then close
connector block housing. Excess cable must be carefully
located inside the wall plate or within the wall cavity itself.
Carefully offer fitting
(
C
)
over mounting bracket then
secure in place with the screws and washers removed
earlier.
B
B
D
D
A
A
C
C
Содержание HERRINGBONE IP44 WALL LIGHT
Страница 1: ...HERRINGBONE GLASS OUTDOOR IP44 WALL LIGHT USER GUIDE ...
Страница 5: ...04 ...
Страница 6: ...05 ...
Страница 7: ...06 ...


