background image

23

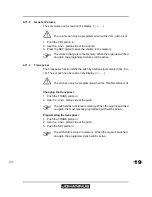
4.11.10 Demo Songs

The Demo Songs function plays twelve different demo songs.
1. Push the MENU piston in.
2. Use the - and + pistons to select the 

Demo Songs

3. Push the SET piston in. The title and composer of the first demo song 

appear on the display.

4. Use the - and + pistons to select one of the twelve demo songs.
5. Press the SET piston in to select a demo song.
6. Use the - and + pistons to choose whether to play the selected demo 

song (

play one

) or all demo songs (

play all

).

7. Press the SET piston in to start playing the selected demo song(s) and.
a. Press the right 0 piston in for several seconds to stop playing the demo 

song.

b. Press the - and + pistons before or during playing to adjust the volume.
8. After playing the demo song(s), press the MENU piston in. You return 

automatically to the main menu.

9. Press the MENU piston in again to exit the Easy Menu.

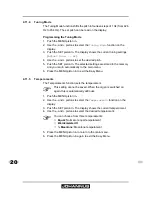
4.11.11 Standard Intonation

The Standard Intonation function saves the desired standard intonation in 
the memory.
1. Push the MENU piston in.
2. Use the - and + pistons to select the 

Std. Intonation

 function.

3. Push the SET piston in. The display shows the set intonation.
4. Use the - and + pistons to select an intonation (

Romantic

Symphonic


or 

Baroque

) that must  be activated when the organ is switched on. 

5. Push the SET piston in. The selected intonation is stored in the memory. 

After this, the 

Chorus ON/ OFF

 option appears on the display.

6. Use the - and + pistons to select if the Chorus (CH) accessory is 

switched on or off when the organ is switched on.

7. Push the SET piston in. The selected setting is stored in the memory and 

you return automatically to the main menu. 

8. Press the MENU piston in to exit the Easy Menu.

4.11.12 General Crescendo

With a General Crescendo different registrations can be activated in steps. 
These registrations start with very quiet (pianissimo) to very loud (tutti).

Activate the General Crescendo

Содержание SWEELINCK 17

Страница 1: ...USER MANUAL JOHANNUS SWEELINCK 17 27 AND 37 AGO...

Страница 2: ...us com Website www johannus com Version 1 0 Date February 2007 2007 Johannus Orgelbouw All rights reserved Nothing in this publication may be reproduced stored in a data file or made public in any for...

Страница 3: ...Sweelinck 37 AGO 11 3 6 Connecting and switching on the accessories 12 3 7 External connections 12 3 8 External loudspeaker output optional 13 4 OPERATION 14 4 1 Expression pedals 14 4 2 Acoustics 14...

Страница 4: ...pedal 27 5 3 Warranty 27 6 MIDI IMPLEMENTATIONS 28 6 1 MIDI Implementation Chart 28 6 2 MIDI specifications 29 6 2 1 Default basic channels transmitted recognized 29 6 2 2 Basic channel changes trans...

Страница 5: ...area Do not expose the organ to liquids Follow the instructions and precautionary measures in this user manual Keep this user manual with the organ The organ may only be opened by a technician authori...

Страница 6: ...the music desk E in the groove on the top of the organ 6 Place the organ bench over the pedalboard 7 Make sure the voltage of the organ matches the voltage of the mains See the serial plate F 8 Connec...

Страница 7: ...e pedalboard from the organ Relative humidity within the storage area 10 to 90 2 4 Opening and closing the rolltop cover The organ can be closed with a wooden rolltop cover that has a lock The rolltop...

Страница 8: ...SCRIPTION OF THE ORGAN 3 1 Overview of the main components i A Rolltop cover E General Crescendo B Rolltop cover lock F Expression pedals C Music desk G Pedalboard D Toe studs H Organ bench A B C H G...

Страница 9: ...M 8 1 8 1 A Couplers and tremulants P CANCEL piston B MIDI stops Q MENU C Main group intonations R General Crescendo D Pedal stops S and pistons E Swell stops T Chorus F Preprogrammed memory U Fixed A...

Страница 10: ...I C K BAR SYM ROM L M N A Pedal stops Q On off B Couplers R CANCEL piston C Main group intonations S MENU D Swell stops T General Crescendo E Great stops U and pistons F Preprogrammed memory V Chorus...

Страница 11: ...erview of the toe studs Sweelinck 37 AGO i 8 7 6 5 1 2 3 4 TUTTI CH PED SW PED GT PED A B C A Generals 8 x B Reversible couplers 3 x C Tutti 1 x 8 7 6 5 1 2 3 4 SW GT CH GT SW CH TUTTI CH PED SW PED G...

Страница 12: ...nnecting a sequencer or PC with the optional Johannus Intonat program for example AUX IN This is a stereo input for playing the sound of an external device through the amplifiers of the organ For exam...

Страница 13: ...External loudspeaker output optional The external loudspeaker output 8 is situated at the rear of the organ The loudspeaker connector board provides the possibility to connect external loudspeaker box...

Страница 14: ...D echo standard echo for clearer and more transparent sound Turn the right hand rotary control for the length of a 2D echo Pull out the switch on the rotary control for a 3D echo extra addition to the...

Страница 15: ...ctivates the stops associated with the pedalboard Great Activates the stops associated with the Great Swell Activates the stops associated with the Swell Choir Activates the stops associated with the...

Страница 16: ...n is active the couplers and tremulants can only be switched on and off manually Reeds Off RO This is a function to switch off all reeds simultaneously As long as this piston is pressed no reeds can b...

Страница 17: ...ammed memory location piston PP T 6 Release the SET piston 4 11 Easy Menu The Easy Menu is an operating system whose settings can be read on the display The Easy Menu is operated with the and pistons...

Страница 18: ...is a capture memory option for the entire organ General and for each separate division Divisionals You can call up 256 capture memory locations per division Programming a capture memory location 1 Se...

Страница 19: ...s to set the pitch Programming the transposer 1 Push the TRANS piston in 2 Use the and pistons to set the pitch 3 Push the SET piston in The volume can only be programmed when the VOL piston is lit Th...

Страница 20: ...rn automatically to the main menu 6 Press the MENU piston in to exit the Easy Menu 4 11 5 Temperaments The Temperaments function sets the temperament 1 Push the MENU piston in 2 Use the and pistons to...

Страница 21: ...in menu 9 Press the MENU piston again to exit the Easy Menu 4 11 7 Display Mode 1 Press the MENU piston 2 Use the and pistons to select the Display Mode function on the display 3 Press the SET piston...

Страница 22: ...Data Dump Mode function sends settings from the organ to a storage medium for example a sequencer through the MIDI SEQ output See 3 7 1 Push the MENU piston in 2 Use the and pistons to select the Data...

Страница 23: ...xit the Easy Menu 4 11 11 Standard Intonation The Standard Intonation function saves the desired standard intonation in the memory 1 Push the MENU piston in 2 Use the and pistons to select the Std Int...

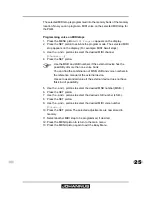
Страница 24: ...CR piston to switch off the General Crescendo function 4 11 13 Programming MIDI stops MIDI is a protocol for communication between the organ and other devices such as PC Sound Module Other musical in...

Страница 25: ...umber MSB 6 Press the SET piston 7 Use the and pistons to select the desired LSB number LSB 8 Press the SET piston 9 Use the and pistons to select the desired MIDI voice number Voice 10 Press the SET...

Страница 26: ...onent Maintenance Frequency Cabinet Cleaning See 5 1 1 As required Manuals Cleaning and removing scratches See 5 1 2 As required Do not use furniture polish or teak oil to clean the organ cabinet Dire...

Страница 27: ...alboard 4 Set the organ upright 5 Make sure the pedalboard works properly 6 Contact your dealer if the pedalboard does not work properly 5 3 Warranty The conditions are specified in the warranty certi...

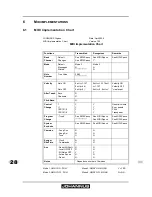
Страница 28: ...7 9nH v 0 8nH v Velocity ON Velocity OFF irrelevant After Touch Keys Channels N N Pitch Bend N Control Change 7 11 100 101 6 100 101 6 Y Y Y Y Y Y Y Y General volume Expr pedals Pitch Transposer Progr...

Страница 29: ...Stops 6 2 2 Basic channel changes transmitted Can be programmed with the MIDI program 6 2 3 Control changes transmitted i Controller 7 07h General volume with volume values 40 28h 127 7Fh Controller...

Страница 30: ...t it is transmitted All stops off The all stops off sys ex code is 7F This sys ex code is transmitted through the MIDI SEQ output when the 0 piston is pressed for a long time When an all stops off sys...

Страница 31: ...ceded by the sys ex code 3F is transmitted through the MIDI SEQ output This is to distiguish between a normal organ stop and a MIDI stop before transmitting a module When a stop is switched on and off...

Страница 32: ...32...

Страница 33: ...ve 15 FF 9 Fix Accessories 16 G General Crescendo 16 activate 23 change 24 General Volume 19 I Intonations 14 M Main components 8 Manual Bass 16 MB 16 Memory lock 16 MF 9 MIDI programming 24 P Placeme...

Отзывы: