background image

CLIZIA D 24 AS

12

EN

cod. 3541C810  -  Rev. 00 - 09/2012

EN

1. GENERAL WARNINGS

Carefully read and follow the instructions contained in this instruction booklet.

After boiler installation, inform the user regarding its operation and give him this manual, which is
an integral and essential part of the product and must be kept with care for future reference.

Installation and maintenance must be carried out by professionally qualified personnel, in compli-
ance with the current regulations and according to the manufacturer's instructions. Do not carry
out any operation on the sealed control parts.

Incorrect installation or inadequate maintenance can result in damage or injury. The Manufacturer
declines any liability for damage due to errors in installation and use, or failure to follow the in-
structions.

Before carrying out any cleaning or maintenance operation, disconnect the unit from the electrical
power supply using the switch and/or the special cut-off devices.

In case of a fault and/or poor operation, deactivate the unit and do not try to repair it or directly
intervene. Contact professionally qualified personnel. Any repair/replacement of the products
must only be carried out by qualified personnel using original replacement parts. Failure to comply
with the above could affect the safety of the unit.

This unit must only be used for its intended purpose. Any other use is deemed improper and there-
fore hazardous.

The packing materials are potentially hazardous and must not be left within the reach of children.

The unit must not be used by people (including children) with limited physical, sensory or mental
abilities or without experience and knowledge of it, unless instructed or supervised in its use by
someone responsible for their safety.

The unit and its accessories must be appropriately disposed of, in compliance with the current reg-
ulations.

The images given in this manual are a simplified representation of the product. In this represen-
tation there may be slight and insignificant differences with respect to the product supplied.

2. OPERATING INSTRUCTIONS
2.1 Introduction
CLIZIA D 24 AS

 is a high-efficiency heat generator for heating and domestic hot water

production, running on natural gas, equipped with an open-flue burner with electronic ig-
nition, sealed chamber with forced ventilation, and microprocessor control system, de-
signed for installation indoors or outdoors in a partially protected place (in compliance
with EN 297/A6) for temperatures to -5°C.

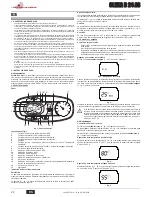
2.2 Control panel
Panel

fig. 1 - Control panel

Key of panel fig. 1
1

DHW temperature setting decrease button

2

DHW temperature setting increase button

3

Heating system temperature setting decrease button

4

Heating system temperature setting increase button

5

Display

6

"Sliding Temperature" Menu - Summer/Winter mode selection - Reset button

7

Unit On/Off - Economy/Comfort mode selection button

8

DHW symbol

9

DHW mode

10

Summer mode

11

Multifunction

12

Eco (Economy) mode

13

Heating

14

Heating symbol

15

Burner lit and actual power level (flashing during combustion fault function)

16

Service Tool connection

17

Water gauge

Indication during operation
Heating

A heating demand (generated by the Room Thermostat or Remote Timer Control) is in-
dicated by flashing of the hot air above the radiator on the display.
The display (detail 11 - fig. 1) shows the actual heating delivery temperature and, during
heating standby time, the message 

“d2”

.

Domestic hot water (DHW)

A DHW demand (generated by drawing domestic hot water) is indicated by flashing of
the hot water under the tap on the display.
The display (detail 11 - fig. 1) shows the actual DHW outlet temperature and, during
DHW standby time, the message 

“d1“

.

Comfort

A Comfort demand (reinstatement of temperature inside the boiler) is indicated by flash-
ing of the water under the tap on the display. The display (detail 11 - fig. 1) shows the
actual temperature of the water in the boiler.

Fault

In case of a fault (see cap. 4.4) the display shows the fault code (detail 11 - fig. 1) and,
during safety standby times, the messages 

"d3"

 and 

"d4"

.

2.3 Lighting and turning off
Connection to the power supply

During the first 5 seconds the display will also show the card software release.

Open the gas cock ahead of the boiler.

The boiler is now ready to function automatically whenever domestic hot water is
drawn or in case of a heating demand (generated by Room Thermostat or Remote
Temperature Control).

Turning the boiler off and on

Press the 

on/off

 button (detail 7 - fig. 1) for 5 seconds.

fig. 2 - Turning the boiler off

When the boiler is turned off, the PCB is still powered. Domestic hot water and heating
are disabled. The antifreeze system remains activated. To relight the boiler, press the

on/off

 button (detail 7 - fig. 1) again for 5 seconds.

fig. 3

The boiler will be immediately ready to work whenever domestic hot water is drawn or in
case of a heating demand (generated by the Room Thermostat or the Remote Timer
control).

B

The antifreeze system does not work when the power and/or gas to the unit are
turned off. To avoid damage caused by freezing during long idle periods in win-
ter, it is advisable to drain all water from the boiler, DHW circuit and system; or
drain just the DHW circuit and add a suitable antifreeze to the heating system,
complying with that prescribed insec. 3.3.

2.4 Adjustments
Summer/Winter Switchover

Press the 

summer/winter

 button (detail 6 - fig. 1) for 2 seconds.

The display activates the Summer symbol (detail 10 - fig. 1): the boiler will only deliver
domestic hot water. The antifreeze system remains activated.
To deactivate the Summer mode, press the 

summer/winter

 button (detail 6 - fig. 1)

again for 2 seconds.

Heating temperature adjustment

Use the heating buttons (details 3 and 4 - fig. 1) to vary the temperature from a min. of
30°C to a max. of 80°C; in any case, it is advisable not to operate the boiler below 45°C. 

fig. 4

Domestic hot water (DHW) temperature adjustment

Use the DHW buttons (details 1 and 2 - fig. 1) to adjust the temperature from a min. of
40°C to a max. of 55°C.

fig. 5

0

1

4

2

3

reset

eco

comfort

9

15

13

12

11

8

1

3

6

7

10

2

16

4

14

5

17

I I I I

II

II

I

I I I I

II

II

I

Содержание Clizia 24 AS

Страница 1: ...D E F A B C 85 115 91 109 195 266 A B C D F E 58 5 178 126 76 54 51 80 5 80 330 700 400 30 30 24 5 24 5 24 5 F A B C D E 117 93 mm 114 mm 770 mm 791 mm IT ISTRUZIONE PER L USO L INSTALLAZIONE E LA MAN...

Страница 2: ...Economy Comfort on off apparecchio 8 Simbolo acqua calda sanitaria 9 Indicazione funzionamento sanitario 10 Indicazione modalit Estate 11 Indicazione multi funzione 12 Indicazione modalit Eco Economy...

Страница 3: ...LI E SECONDO LE REGOLE DELLA BUONA TECNICA 3 2 Luogo d installazione Il circuito di combustione dell apparecchio stagno rispetto l ambiente di installazione e quindi l apparecchio pu essere installato...

Страница 4: ...schema elettrico alla fig 24 fig 8 Accesso alla morsettiera 3 6 Condotti fumi Avvertenze L apparecchio di tipo C a camera stagna e tiraggio forzato l ingresso aria e l uscita fumi devono essere colle...

Страница 5: ...eti opposte C6X Aspirazione e scarico con tubi certificati separatamente EN 1856 1 B2X Aspirazione dal locale di installazione e scarico a parete o tetto IMPORTANTE IL LOCALE DEVE ESSERE DOTATO DI VEN...

Страница 6: ...vola gas La scheda si porta sull impostazione q02 visualizzando con una pressione dei ta sti sanitario il valore attualmente salvato Se la pressione letta sul Manometro diversa dalla pressione massima...

Страница 7: ...remendo per 3 secondi il tasto Eco comfort sar possibile cancellare tutte le anomalie memorizzate nel Men History automaticamente la scheda uscir dal Men Service in modo da confermare l operazione L u...

Страница 8: ...cata accensione del bru ciatore Mancanza di gas Controllare che l afflusso di gas alla caldaia sia regolare e che sia stata eli minata l aria dalle tubazioni Anomalia elettrodo di rivelazione accensio...

Страница 9: ...14 Valvola di sicurezza 74 Rubinetto di riempimento impianto 16 Ventilatore 81 Elettrodo d accensione e rilevazione 19 Camera combustione 95 Valvola deviatrice 22 Bruciatore 114 Pressostato acqua 27...

Страница 10: ...m3 h 2 73 Portata gas min G20 m3 h 0 88 Ugelli bruciatore G31 n x 11 x 0 79 Pressione gas alimentazione G31 mbar 37 Pressione gas max al bruciatore G31 mbar 35 0 Pressione gas min al bruciatore G31 mb...

Страница 11: ...a elettrico fig 24 Circuito elettrico A Attenzione Prima di collegare il termostato ambiente o il cronocomando re moto togliere il ponticello sulla morsettiera 81 1kW L N 230V 50 Hz 16 N L 32 L N T T...

Страница 12: ...de 13 Heating 14 Heating symbol 15 Burner lit and actual power level flashing during combustion fault function 16 Service Tool connection 17 Water gauge Indication during operation Heating A heating d...

Страница 13: ...AND THE RULES OF PROPER WORKMANSHIP 3 2 Place of installation The combustion circuit is sealed with respect to the place of installation therefore the unit can be installed in any room However the pla...

Страница 14: ...the various connections is also given in the wiring diagram in fig 24 fig 8 Accessing the terminal block 3 6 Fume ducts Important The unit is a C type with sealed chamber and forced draught the air i...

Страница 15: ...6X Intake and exhaust with separately certified pipes EN 1856 1 B2X Intake from installation room and wall or roof exhaust IMPORTANT THE ROOM MUST BE PROVIDED WITH APPROPRIATE VENTILATION CLIZIA D 24...

Страница 16: ...om the nominal maximum pressure pro ceed by increases decreases of 1 or 2 units of parameter q02 by pressing the DHW buttons the value is stored after each modification wait 10 seconds for the pressur...

Страница 17: ...l automatically exit the Service Menu in order to confirm the operation Press the Reset button for 20 seconds to exit the card Service Menu or exiting occurs automatically after 15 minutes b05 Relay c...

Страница 18: ...de fault Fault Possible cause Cure A01 No burner ignition No gas Check the regular gas flow to the boiler and that the air has been elimi nated from the pipes Ignition detection electrode fault Check...

Страница 19: ...not supplied 14 Safety valve 74 System filling cock 16 Fan 81 Ignition and detection electrode 19 Combustion chamber 95 Diverter valve 22 Burner 114 Water pressure switch 27 Copper exchanger for heati...

Страница 20: ...ax gas delivery G20 m3 h 2 73 Min gas delivery G20 m3 h 0 88 Burner nozzles G31 no x 11 x 0 79 Gas supply pressure G31 mbar 37 Max gas pressure at burner G31 mbar 35 0 Min gas pressure at burner G31 m...

Страница 21: ...ring diagram fig 24 Electrical circuit A Important Before connecting the room thermostat or the remote timer con trol remove the jumper on the terminal block 81 1kW L N 230V 50 Hz 16 N L 32 L N T T 27...

Страница 22: ...mbolo de calefacci n 15 Indicaci n de quemador encendido y potencia actual parpadeante durante la funci n de anomal a de combusti n 16 Conexi n para Service Tool 17 Higr metro Indicaci n durante el f...

Страница 23: ...stalaci n por lo cual el aparato puede instalarse en cualquier habitaci n No obstante el local de instalaci n debe ser lo suficientemente aireado para evitar situaciones de peligro si hubiera una p r...

Страница 24: ...l ctrica 3 6 Conductos de humos Advertencias El equipo es de tipo C con c mara estanca y tiro forzado la entrada de aire y la salida de humos deben conectarse a sistemas como los que se indican m s ad...

Страница 25: ...con tubos certificados separados EN 1856 1 B2X Aspiraci n del ambiente de instalaci n y evacuaci n en pared o techo IMPORTANTE EL LOCAL DEBE ESTAR DOTADO DE VENTILACI N APROPIADA CLIZIA D 24 AS Longi...

Страница 26: ...o aumentar o disminuir el par metro q02 en pasos de 1 o 2 unidades mediante las teclas de ajuste del agua sanitaria Despu s de cada modificaci n el valor se guarda en la memoria esperar 10 segundos a...

Страница 27: ...tecla Eco Comfort durante 3 segundos se borran todas las anomal as me morizadas en el Men Historial la tarjeta sale del men Service para confirmar que se ha realizado la operaci n La salida del men Se...

Страница 28: ...n encendido Controlar que el electrodo est bien colocado y conectado y que no tenga incrustaciones V lvula del gas averiada Controlar la v lvula del gas y cam biarla si es necesario Cableado de la v...

Страница 29: ...de seguridad 74 Llave de llenado de la instalaci n 16 Ventilador 81 Electrodo de encendido y detecci n 19 C mara de combusti n 95 V lvula desviadora 22 Quemador 114 Presostato del agua 27 Intercambia...

Страница 30: ...or con G20 mbar 1 5 Caudal m ximo gas G20 m3 h 2 73 Caudal m nimo de gas G20 m3 h 0 88 Inyectores quemador G31 n x 11 x 0 79 Presi n de alimentaci n gas G31 mbar 37 Presi n gas m x en el quemador con...

Страница 31: ...trico fig 24 Circuito el ctrico A Atenci n Antes de conectar el termostato de ambiente o el reloj programa dor a distancia quitar el puente de la regleta de conexiones 81 1kW L N 230V 50 Hz 16 N L 32...

Страница 32: ...1 1 2 3 4 5 6 7 8 9 10 11 12 Eco 13 14 15 16 17 11 1 d2 11 1 d1 Comfort 11 1 cap 4 4 11 1 d3 d4 2 3 5 7 1 5 2 7 1 5 3 B sez 3 3 2 4 6 1 2 10 1 6 1 2 3 4 1 30 C 80 C 45 C 4 40 C 55 C 1 2 1 5 0 1 4 2 3...

Страница 33: ...1 3 1 5 6 1 CU 1 1 1 10 0 3 1 OF 1 1 6 5 6 1 6 A 1 1 17 1 1 0 F37 1 7 7 3 3 1 3 2 2009 142 EN 297 pr A6 5 C A 3 3 B B 25 Fr 1 F 10 CaCO3 3 4 ECO 7 1 7 1 20 30 40 50 60 70 80 90 85 20 10 0 10 20 1 2 3...

Страница 34: ...C Cny A B 9 2 3 4 1 2 3 4 5 6 72 139 138 3 4 A 1 1 2 2 4 3 3 5 6 B C1X C3X 010006X0 08522870 10 010008X0 08522880 11 010007X0 12 08522890 13 60 100 80 125 5 10 90 1 0 5 45 0 5 0 25 0 2 O 43 0 3 O 43...

Страница 35: ...2 0 2 1KWMA06K 2 0 2 0 4 0 45 1KWMA01K 1 2 2 2 45 1KWMA65A 1 2 2 2 90 1KWMA02K 2 0 3 0 90 1KWMA82A 1 5 2 5 90 1KWMA70U 1 5 2 5 1KWMA16U 0 2 0 2 1KWMA55U 3 0 T 1KWMA05K 7 0 1KWMA85A 2 0 1KWMA86A 5 0 8...

Страница 36: ...2 10 3 1 q01 q01 1 2 10 Eco Comfort 2 TEST TEST cap 4 1 TEST sez 4 1 3 1 00 100 5 TEST sez 4 1 10 7 b 0 1 4 2 3 reset eco comfort I I I I I I I I I I I I I I I I I I I I I I I I I I I I I I I I I I I...

Страница 37: ...P05 31 85 C 80 C 80 C P06 0 100 100 100 P07 b02 1 0 0 0 1 2 5 3 10 4 20 b02 2 0 0 1 2 5 3 10 4 20 b02 3 0 4 C 2 C b02 4 0 4 C 2 C P08 b02 1 0 60 30 60 b02 2 0 60 60 b02 3 0 60 30 b02 4 0 60 30 P09 b02...

Страница 38: ...38 RU cod 3541C810 Rev 00 09 2012 4 2 cap 5 4 3 20 1 4 4 11 1 A RESET 6 1 1 RESET F 9 3 0 5 A01 A02 A03 F04 F05 A06 F07 A09 F10 1 F11 F14 2 A16 F20 A21 F20 10 F20 A23 A24 F34 180 F35 F37 F39 A41 F42 F...

Страница 39: ...3 5 38 7 39 8 42 9 44 10 56 11 72 14 74 16 81 19 95 22 114 27 138 28 139 29 187 32 194 36 241 37 278 44 32 114 36 14 19 27 28 56 29 5 16 81 95 278 42 38 37 10 8 7 9 11 194 39 74 187 22 56 27 14 74 32...

Страница 40: ...30 90 5 92 42 EEC NOx 3 150 NOx G20 x O 11 x 1 35 G20 20 0 G20 12 0 G20 1 5 G20 3 2 73 G20 3 0 88 G31 x O 11 x 0 79 G31 37 G31 35 0 G31 5 0 G31 2 00 G31 0 65 3 PMS 0 8 C 90 tmax 1 0 8 1 9 PMW 0 25 t...

Страница 41: ...CLIZIA D 24 AS 41 RU cod 3541C810 Rev 00 09 2012 5 5 24 A 81 1kW L N 230V 50 Hz 16 N L 32 L N T T 278 T 42 4 3 2 1 44 38 114 ABM01 LC32 3 2 1 95 72 139 138...

Страница 42: ...rmit Il costruttore dichiara che questo apparecchio conforme alle seguenti direttive CEE Direttiva Apparecchi a Gas 2009 142 Direttiva Rendimenti 92 42 Direttiva Bassa Tensione Direttiva Compatibilit...

Страница 43: ......
Страница 44: ...95 GRUGLIASCO TORINO ITALIA TEL 011 40221 CAS POSTALE 1393 10100 TORINO TELEX 220364 IOTERM I TELEGR TF78 42 42 JOANNES TORINO TELEFAX 011 780 40 59 BRUCIATORI DI GASOLIO GAS NAFTA CALDAIE MURALI A GA...

Отзывы: