background image

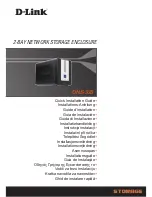
I N CLU D E D  HAR DWAR E

Continued on Next Page 

Page 2 • JL Audio, Inc., 2016

SB-POL-RZG2/10TW3  INSTR_SKU# 011446

Note:  For optimum performance, JL Audio recommends applying the included Foam Strips (or sound damping material) to surrounding plastic panels to reduce unwanted vibrations.

* Pre-installed on enclosure

BOM ID

Qty

SKU

Description

1

4

153729 1/4 - 20 x 1” Stainless Steel Serrated Flange Bolt

2

1

153678 Side Bracket

  3*

5

153728 1/4 - 20 x 1-1/2” Stainless Steel Low Profile Cap Screw

  4*

1

150867 Black Starboard Baffle

5

1

153730 3/8 - 16 x 1-1/4” Stainless Steel Serrated Flange Bolt

6

1

153731 3/8” Stainless Steel Serrated Spring Lock Washer

7

2

153732 3/8” Stainless Steel 1” Diameter Flat Washer

8

1

153677 Top Bracket

9

1

151140 3/8 - 16 U-Nut

10

2

153735 #8 x 1/2” Stainless Steel Pan Head Screw

11

1

153707 Glove Box Latch

12

1

153676 Bottom Bracket

13

1

153734 1/4” Stainless Steel 5/8” Diameter Flat Washer

14

1

153733 #12 x 3/4” Stainless Steel Phillips Pan Head Screw

-

1

150249 Foam Strips (not shown)

Содержание Stealthbox SB-POL-RZG2/10TW3

Страница 1: ...letely before beginning the process If you choose to perform the installation yourself it is absolutely vital that the Stealthbox be properly mounted to the vehicle according to these instructions Fai...

Страница 2: ...78 Side Bracket 3 5 153728 1 4 20 x 1 1 2 Stainless Steel Low Profile Cap Screw 4 1 150867 Black Starboard Baffle 5 1 153730 3 8 16 x 1 1 4 Stainless Steel Serrated Flange Bolt 6 1 153731 3 8 Stainles...

Страница 3: ...NNECTIONS Using quality power signal and speaker wire is essential in ensuring the performance of your Stealthbox JL Audio recommends using a 4 AWG power kit such as the XD PCS4 1B for your Stealthbox...

Страница 4: ...e the handle from the vehicle STEP 5 Remove the retainer clip and pin from the passenger handle STEP 4 Remove the indicated Torx bolt from under the front cover along with the one on the opposite side...

Страница 5: ...the dash panel STEP 13 Remove the indicated Torx bolt from the dash panel along with the one on the opposite side STEP 12 Pictured are the dash light and USB grommet removed from the dash panel STEP...

Страница 6: ...e enclosure and lift the Stealthbox into position as shown Thread a pair of 1 4 20 x 1 Serrated Flange Bolts through the holes in the Top Bracket into the threaded inserts in the top of the enclosure...

Страница 7: ...luded 8 x 1 2 Pan Head Screws STEP 29 Remove the two factory screws holding the glove compartment door latch to the glove compartment and remove the latch These factory screws will not be reused STEP...

Страница 8: ...proof pod can be mounted to a roll cage precisely aimed for optimum sound Mounting fixtures are available to fit a variety of roll cage diameters All specifications are subject to change without notic...

Отзывы: