


3. ADJUSTMENTS AND DRIVING
3. ADJUSTMENTS AND DRIVING
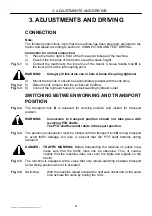
CONNECTION
Note:
The following instructions imply that the machine has been prepared, adjusted to the
tractor and tested according to section 2. CONNECTION AND TEST DRIVING.
Instruction for normal connection:
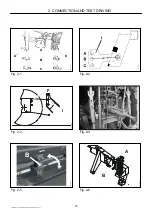
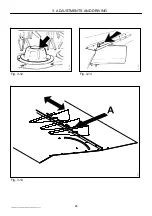
1) Place the tractor right in front of the three-point linkage of the machine.
2) Check if the link arms of the tractor are at the same height.
Fig. 3-1
3) Connect the machine to the link arms of the tractor. Choose middle hole B in
the lever arm I at the left coupling point.
WARNING:
Category III link arms can in hole A break the spring tightener
4) Mount the top link. It should be approximately parallel with the link arms.
Fig. 3-2
5) Raise the link arms so that the jack A can be lifted.
Fig. 3-3
6) Connect the hydraulic hoses to a double-acting hydraulic outlet.
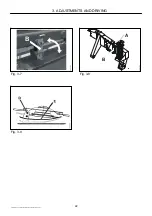
SWITCHING BETWEEN WORKING AND TRANSPORT
POSITION
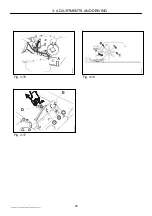
Fig. 3-4 The transport lock B is released for working position and locked for transport
position.
WARNING:
Conversion to transport position should not take place with
revolving PTO shafts.
The PTO shafts cannot rotate in transport position.
Fig. 3-4 The pendulum suspension must be locked with the transport lock B during transport
to avoid traffic damage, but also to prevent that the PTO shaft bottoms during
transport.
DANGER: TRAFFIC MARKING: Before transporting the machine on public road,
make sure that the traffic rules can be observed. This, of course,
implies that the machine does not cover the lights and signals on the
tractor.
Fig. 3-5 The machine is equipped with a valve that only allows switching between transport
and working position when it is actuated.
Fig. 3-6
Switching:
With the machine raised activate the hydraulic outlet and at the same
time actuate the valve by pulling the cord.
PIGB-093X-06 GX 2402/2802/3202 SM-GX 2402/2802 SC 0410
21
Содержание GX 3202 SM
Страница 24: ...3 ADJUSTMENTS AND DRIVING PIGB 093X 06 GX 2402 2802 3202 SM GX 2402 2802 SC 0410 24 PR12 0018 Fig 3 10 Fig 3 11...
Страница 26: ...3 ADJUSTMENTS AND DRIVING PIGB 093X 06 GX 2402 2802 3202 SM GX 2402 2802 SC 0410 26 Fig 3 12 Fig 3 13 Fig 3 14...
Страница 38: ...4 GREASING PIGB 093X 06 GX 2402 2802 3202 SM GX 2402 2802 SC 0410 38 Fig 4 5 Fig 4 6...
Страница 40: ...4 GREASING PIGB 093X 06 GX 2402 2802 3202 SM GX 2402 2802 SC 0410 40 PR11 0045 E Fig 4 7 Fig 4 8...
Страница 44: ...5 MAINTENANCE PIGB 093X 06 GX 2402 2802 3202 SM GX 2402 2802 SC 0410 44 Fig 5 2 PR12 0709 A B D C Fig 5 3...
Страница 50: ...5 MAINTENANCE PIGB 093X 06 GX 2402 2802 3202 SM GX 2402 2802 SC 0410 50 Fig 5 16 Fig 5 17 Fig 5 18...
Страница 54: ......


