


© 2018 Jetta Corporation. All rights reserved. REV 03/2018
1(800) 288-7771
INSTALLATION INSTRUCTIONS | JETTA CORPORATION
PAGE | 8
FREESTANDING INSTALLATION INSTRUCTIONS
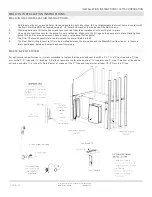
ROUGH-IN
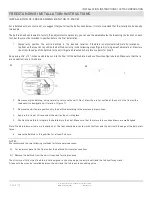
Test fit the tub and verify dimensions. Carefully level the unit, ensuring that uniform support is given to all the feet and that no portion
of the tub shell is bearing weight.
SITE PREPARATION:
o
The site should be cleared of debris and vacuumed. This will ensure that the bathtub is leveled properly.
o
Check if the floor is leveled and solid. The level should be in a range that can be compensated for by the use of adjustable feet.
An average sized bathtub can weigh as much as 1000 lbs when full, the floor must be able to support this weight.
o
An opening of 6” x 12” should be provided in the floor for the bathtub drain and overflow. Make sure there are no
obstructions in this space.
o
The plumbing rough-in for both the drain and the supply lines should be completed by a licensed plumber before the
bathtub is moved into its final position.
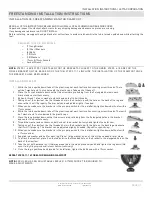
PROTECTIVE FOAM PACKAGING:
The adjustable feet are protected with foam packaging around each foot to ensure the quality of the bathtubs during
transportation. Remove foam protectors prior to installation.
PREPARATIONS
Before installing a new Jetta Cosmo bathtub, we strongly recommend following the installation check list and hiring a certified
plumber to handle the installation.
REQUIRED TOOLS
o
Levels
o
Goggles
o
Tape Measure
o
Caulking Gun
REQUIRED MATERIALS
o
Silicone bathroom caulking (mildew resistant)
o
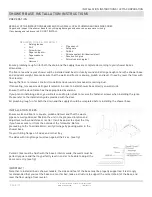
Visually inspect the bathtub to make sure it has not been damaged during transport. In case of damage, do not proceed with the
installation.
o
Make sure the bathtub is the model that you ordered, that its dimensions are correct, and that the location of the drain
corresponds to the plans.
o
To protect the bathtub during installation, cut a piece cardboard from the packaging and place it in the bottom of the bathtub.
o
If the bathtub is equipped with adjustable metal legs, they must first be installed by screwing them into the metal opening beneath
the bathtub.
Содержание RAIN SHOWER BASES
Страница 2: ......


