background image


Español - 10 -

9.6.- INTRODUCIR TEXTO: 
 

Operación 

Método 

Carácter birmano 

Mya, presione la tecla hasta que el carácter aparezca. 

Introducción de dígitos 

123,  Presione  las  diferentes  teclas  numéricas  para  introducir  los 
números deseados. 

Introducción de letras 

AbdabdABC, presione la tecla correspondiente hasta que aparezca 
la letra deseada. 

Seleccionar un método 
preferido de introducción 
de caracteres 

Setting > Phone Settings > Pref. Input method 

Introducción de símbolos 

Presione  la  tecla  [#]  y  seleccione  el  símbolo  deseado  utilizando  las 
flechas de dirección. 

Introducción de espacios 

A  parte  del  modo  de  introducción  de  números,  pulsando  la  tecla  [0] 
podrá introducir espacios. 

Borrar un carácter 

Pulse  la  tecla  [NAMES/CLR/BACK],  o  mantenga  la  tecla  pulsada 
hasta borrar los caracteres deseados. 

Mover el cursor 

Utilice las flechas de dirección. 

Cambiar el modo de 
introducción de caracteres 

Menu > Messaging > Write Message Options > Input Method. 

 
10.- MENU DE FUNCIONES: 
 

Función 

Descripción 

Selección 

Create message 
(Crear mensaje) 

Redactar  un  nuevo  mensaje  y 
enviarlo. 

Menu  >  Messaging  >  Write 
message 

Read message 
(Leer mensaje) 

Leer los mensajes de la bandeja 
de entrada, mensajes con fallo, 
borradores y bandeja de salida. 

Menu 

Messaging 

Inbox/Outbox/Drafts/Sent 
Messages 

Message settings 
(Ajuste de mensaje) 

Realizar  pequeños  ajustes  sobre 
los mensajes. 

Menu  >  Messaging  >  SMS 
Settings 

Recent Calls 
(Llamadas recientes) 

Visualizar  o  llamar  de  nuevo  a 
números 

de 

llamadas 

ya 

realizadas. 

Menu  >  Call  center  >  Missed 
calls/Dialed  calls/Received  calls 
> Options > View 

Call duration 
(Duración de la llamada) 

Comprueba las últimas llamadas 
recibidas, 

realizadas 

la 

duración de cada una de ellas. 

Menu  >  Call  center  >  Call 
history  >  Missed  calls/Dialed 
calls/Received  calls  >  Options  > 
View 

Browse contact 
(Buscar un contacto) 

Visualiza 

la 

agenda 

de 

contactos. 

Menu > Phonebook 

Add contact 
(Añadir contacto) 

Guarda  un  nuevo  contacto  en  la 
agenda. 

Menu  >  Phonebook  >  Options  > 
Select to SIM “X”/Phone 

Speed dial list 
(Lista de marcado rápido) 

Configura  y  visualiza  la  lista  de 
marcado rápido. 

Menu  >  Phonebook  >  Options  > 
Phonebook settings > Speed dial 

Call divert 
(Desvío de llamadas) 

Especificación  de  condiciones 
(bajo qué condiciones han de ser 
desviados los diferentes  tipos de 
llamada a otro número). 

Menu  >  Call  center  >  Call 
settings > SIM “X” call setting > 
Call divert 

Call waiting 

Poner  la  llamada  actual  en  Menu  >  Call  center  >  Call 

Содержание X-500

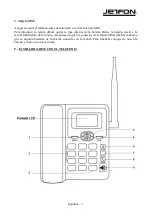
Страница 1: ...TELEFONO GSM DE SOBREMESA MANUAL DE INSTRUCCIONES J JE ET TF FO ON N X X 5 50 00 0...

Страница 2: ...CTERISTICAS 5 6 ESPECIFICACIONES TECNICAS 6 7 INSTALACION 6 8 FAMILIARIZARSE CON EL TELEFONO 7 9 FUNCIONAMIENTO 8 9 1 ENCENDER Y APAGAR EL TELEFONO 8 9 2 REALIZAR UNA LLAMADA 9 9 3 MENSAJES 9 9 4 CONT...

Страница 3: ...icos que no hayan sido objeto de una recogida selectiva son potencialmente peligrosos para el medio ambiente y la salud p blica debido a la posible presencia de sustancias peligrosas Este aparato es c...

Страница 4: ...encias electromagn ticas La utilizaci n de este tel fono puede provocar interferencias en aparatos m dicos como aud fonos y marcapasos u otros dispositivos m dicos de centros hospitalarios Consulte al...

Страница 5: ...edor Art culos suministrados Tel fono GSM de sobremesa Microauricular con cable Bater a I n L tio 3 7 V 800 mAh Alimentador AC DC Manual de instrucciones Nota Los art culos suministrados en el embalaj...

Страница 6: ...o Consumo en reposo 30 mA Consumo en funcionamiento 400 mA Sensibilidad 105 dB Temperatura de funcionamiento 30 C a 40 C Ruido ambiente 60 dB Antena integral 2 0 dBi m x Bater a I n L tio 3 7 V 800 mA...

Страница 7: ...quitar la tapa inferior de la bater a Retire la bater a deslice la tarjeta SIM dentro de la ranura Aseg rese de que los contactos de la tarjeta SIM est n hacia abajo y que la esquina biselada de la mi...

Страница 8: ...agenda telef nica puede utilizar las flechas arriba y abajo para seleccionar el n mero al que desea llamar para llamar al tel fono seleccionado vuelva a pulsar la tecla REDIAL 8 SEND Mientras hay una...

Страница 9: ...dores para ver los mensajes guardados como borrador Seleccione Sent messages Mensajes enviados para ver los mensajes enviados Seleccione SMS templates Plantillas de SMS para ver las plantillas disponi...

Страница 10: ...ge Read message Leer mensaje Leer los mensajes de la bandeja de entrada mensajes con fallo borradores y bandeja de salida Menu Messaging Inbox Outbox Drafts Sent Messages Message settings Ajuste de me...

Страница 11: ...a pantalla Ajuste del contraste de la pantalla LCD Menu Settings Phone settings Contrast Backlight Iluminaci n de la pantalla Ajuste del tiempo que la iluminaci n de la pantalla se mantendr encendida...

Страница 12: ...mada entrante Compruebe el ajuste del volumen del tono de llamada entrante y compruebe si la opci n mute est activada No se muestra nada en la pantalla al desconectar el tel fono del alimentador AC DC...

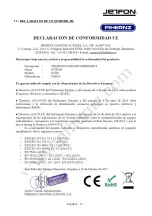
Страница 13: ...Espa ol 13 12 DECLARACION DE CONFORMIDAD...

Страница 14: ...rios no originales o incompatibles conexi n a una tensi n distinta a la especificada ni reclamaciones debidas a deterioro en el aspecto externo por el uso normal y reparaciones realizadas por personal...

Страница 15: ...DESKTOP GSM TELEPHONE USER S MANUAL J JE ET TF FO ON N X X 5 50 00 0...

Страница 16: ...D ARTICLES 5 5 CHARACTERISTICS 5 6 TECHNICAL SPECIFICATIONS 6 7 INSTALLATION 6 8 GETTING STARTED 7 9 OPERATION 8 9 1 POWER ON OFF 8 9 2 MAKE A CALL 8 9 3 MESSAGE 9 9 4 PHONE CODE 9 9 5 PIN CODE AND PU...

Страница 17: ...n or regional administration Electronic products that have not been disposed of in this way are potentially dangerous for the environment and public health due to the possible presence of dangerous su...

Страница 18: ...t a physician or the manufacturer of the medical device before using the phone Be aware of the usage limitation when using the phone at places such as oil warehouses or chemical factories where there...

Страница 19: ...on Supplied articles Desktop GSM telephone Handset with cord 3 7 V 800 mAh Li Ion battery AC DC adapter User s manual Note The articles supplied in the box may differ from the table above in relation...

Страница 20: ...put 110 240 VAC 50 60 Hz 250 mAh Output 5 VDC 1000 mA 7 INSTALLATION Icon Description Icon Description Signal strength New message Silent Unconditional divert Power indicator Alarm clock 1 Handset Con...

Страница 21: ...English 7 with the SIM card slot Install the battery again and install the bottom cover 8 GETTING STARTED...

Страница 22: ...if press this key then far would can t hear anything from your phone termination it would re back when press the mute press again 9 HANDS FREE Transfer the call to the speakerphone press this key and...

Страница 23: ...de could prevent your SIM card from illegal use When PIN code is enabled you should enter the PIN code when powering ON the phone again Change the default PIN code to your own as soon as possible PUK...

Страница 24: ...ther number Menu Call center Call settings SIM X call setting Call divert Call waiting Put the current call on hold to answer the other incoming call Menu Call center Call settings SIM X call settings...

Страница 25: ...below Problem Cause Possible solution When switching ON the phone it prompts enter PIN Input your PIN code which offered with SIM card together If you have changed the PIN code input the new PIN code...

Страница 26: ...English 12 12 DECLARATION OF CONFORMITY...

Страница 27: ...mpatible accessories connection to a different voltage than specified in the instruction manual or deterioration in external appearance by normal use and repairs that is performed at other Official Te...

Отзывы: