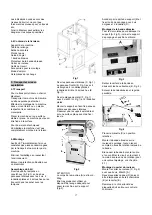
background image


Fig 15 

Slightly loosen the four motor mount 
nuts (A, Fig. 15) just enough so the 
tracking bolts (B) can make an 
adjustment.   


8. Maintenance and inspection


General notes: 
Maintenance, cleaning and repair 
work may only be carried out after 
the machine is protected against 
accidental starting by pulling the 
mains plug. 

Check sanding belts regularly for 
faults. Replace a defective sanding 
belt immediately. 

Inspect the blade tracking regularly. 

Take away the belt tension if the 
machine is not in use for a longer 
period. 

Clean the machine regularly. 

Inspect the proper function of the dust 
extraction daily. 

Defective safety devices must be 
replaced immediately. 

All protective and safety devices must 
be re-attached immediately after 
completed cleaning, repair and 
maintenance work. 

Repair and maintenance work on the 
electrical system may only be carried 
out by a qualified electrician. 


9. Trouble shooting 


Motor doesn’t start 

*No electricity- 
check mains and fuse. 

*Defective switch, motor or cord- 
consult an electrician. 

*Overload has reacted- 
Wait and reset overload cut-off. 


Sanding belt slips 

*Sanding belt is stretched- 
install new sanding belt. 

*Too much applied pressure 
move work piece while sanding. 


Machine vibrates excessively 

*

Stand on uneven floor- 

adjust stand for even support. 

*motor mounts are loose- 
tighten motor mount bolts. 


Abrasive belt keeps tearing 

*

Belt is running the wrong direction- 

observe arrow on the sanding belt 


Sanded edge not square 

*Table not square to sanding platen- 
Adjust positive stop for 90

°


Sanding marks on the wood 

*

Work piece was held still- 

keep work piece moving. 

*Wrong grit sanding belt- 
use coarser grit for stock removal 
and fine grit for finish sanding. 

*Feed pressure too high- 
never force the wood. 


10. Available accessories 

Stock number 60-0505 

Abrasive strip cleaning stick 

Stock number 708118 

Mobile base up to 250kg 


Refer to the JET-Pricelist  
for various grit sanding belts. 


Содержание OES-80CSM

Страница 1: ...rating Instructions Translations D Gebrauchsanleitung F Mode d emploi Walter Meier Tool AG T mperlistrasse 5 CH 8117 F llanden Switzerland Phone 41 44 806 47 48 Fax 41 44 806 47 58 jetinfo eu walterme...

Страница 2: ...he regulations 2006 42 EC Machinery Directive 2004 108 EC EMC Directive Electro Magnetic Compatibility 2006 95 EC Low Voltage Directive 2002 95 EC RoHS Directive Reduction of Hazardous Substances desi...

Страница 3: ...clarations and agreements concerning warranties The warranty period is valid for eight hours of daily use If this is exceeded the warranty period shall be reduced in proportion to the excess use but t...

Страница 4: ...the work piece must be observed Do not remove chips and work piece parts until the machine is at a standstill Do not stand on the machine Connection and repair work on the electrical installation may...

Страница 5: ...care and adequate resources when lifting the unit up onto the stand B Through the door in the cabinet E attach main unit to stand with two hex cap bolts and two flat washers D Sanding belt installati...

Страница 6: ...tton on the main switch stops the machine After connecting to the power source turn on the power to the machine just enough to start the belt rotating and then turn off Do this several times and obser...

Страница 7: ...then turn off Do this several times and observe belt tracking Readjust if necessary 7 3 Tilting angle adjustment Disconnect the machine from the power source Pull handle A Fig 12 forward to release t...

Страница 8: ...t by a qualified electrician 9 Trouble shooting Motor doesn t start No electricity check mains and fuse Defective switch motor or cord consult an electrician Overload has reacted Wait and reset overlo...

Страница 9: ...eltend gemacht werden Weitergehende Anspr che sind ausgeschlossen Die vorliegende Garantie umfasst s mtliche Garantieverpflichtungen seitens des Verk ufers und ersetzt alle fr heren Erkl rungen und Ve...

Страница 10: ...ntration entsteht verwenden Sie stets eine geeignete Absauganlage Holzstaub ist explosiv und kann gesundheitssch digend sein Insbesondere tropische H lzer und harte H lzer wie Buche und Eiche sind als...

Страница 11: ...mplett montiert 5 2 Montage Wenn Sie beim Auspacken einen Transportschaden feststellen benachrichtigen Sie umgehend Ihren H ndler nehmen Sie das Ger t nicht in Betrieb Entsorgen Sie die Verpackung bit...

Страница 12: ...e nur Anschlussleitungen mit Kennzeichnung H07RN F Anschl sse und Reparaturen der elektrischen Ausr stung d rfen nur von einen Elektrofachkraft durchgef hrt werden Bei berlastung des Motors schaltet d...

Страница 13: ...10 Die Sterngriffschrauben B Fig 10 l sen und die Schleifbandabdeckung A entfernen Die Bandspannung mittels Hebel C l sen Das Schleifband vorsichtig entnehmen Neues Schleifband auflegen dabei auf ang...

Страница 14: ...regelm igen Abst nden die korrekte Einstellung der Bandf hrung Entspannen Sie das Schleifband bei l ngeren Arbeitspausen Reinigen Sie die Maschine in regelm igen Zeitabst nden Pr fen Sie t glich die a...

Страница 15: ...arantie dans les 12 mois suivant la date de la vente date de la facture Toute autre pr tention est exclue La pr sente garantie comprend toutes les obligations de garantie incombant au vendeur et rempl...

Страница 16: ...durs tels que le h tre et le ch ne sont class es comme tant canc rig nes Retirer les clous et autres corps trangers de la pi ce avant de d buter l usinage Ne jamais mettre la machine en service sans l...

Страница 17: ...dans le sachet avec les tampons Fig 1 Fixer les panneaux lat raux C Fig 1 au panneau frontal D Fig 1 avec 4 vis borgnes 8 rondelles plates 4 rondelles d arr t et 4 crous hex E Fig 1 Fixer la plaque de...

Страница 18: ...use Vitesse minimale de l aspiration 20 m s N utiliser que des tuyaux d aspiration de la qualit difficilement inflammable et int grer les tuyaux dans la mise la terre de la machine 5 5 Mise en exploit...

Страница 19: ...e D connecter la machine du r seau Tirer la bande la main dans le sens indiqu sur le carter de la bande La bande doit circuler au centre du rouleau Fig 11 Desserrer le contre crou A Fig 11 Maintenant...

Страница 20: ...diatement toutes pi ces endommag es ou us es R installer les dispositifs de protection imm diatement Tous travaux de branchement et de r paration sur l installation lectrique doivent tre ex cut s uniq...

Отзывы: