

11
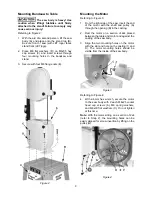
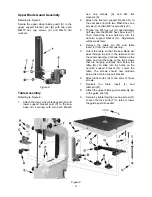
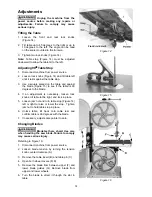
Upper Blade Guard Assembly
Referring to Figure 8:
Secure the
upper wheel blade guard
(A) to the
upper support bracket post
(B) with two each
M6x10
hex cap screws
(C) and M6x16
flat
washer
s.
Figure 8
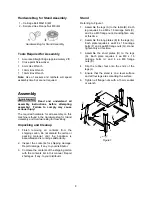
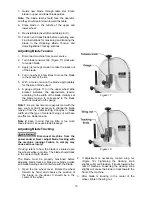
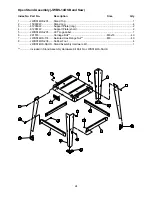
Table Assembly
Referring to Figure 9:
1. Attach the lower wheel blade guard (D) and
lower support bracket post (C) to the saw
base (E), securing with two each M6x20
hex cap screws (A) and M6 flat
washers (B).
2. Attach the trunnion support bracket (G) to
the saw base (E) with two M8x30 hex cap
screws (J) and two M8 lock washers (K).
3. Thread the M8 hex nut (U) approximately
half way onto the M8x80 hex cap screw (T).
Then thread the screw half way into the
trunnion support bracket (G). Adjustment
will be made later.
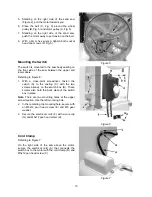
4. Remove the table pin (M) and table
insert (L) from the center opening.
5. Orient the table so that the saw blade will
pass through the slot in the table and into
the center opening. Continue holding up the
table, and turn the table so the two screws
that are hanging vertically from below the
table (N) can slide into the holes on the
trunnion support bracket (O). Lower the
table. The screws should now protrude
below the trunnion support bracket.
6. Attach lock knobs (H) to the ends of these
screws.
7. Reinsert the table insert (L) and
table pin (M).
8. Attach the upper blade guard assembly (Q)
to the guide post (S).
9. Secure by tightening the hex cap screw (R).
Loosen the lock knob (T) to raise or lower
the guide post as needed.
Figure 9
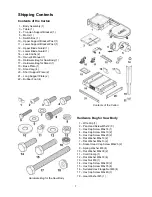
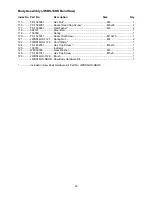
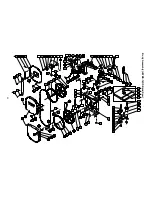
Содержание JWBS-140S
Страница 23: ...23 Body Assembly JWBS 14OS Band Saw...
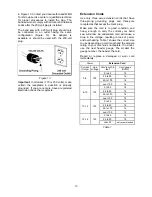
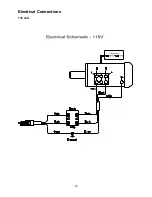
Страница 25: ...25 Electrical Connections 115 volt...
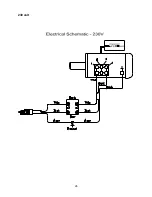
Страница 26: ...26 230 volt...
Страница 27: ...27 Notes...
Страница 28: ...28 WMH Tool Group 2420 Vantage Drive Elgin Illinois 60123 Phone 800 274 6848 www wmhtoolgroup com...


