background image


4.3 Noise emission 

Acoustic pressure level (according to EN ISO 11202):  
Idling 

71,9 dB (A) 

In operation 

84,1 dB (A) 

The specified values are emission levels and are not necessarily 
to be seen as safe operating levels. 
As workplace conditions vary, this information is intended to 
allow the user to make a better estimation of the hazards and 
risks involved only. 


4.4 Content of delivery 

Disc brake 
Dust collection port 57mm 
Abrasive disc, 60 grit 
Mitre gauge 
Operating manual 
Spare parts list. 


5.  Transport and start up 

5.1  Transport and installation 

The machine is designed to operate in closed rooms and must be 
placed stable on firm and levelled surface. 

For safety reasons, the machine must be bolted to the work 
bench or to a suitable stand . 

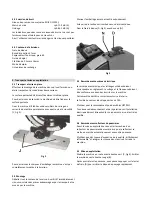
Attach a large C‐clamp to each side of the sander and 
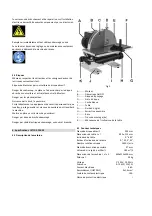
workbench, or permanently mount with 4 bolts M8 and nuts (J, 
Fig 2). 


Fig 2 

For packing reasons the machine is not completely assembled. 


5.2  Assembly 

If you notice transport damage while unpacking, notify your 
supplier immediately. Do not operate the machine! 

Dispose of the packing in an environmentally friendly manner. 

Clean all rust protected surfaces with a mild solvent. 

Attach the disc brake (D, Fig 3) with two hex socket screws (N). 


Fig 3 


5.3 Mains connection 

Mains connection and any extension cords used must comply 
with applicable regulations. 
The mains voltage must comply with the information on the 
machine licence plate.  

This machine must be properly grounded. 

The mains connection must have a 10 A surge‐proof fuse. 

Only use power cords marked H07RN‐F 

Connections and repairs to the electrical equipment may only be 
carried out by qualified electricians.  


5.4 Dust connection 

Before initial operation, the machine must be connected to a 
dust collector. 

The suction should switch on automatically when the belt sander 
is switched on. 

Flexible hoses must be of non‐flammable quality, and must be 
connected to the dust collector ground system. 


5.5 Starting operation 

You can start the machine with the green ON‐button (C, Fig 4). 
The red OFF‐button (B) on the main switch stops the machine. 

After you have turned “OFF” the sander you can press the brake 
lever (D) to stop the sanding disc rapidly. 

Содержание JDS-12X-M

Страница 1: ...JDS 12X M DISC SANDER GB Operating Instructions DE Bedienungsanleitung F Mode d emploi Tool France SARL 9 Rue des Pyr n es 91090 LISSES France www jettools com M JDS 12X M 2019 04...

Страница 2: ...htlinie Directive Machines 2014 30 EU electromagnetic compatibility elektromagnetische Vertr glichkeit compatibilit lectromagn tique designed in consideration of the standards und entsprechend folgend...

Страница 3: ...ing faults This warranty does not cover any defects which are caused either directly or indirectly by incorrect use carelessness damage due to accidents repairs or inadequate maintenance or cleaning a...

Страница 4: ...velled table surface or on the supplied cabinet stand Make sure that the power cord does not impede work and cause people to trip Keep the floor around the machine clean and free of scrap material oil...

Страница 5: ...nal protection gear such as safety goggles and dust mask Use a suitable dust exhaust system Defective sanding discs can cause injuries The use of incorrect mains supply or a damaged power cord can lea...

Страница 6: ...ify your supplier immediately Do not operate the machine Dispose of the packing in an environmentally friendly manner Clean all rust protected surfaces with a mild solvent Attach the disc brake D Fig...

Страница 7: ...n accordance with directional arrow Sand on downward side of disc only Sanding on the upward side could cause the workpiece to fly up kickback causing injury Never sand with the disc safety guard not...

Страница 8: ...afety guard Reattach the machine table and adjust the table gap Table gap adjustment To avoid jamming the workpiece or fingers between the table and sanding surface adjust the clearance between the sa...

Страница 9: ...ace is not square Table not square to sanding disc Use a square to adjust the table Sanding marks on wood Workpiece held still Keep workpiece moving Wrong grit sanding disc Feed pressure too high 10 E...

Страница 10: ...fehlern ist Diese Garantie trifft nicht auf jene Defekte zu welche auf direkten oder indirekten nicht fachgerechten Gebrauch Unachtsamkeit Unfallschaden Reparatur mangelhafte Wartung bzw Reinigung sow...

Страница 11: ...orgen Sie f r gute Beleuchtung Achten Sie darauf dass die Maschine standsicher auf fester und ebener Tischfl che steht Beachten Sie dass die elektrische Zuleitung nicht den Arbeitsablauf behindert und...

Страница 12: ...en Bediener geschleudert Gef hrdung durch wegfliegende Werkst cke Gef hrdung durch L rm und Staub Unbedingt pers nliche Schutzausr stungen wie Augen Geh r und Staubschutz tragen Eine geeignete Absauga...

Страница 13: ...ie Verpackung bitte umweltgerecht Entfernen Sie das Rostschutzfett mit einem milden L sungsmittel Montieren Sie die Tellerbremse D Fig 3 mit zwei Senkkopfschrauben N Fig 3 5 3 Elektrischer Anschluss D...

Страница 14: ...tz Beim Schleifen auf der aufsteigenden Seite kann das Werkst ck erfasst und dem Bediener entgegengeschleudert werden Es besteht hohe Verletzungsgefahr Im Spalt zwischen Schleiftisch und Tischlippe k...

Страница 15: ...nd ein 7 3 Tischabstand Einstellung Im Spalt zwischen Schleiftisch und Tischlippe k nnen sich Werkst cke verklemmen Beachten Sie dass der Abstand 1 5mm nicht bersteigt Fig 10 Fig 11 Fig 10 Zur Einstel...

Страница 16: ...ntrollieren Schleifbild ist schlecht Werkst ck wurde nicht bewegt Werkst ck bewegen Falsche Schleifteller K rnung grobe K rnung zum Schruppen feine K rnung zum Schlichten Anpressdruck zu hoch Bearbeit...

Страница 17: ...n Cette garantie ne couvre pas les d fauts qui sont caus s directement ou indirectement par l utilisation incorrecte la n gligence les dommages accidentels la r paration la maintenance ou le nettoyage...

Страница 18: ...ire tr bucher l op rateur Conserver le sol autour de la machine propre sans d chets huile ou graisse Pr ter grande attention votre travail et rester concentr Ne pas travailler sous l influence de drog...

Страница 19: ...ussi re pour travailler la machine Mettre en place un collecteur de poussi res Danger par disque abrasif endommag Danger par c ble lectrique endommag us ou mal branch 4 Sp cifications JET JDS 12X M 4...

Страница 20: ...des pi ces endommag es par le transport et ne montre pas la machine Eliminer l emballage en respectant l environnement Enlever la protection antirouille avec un dissolvant doux Fixer le frein disque...

Страница 21: ...le bas Ne jamais travailler sans le cache disque Pour viter de coincer la pi ce ou les doigts entre la table et la surface de pon age laissez un espace maximal de 1 5 mm entre le disque de pon age et...

Страница 22: ...r un jeu maximal de 1 5 mm Fig 10 et Fig 11 Fig 10 Si un r glage est n cessaire desserrez les quatre vis 1 4 Fig 11 et mettez la table en place Utilisez par exemple une cl Allen de 1 5 mm M Fig 11 com...

Страница 23: ...ngle de pon age 90 mal r gl Ajuster la butt e R sultat de pon age insuffisant Pi ce usiner est rest e immobile Bouger la pi ce en travaillant Grain de bande non adapt Grain gros pour rifler grain fin...

Страница 24: ...JDS 12X M Parts Explosion...

Страница 25: ...e cap 1 21 JDS12 021 Screw M10 8 1 22 JDS12 022 Spring 1 23 JDS12 023 Pointer 1 24 JDS12 024 Screw M5 10 1 25 TS 1503061 Screw M6 25 2 26 TS 1550041 Washer 6 2 27 TS 1551041 Spring washer 6 2 28 JDS12...

Страница 26: ...56 Dust port 1 57 JDS12 057 Plastic shield 1 58 JDS12 058 Disc body 1 59 JDS12 059 Washer 1 60 TS 1514021 Screw M6 16 5 61 JDS12 061 Sand tray 1 62 JDS12 062 Screw M5 10 1 63 JDS12 063 Bolt M6 16 4 64...

Отзывы: