


8
Installation
8.1
Unpacking the machine
Do not handle the packed
machine using slings.
To install the machine, first remove the packing,
paying particular attention not to cut any electric
wires or hydraulic hoses. Lift using straps (Figure
3).
Figure 3
8.2
Anchoring and handling the
machine
The base of the machine must be anchored to the
floor by two lag bolts or studs properly anchored
into concrete.
Electrical Connections
All electrical connections
must be done by a qualified
electrician. All adjustments or repairs must be
done with the machine disconnected from the
power source, unplugged. Failure to comply
may result in serious injury!
The
J-FK350-2
is rated at
220V
.
The
J-FK350-4
is rated at
440V
.
These machines not supplied with a plug. Use a
plug and outlet rated at least 20amps. The circuit
for the machine should also be protected by at
least a 20 amp circuit breaker or fuse.
Make sure that the blade turns in the correct
direction.
If it does not, simply reverse two of the
phase wires on the supply input.
The cold saw is now ready for use.
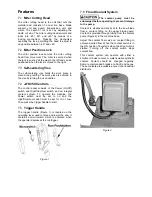
Controls
10.1
Control Panel
The
Control Panel
(Figure 4) is located on the front
of the cabinet stand and consists of the
Power
and
High/Stop/Low
switches, described below.
Power Switch
– The
Power
switch has two
positions,
Off
and
On.
High/Stop/Low Switch
– This switch controls the
blade speed. To operate the saw, the power switch
must set to on,
High
or
Low
must be selected, and
the
Run Trigger
pressed.
Figure 4
10.2
Trigger Handle
To operate, the
Power
switch must be set to ON, a
Hi
or
Low
speed selection made, and the trigger
handle pressed.
Figure 5
Содержание J-FK350-4
Страница 1: ...Operating Instructions and Parts Manual Ferrous Manual Cold Saws Models J FK350 2 J FK350 4...
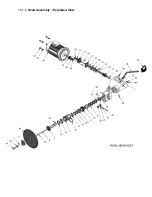
Страница 15: ...15 1 2 Head Assembly Exploded View...
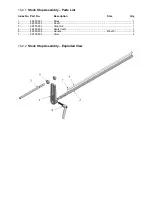
Страница 21: ...15 5 2 Manual Vise Assembly Exploded View...
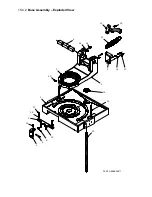
Страница 23: ...15 6 2 Guard Assembly Exploded View...
Страница 26: ...Wiring Diagram...


