background image

 5

5.0

  Setup and assembly 


Read and understand all 

assembly instructions before attempting 
assembly. Failure to comply may cause serious 
injury.


5.1

  Shipping contents 

Refer to Figures 1 and 2. 

1   Box and pan brake (not shown) 

Support legs – A  

Curved handle – B  

Straight handles – C  

Stop rod – D  

Counterweight assemblies – E 

Stop rod pin – F  

Stop collar – G 

Hex key, 6mm – H 

Hex cap bolts, M12x40 – HP1 

Hex cap bolts, M10x40 – HP2 

Flat washer, M16 – HP3 

Flat washers, M12 – HP4 

Flat washers, M10 – HP5 

Lock washers, M12 – HP6 

Lock washers, M10 – HP7 

Hex nuts, M12 – HP8 

Hex nut, M16 – HP9 

Cotter pin – HP10 


Figure 1 


Figure 2 

5.2

  Tools required for assembly 

6mm hex key (provided) 
pliers 

5.3

  Unpacking and cleanup 

1.  Remove all contents from shipping crate and 

compare to the contents list in this manual. If 
shipping damage or any part shortages are 
identified, contact your distributor. Do not 
discard packing material until brake is 
assembled and operating satisfactorily. 

2.  Carefully clean all rust protected surfaces with 

a mild solvent or kerosene and a soft rag. Do 
not use lacquer thinner, paint thinner, or 
gasoline – these will damage painted surfaces. 

3.  Coat all machined surfaces with a light coat of 

oil to inhibit rust. 

5.4

  Assembly 

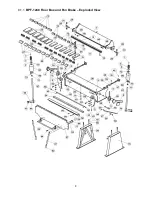
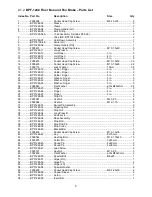
Refer to exploded view if additional clarification is 
needed for assembly. 

1.  Remove bolts holding support legs and brake to 

pallet. 

2.  Locate brake in a dry, well-lighted area with a 

sturdy, level floor. Machine location must allow 
room for loading and offloading stock, and 
access on all sides for maintenance. 

3.  Use hoist or forklift to carefully lift brake onto 

support legs. Secure with M12 bolts, washers 
and nuts (HP1/HP4/HP6/HP8). 


Do not allow anyone 

beneath brake while moving it into position 
and until it is secured on support legs.


4.  Verify that brake is level; use shims if 

necessary. Secure support legs to floor with 
appropriate fasteners, such as lag bolts (not 
provided). 

5.  Install counterweight assemblies to left and 

right hinges with M12 bolts, lock washers and 
flat washers (HP1/HP4/HP6). See Figure 3. 


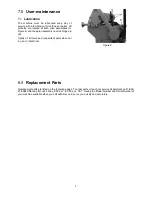
Figure 3 

Содержание BPF-1248

Страница 1: ... Instructions and Parts Manual 12 x 48 in Box and Pan Brake Model BPF 1248 JET 427 New Sanford Road LaVergne Tennessee 37086 Part No M 754110 Ph 800 274 6848 Edition 1 10 2015 www jettools com Copyright 2015 JET ...

Страница 2: ...hemicals work in a well ventilated area and work with approved safety equipment such as face or dust masks that are specifically designed to filter out microscopic particles 10 Do not operate this machine while tired or under the influence of drugs alcohol or any medication 11 Remove adjusting keys and wrenches Form a habit of checking to see that keys and adjusting wrenches are removed from the m...

Страница 3: ...t in serious or possibly even fatal injury SAVE THESE INSTRUCTIONS 2 0 About this manual This manual is provided by JET covering the safe operation and maintenance procedures for a JET Model BPF 1248 Box and Pan Brake This manual contains instructions on installation safety precautions general operating procedures maintenance instructions and parts breakdown Your machine has been designed and cons...

Страница 4: ...ecifications Model number BPF 1248 Stock number 754110 Capacity mild steel 12 gauge 2 5mm Bending length capacity 48 in 1220mm Maximum box depth 4 in 100mm Maximum lift of beam 1 1 2 in 38mm Beam adjustment front to rear 7 8 in 22mm Recommended minimum flange in capacity material 1 in 25 4mm Number of fingers and width 5 3 in 2 4 in 5 5 in Finger nose angle 45 Finger nose radius 1 32 in 0 79mm Ove...

Страница 5: ... assembled and operating satisfactorily 2 Carefully clean all rust protected surfaces with a mild solvent or kerosene and a soft rag Do not use lacquer thinner paint thinner or gasoline these will damage painted surfaces 3 Coat all machined surfaces with a light coat of oil to inhibit rust 5 4 Assembly Refer to exploded view if additional clarification is needed for assembly 1 Remove bolts holding...

Страница 6: ...the rear Turn knobs M to adjust fingers for parallel Figure 7 The truss nuts N Figure 7 can be used to help achieve alignment in apron and hold down assemblies by eliminating any bowing at the center of these assembles Finger alignment can be achieved by loosening cap screws on the fingers and raising apron to 90 degree position Push fingers forward against apron bar for proper alignment Retighten...

Страница 7: ...ear the hinge pin B Lightly oil all machined unpainted parts when not in use to inhibit rust Figure 8 8 0 Replacement Parts Replacement parts are listed on the following pages To order parts or reach our service department call 1 800 274 6848 Monday through Friday 8 00 a m to 5 00 p m CST Having the Model Number and Serial Number of your machine available when you call will allow us to serve you q...

Страница 8: ...8 8 1 1 BPF 1248 Floor Box and Pan Brake Exploded View ...

Страница 9: ...her Finger 5 in 5 24 F002643 Flat Washer ø10xØ20x2mm 38 25 BPF1248 25 Finger 3 in 5 26 BPF1248 26 Finger 4 in 2 27 BPF1248 27 Finger 5 in 5 28 BPF1248 28 Stop Pin 2 29 F003091 Hex Nut M20 2 5 4 30 F003084 Hex Nut M12 1 75 5 31 BPF1248 31 Swivel Pin Assembly 2 32 BPF1248 32 Adjusting Nut 2 33 BPF1248 33 Stop Nut 2 34 BPF1248 34 Long Press B 1 35 BPF1248 35 Knob Lock 2 36 BPF1248 36 Base Assembly 1 ...

Страница 10: ...F1248 69 Special Nut B 2 70 BPF1248 70 Support Leg 2 71 BPF1248 71 Hex Nut 2 72 BPF1248 72 Special Nut A 2 73 F005383 Socket Head Cap Screw M6 1 0x20 2 74 F010405 Socket Set Screw M6 1 0x20 4 75 BPF1248 75 Scale Pointer 1 F012226 Hex Key not shown 6mm 1 LM000079 ID Label BPF 1248 not shown 1 LM000133 Warning Label not shown 1 JET 165 JET Logo with adhesive not shown 165x68 mm 1 Some parts are show...

Страница 11: ...itional action needed JET has Authorized Service Centers located throughout the United States For the name of an Authorized Service Center in your area call 1 800 274 6846 or use the Service Center Locator on the JET website More Information JET is constantly adding new products For complete up to date product information check with your local distributor or visit the JET website How State Law App...

Страница 12: ...12 427 New Sanford Road LaVergne Tennessee 37086 Phone 800 274 6848 www jettools com ...

Отзывы: