
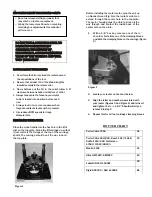


5. With the Mast-R-Lift II Crank Handle loosen the
tensioning cap screw sufficiently to force the
carriage to spread (Figure 5). This allows the
router to be installed easily.
Figure 4
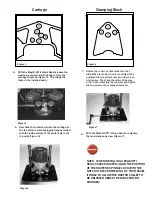
Carriage
Clamping Block
Figure 5
6. Now slide the router motor into the carriage so
the top of the motor housing just makes contact
with the inside surface of the center hole in the
top plate (Figure 6)
Figure 6
8. With the Mast-R-Lift™ II Crank handle, re-tighten
the tensioning cap screw. (Figure 7)
Figure 7
7.
Rotate the router so that when the final
installation is made all router controls will be
positioned for convenient access an there is no
interference. Then back the motor off approx.
1/16” from contacting the top plate and tighten
the cap screw on the carriage assembly.
Figure
3
NOTE: WHEN INSTALLING A FELISATTI
RFG2/1500VE ROUTER, ALIGN THE POSITION
OF THE ROUTERS SPINDLE LOCK WITH THE
NOTCH IN THE CENTRE RING OF YOUR EXCEL
II TABLE TO ALLOW THE ROUTER COLLET TO
BE ADJUSTED ABOVE THE TABLE FOR BIT
CHANGES!


