background image

IMPORTANT SAFETY PRECAUTIONS CONT’D 

ROUTER SAFETY PRECAUTIONS 

Never force the bit or overload the router beyond 
the expectations of the tool.

Be sure that at least 3/4 of the shank length is 
inserted securely in the router collet.

Never bottom out the bit in the collet. Allow 1/8”
clearance between shank and bottom of collet.

Always make sure the fence on your router 
table is locked into position before each

use.

Always rout in two or more passes when
large amounts of stock must be removed. 

Use reduced RPM speeds for large

diameter bits.

INSTALLING THE ROUTER 

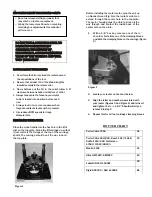
Place the crank handle into the hex hole in the lift’s 

dial on the top plate. Crank the lift carriage up so that 

it just contacts the O-rings at the top of the carriage 

shafts. The carriage should be all the way toward 
the top plate

Porter Cable 7518 

A1 

Porter Cable 690/890, Bosch 1617/1618, 

DeWalt 610/618, Craftsman 

17543/17540/28190 

F4 

Makita 1101 

C1 

Hitachi M12VC/KM12VC 

E2 

D3 

Rigid R29302

 / AEG 1400KE


B1 

Figure 1 

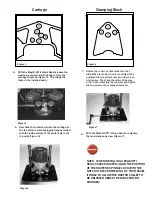
Figure 2 

ROUTER CHART

1.

With a 

1/8”

 hex key, remove one of the ¼”

shoulder bolts from one of the clamping blocks 

and slide the clamping block on the carriage (Figure 

2) 

Before installing the router motor, prop the unit up 

on blocks of wood (Fig. 1) so the router’s collet can 

extend through the center hole in the top plate. 

The motor housing must be able to slide all the 

way through and contact the inside back of the 

center hole on the plate. 

2. Locate your router on the chart below.

3. Align the letter and number associated with

your router (Figures 3 and Figure 4) and reinsert

and tighten the ¼- x 1-1/2” Shoulder Bolt you

removed in step 2.

4. Repeat this for all four carriage clamping blocks

•  Do not wear loose clothing or jewelry that

may catch on tools or equipment. 

• Unplug the tool or machine when mounting 

or making any adjustments to mechanical 
performance

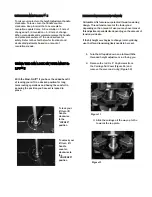
DO NOT USE A CORDLESS DRILL TO 

RAISE AND LOWER THE LIFT 
CARRIAGE. THE AMOUNT OF 
FRICTION WILL CAUSE PREMATURE 
WEAR OF THE THREADS AND WILL 
VOID WARRANTY 

Felisatti RF62/1500VE

Содержание mast-r-lift II

Страница 1: ...ustment Handle 10 1 4 28 x Leveling Set Screws 1 5 32 Hex Key Also includes 1 Insert Ring 1 Insert Ring Wrench 1 8 Hex Wrench 1 Start Pin 4 M6 x 30mm Mounting Screws Used for Mast R Top 03004A and 03005 4 20 X 1 Flat Head Cap Screw Used for Mast R Top Model 03004 61 Forest Plain Road Oro Medonte Ontario L3V 0R4 Canada 866 272 7492 Toll Free 705 726 8233 Local Phone 705 327 0295 Fax Email jessem je...

Страница 2: ...ita 1101 C1 Hitachi M12VC KM12VC E2 D3 Rigid R29302 AEG 1400KE B1 Figure 1 Figure 2 ROUTER CHART 1 With a 1 8 hex key remove one of the shoulder bolts from one of the clamping blocks and slide the clamping block on the carriage Figure 2 Before installing the router motor prop the unit up on blocks of wood Fig 1 so the router s collet can extend through the center hole in the top plate The motor ho...

Страница 3: ...h the Mast R Lift II Crank handle re tighten the tensioning cap screw Figure 7 Figure 7 7 Rotate the router so that when the final installation is made all router controls will be positioned for convenient access an there is no interference Then back the motor off approx 1 16 from contacting the top plate and tighten the cap screw on the carriage assembly Figure 3 NOTE WHEN INSTALLING A FELISATTI ...

Страница 4: ... bars Move the bars out slightly and check for fit Adjust again if necessary Figure 9 Figure 10 Figure 8 LEVELING THE LIFT IN THE TABLE TOP 1 With the Mast R Lift II in the table top opening install 10 set screws into the holes around the lift perimeter Adjust Figure 8 the four corners first to align the lift surface to the table surface so that both are flush Adjust the remaining set screws on th...

Страница 5: ...nd 1 4 revolution 1 2 mm of change When your adjustment is complete remove the handle and place somewhere off the work surface for safety Refer to the chart below for fractional and decimal adjustments based on amount of revolutions made With the Mast R Lift II you have the added benefit of locking your Lift in a desired position for long term routing operations and having the comfort in knowing t...

Страница 6: ...ot cover Repairs or alterations made or attempted by anyone other than JessEm Tool Company or an authorized JessEm service professional Normal wear and tear Abuse misuse or neglect Improper care or maintenance Continued use after partial failure Products that have been modified in any way Products used with improper accessories Prematurethreadwearduetoadjusting height with electric or cordless dri...

Отзывы: