


13
Jeremias INSTALL_HT
Rev: 3/26/19
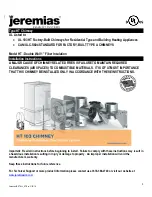
Spark Arrestor (SA)
The Spark Arrestor prevents floating embers from exiting the chimney while allowing flue gas to escape.
To Install (See Fig 27):
1.
Open pivoting top on Rain Cap
2.
Position the solid band of the Spark Arrestor down inside the flue. The wire mesh should be positioned upward.
3.
Close top on Rain Cap
Telescopic Roof Brace (TRB)
The Telescopic Roof Brace provides lateral support for the chimney that extended above the roof line. The TRB must be installed every 5 ft. of
vertical chimney above the roof surface.
No more than 5’ of
chimney may extend beyond the roof brace.
To Install (See Fig 28.)
1.
Attach Legs of the Roof Brace to the Band
2.
Position the Band around the chimney.
3.
Attach the mounting brackets to the Legs
4.
Position the mounting brackets on the roof such that the Legs form approximately a 60° angle
between the legs and the chimney
5.
Secure Mounting Brackets to the Roof surface.
6.
Tighten all hardware nuts & bolts.
Final Check
Before completing assembly, recheck all joints to ensure the locking band has been properly installed and has
captured the bead. Confirm all clearances and support spacing is correct. Remove any protective film or
packaging materials from chimney components.
Important Notice
The UL listing for this product is void if components other than the Listed Components are used. All warranties, stated or implied, are void if the vent
or appliance is installed in a non-conforming manner.
Operation & Maintenance
The method and materials burned in your appliance directly affects the formation of creosote & soot. Burn only seasoned firewood. Avoid burning
green or unseasoned wood. Follow the appliance manufacturers owner’s manual for instructions on how to opera
te the appliance, start and build a
fire.
When wood is burned slowly, it produces tar and other organic vapors, which combine with expelled moisture to form creosote. The creosote vapors
condense in the relatively cool chimney flue of a slow-burning fire. As a result, creosote residue accumulates on the flue lining. When ignited this
creosote makes an extremely hot fire. The chimney should be inspected once every 2 months during the heating season to determine if a creosote
or soot buildup has occurred. If creosote or soot has accumulated, it should be removed to reduce the risk of chimney fire.
Fig 27. Spark Arrestor
Fig 28. Telescopic Roof
Brace


