13
Te
chnical User
GB
FOR FREE ADVICE ON THE USE OF THIS PRODUCT, PLEASE CONTACT OUR SALES SUPPORT TEAM
Jenx Limited, Wardsend Road, Sheffield, S6 1RQ, Tel: +44 (0)114 285 3376 Fax: +44 (0)114 285 3528 [email protected] www.jenx.com
Do not use
this product if you suspect that the
Upper Back Pad
or
Headrest
are faulty or broken.
Contact Jenx Limited immediately for advice. +44 (0) 114 285 3376
NEVER LEAVE YOUR CHILD UNATTENDED WHILE USING THIS PRODUCT
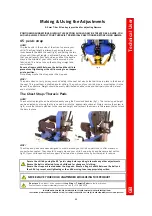
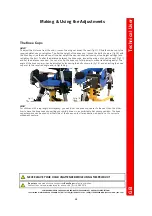
The headrest
HOW?
To angle the headrest up or down and to move it forwards and backwards, loosen the wing nut shown in
(
fig 12)
. Adjust as necessary and re-tighten.
The shape of the headrest can be altered by adjusting the 2 bars with the yellow ends; loosen the screw(s)
at the back of the pad, slide the bar(s) to the required position and re-tighten the screw(s).
If you need more height for the headrest, loosen the screw shown in (
fig 13)
, raise the headrest to the
desired height and re-tighten the screw. If required, the headrest assembly can be removed, rotated 180°
and replaced to give greater flexibility with forwards/backwards movement (see
fig 12 to 13B
for alternative
position). The screw shown in (
fig 13)
will need to be completely removed in order to do this. Once rotated
loosen the wing nut in (
fig 12)
and flip the headrest pad around so that it faces forward. It can also be
removed altogether if necessary.
Making & Using the Adjustments
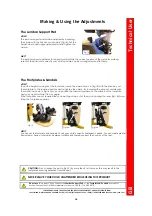
The Upper Back Pad
HOW?
The upper back pad can be adjusted by loosening the index
clamp
(fig 11)
with the Allen key. Set the height, depth and
angle as required and re-tighten the clamp.
WHY?
The upper back pad provides a firm support for your child’s
back. In conjunction with the lumbar support pad, you can
use it to manage the posture of your child and correct any
kyphosis or extension.
WHY?
The headrest should be positioned to stop the child's head from falling by giving it control from the side
and back. For children with good head control you may wish to remove the headrest altogether. If the
child’s head tends to turn to one side you may only need to use one half of the headrest and leave the
other side more open.
Fig 11
Fig 13
Fig 12
Secure the child by using the 45° pelvic strap before you begin to make any other adjustments.
Ensure the belt is adjusted for each child and for changes of clothing.
Ensure the straps are routed under the hip pads. Ensure a fingers width between the belt and the
child to prevent over tightening or the child moving to an inappropriate position.
Please note: do not loosen the index clamp by more than 2 full turns as this may cause the index
clamp to detach from the chair. After tightening the index clamp, move the adjustment to check
that the teeth have locked together securely. If not, tighten further.
Fig 13A
Fig 13B


