background image

VM9020TS

21

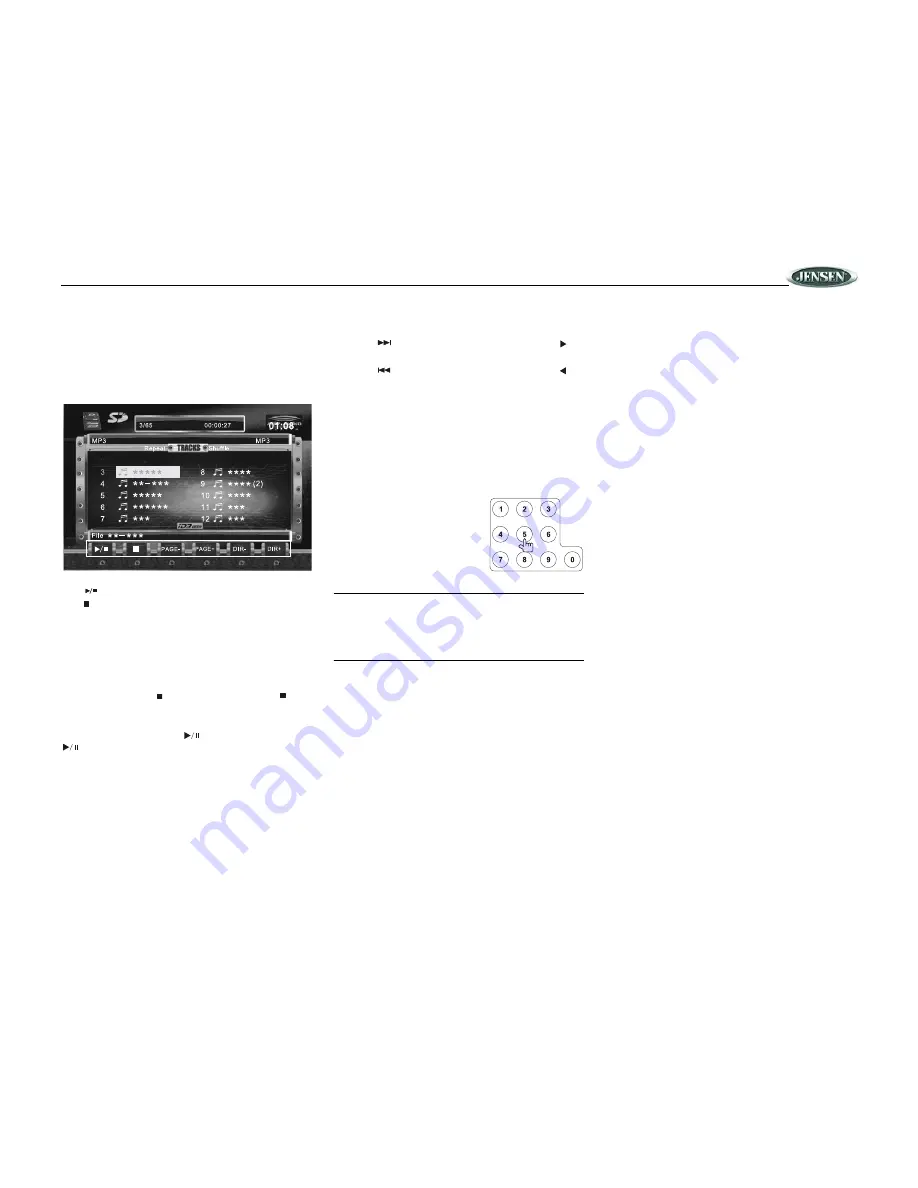
SD CARD READER OPERATION

Accessing SD Card Mode

To switch to SD card mode, press the 

SD

 button (19) on the 

front panel.

Using the Touch-Screen Controls

The touch keys for SD card playback are described below.

: Play/Pause playback

: Stop playback

PAGE -: View previous page

PAGE +: View next page

DIR -: View previous directory

DIR +: View next directory

Controlling Playback

Stopping Playback

Touch the stop button ( ) on the screen or press the 

/

BAND

 button (20) on the remote control to stop playback.

Pausing Playback

Touch the play/pause button (

) on the screen, press the 

 button on the remote control (18), or press the joystick 

button (5) on the front panel to suspend or resume playback.

Repeat Playback

Press the 

REPT

 button (7) on the remote control or touch 

“Repeat” on the screen to alter repeat mode according to the 
following: Repeat Single, Repeat Folder, Repeat Off

Random Playback

Press the 

RDM

 button (33) on the remote control or touch 

“Random” on the screen to activate random playback and 
play all tracks in random order. 

Moving Through Chapters

Press the 

 button (19) on the remote control or the   

button on the joystick (17) to advance to the next chapter. 

Press the 

 button (17) on the remote control or the   

button on the joystick (16) to move to the previous chapter.

Change Directory

Touch the ( [DIR+] / [DIR-] ) key on the screen to navigate 
through the Directories / Folders 

Previous/Next Page

Touch the ( [PAGE+] / [PAGE-] ) key on the screen to 
navigate through Pages / Files. 

Direct Chapter / Track Selection

During DVD, VCD and CD 
playback, you can use the numeric 
keypad on the remote control (29) 
to access a track directly.

NOTE: Media (SD Card / CD-R / DVD) with a ROOT 
directory containing only music, movie or JPEG files 
may cause the RANDOM / REPEAT function to work 
incorrectly. To ensure the proper playback of music, 
movie, and JPEG files, place all media files inside folders 
on the data storage media. 

Содержание Mobile Multimedia DVD/MP3/WMA Receiver VM9020TS

Страница 1: ...VM9020TS Operation Manual...

Страница 2: ...o Tuning 13 Manual Tuning 13 Using Preset Stations 13 Auto Store AS 13 Local Radio Station Seeking LOC 13 DVD Player Operation 14 Opening Closing the TFT Video Screen 14 Insert Eject Disc 14 Ejecting...

Страница 3: ...severest road conditions Tools and Supplies You will need these tools and supplies to install your VM9020TS Torx type flat head and Philips screwdrivers Wire cutters and strippers Tools to remove exis...

Страница 4: ...e new radio assembly to the dashboard or center console using the reverse procedure in step 1 CAUTION For proper operation of the CD player the chassis must be mounted within 30 of horizontal Make sur...

Страница 5: ...1 7 7 7 7 5 5 5 5 3853 3853 3853 3853 8 7 77 5 77 5 1 7 21 6 7 1 7 21 6 7 5 5 2 2 2 2 BROWN BROWN BROWN BROWN 52 1 52 1 7 5 86 7 5 86 PINK PINK GREEN WHITE GREEN WHITE 8 8 HDUER 6ZLWFK HDUER 6ZLWFK 5H...

Страница 6: ...step MENU Mode Press once to move the cursor to the left TV Mode Press to go down one frequency step 9 Joystick DVD Mode Press once to enter the next chapter or track TUNER Mode Press once to auto sea...

Страница 7: ...VM9020TS 5 CONTROLS AND INDICATORS 21 Disc Slot 22 Eject Button Press once to eject the disc Press and hold to reset the mechanism 23 Disc Indicator 24 SD Card Slot 25 Reset Button see page 4...

Страница 8: ...angle ANGLE 12 Continuously adjusts front panel tilt angle Continuously adjusts front panel tilt angle Continuously adjusts front panel tilt angle Continuously adjusts front panel tilt angle ANGLE 13...

Страница 9: ...6 7 8 9 0 Numeric Keypad 29 Directly accesses chapter 1 6 selects preset for current band Directly accesses track DVD SETUP 30 Access DVD Setup menu Access DVD Setup menu Access DVD Setup menu Access...

Страница 10: ...or rear zone SUBTITLE 9 Language selection for subtitle 14 Fast forwards the disc content Fast forwards the disc content 17 Selects the previous track chapter for playback Selects the previous track c...

Страница 11: ...NTRAST and TINT you must be in AUX or CAMERA mode NOTE The default adjustment is 0 in PAL mode Tint is unavailable for adjustment Parameter Adjustment Procedure 1 Enter Picture Quality Setting mode Pr...

Страница 12: ...stical characteristics of your vehicle which vary depending on the type of vehicle and its measurements To get the best possible sound quality from your new system be sure to adjust the settings for t...

Страница 13: ...cursor to the Hour or Min position 3 Press the or buttons 17 19 on the remote control or the or buttons 8 9 on the joystick to adjust the hour or minutes 4 Press the button 14 on the remote control t...

Страница 14: ...Zone To access the rear zone SOURCE MENU touch the top right corner of the screen near the Multi ZONE icon Select the source to be directed to the rear Multi ZONE RCA outputs NOTE Optical media and a...

Страница 15: ...ontrol or screen or the button on the joystick 8 to seek the next available radio station by decreasing the tuning frequency Press the button again to stop searching Manual Tuning Press the or buttons...

Страница 16: ...creen or press the BAND button 20 on the remote control to stop DVD play Pausing Playback Touch the play pause button on the screen or press the button on the remote control 18 to suspend or resume di...

Страница 17: ...able angles of the on screen image Zooming Press the ZOOM button 23 on the remote control to enlarge and pan through the video image using the following options Q1 Q2 Q3 and OFF Multi Language Discs D...

Страница 18: ...is the current playing source for the rear zone EQ FLAT The equalizer setting is FLAT Loud Level 1 The Loud option is set to Level 1 loudness General Disc Information Front DVD Rear AUXIN SURR II DSP...

Страница 19: ...th the selected option highlighted in light blue 2 Select a new value by pressing the or buttons 14 22 on the remote control or the or buttons 6 7 on the joystick 3 Confirm your selection by pressing...

Страница 20: ...ter playback for low volumes On CNTR CTRL 5ms Adjust the time difference between the center and front speakers to create a time delay between 1 and 5 millisec onds producing a more accurate audio effe...

Страница 21: ...sword field and enter a new one NOTE Record the password and keep it in a safe place for future reference The rating for each disc is marked on the disc disc packing or documentation If the rating is...

Страница 22: ...lected MP3 WMA Discs This player allows you to playback MP3 files recorded on CD ROM CD R and CD RW For CD RW discs please make sure it is formatted using the full method and not the quick method to p...

Страница 23: ...Repeat Folder Repeat Off Random Playback Press the RDM button 33 on the remote control or touch Random on the screen to activate random playback and play all tracks in random order Moving Through Cha...

Страница 24: ...r decrease the TV frequency one step Storing Stations AS Automatic Preset Memory To select the strong stations in the current TV frequency range press and hold the joystick button 5 to activate the Au...

Страница 25: ...t TFT MONITOR Monitor does not open automatically TFT Auto Open is turned off Turn TFT Auto Open on No image Incorrect connection to parking brake wire Check wiring and correct PRK SW is activated and...

Страница 26: ...ould this occur the screen will not operate properly until the moisture has evaporated 8 We suggest you use a cleaning disc in this unit more frequently than in the unit in your home due to the enviro...

Страница 27: ...le rates from 8 192kHz Electronic Skip Protection ESP 16Mbit high speed flash memory DVD 2 3 sec CD DA 10 sec MP3 100 sec WMA 200 sec ESP time is approximate Video Format NTSC PAL auto detection Outpu...

Страница 28: ...D TO THE REPAIR OR REPLACEMENT PROVIDED ABOVE AND IN NO EVENT SHALL THE COMPANY S LIABILITY EXCEED THE PURCHASE PRICE PAID BY PURCHASER FOR THE PRODUCT This Warranty is in lieu of all other express wa...

Отзывы: