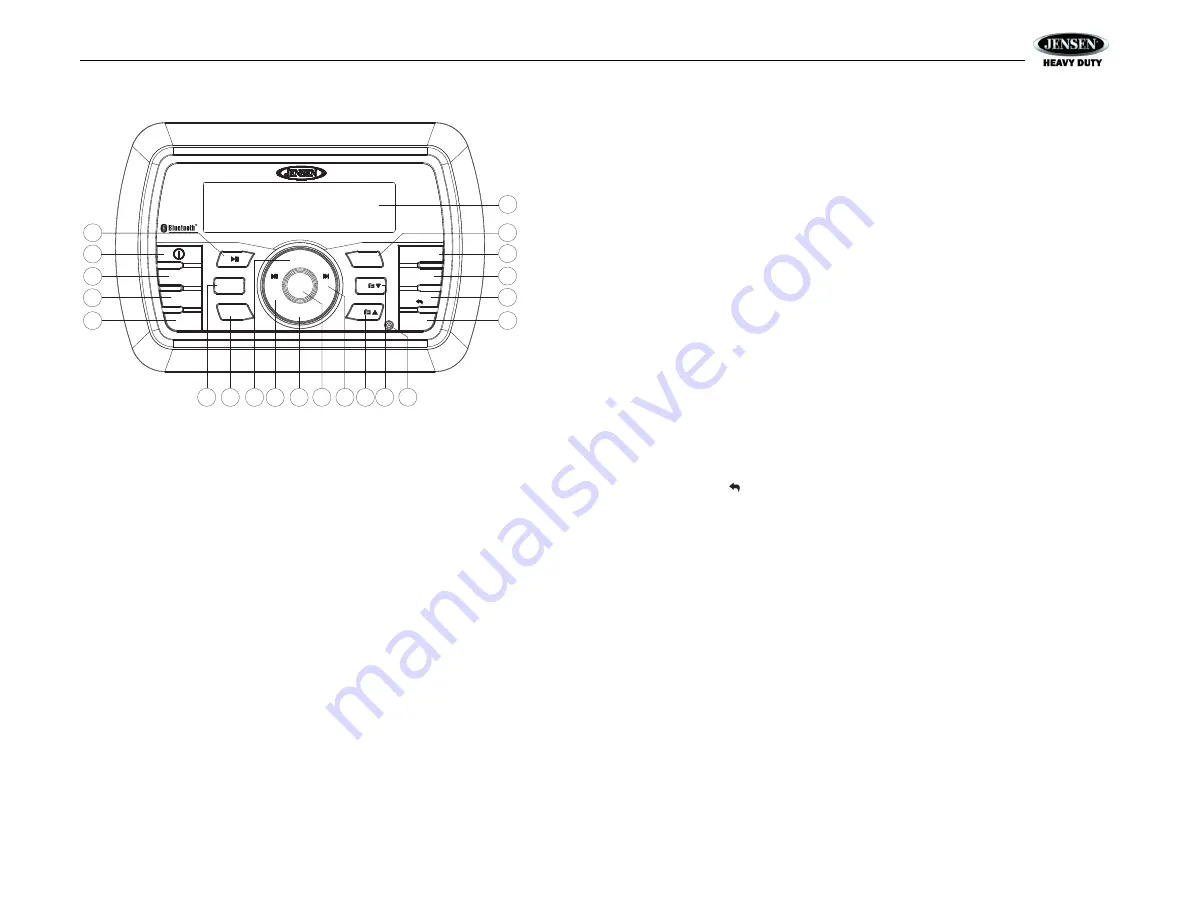
background image

JHD40BT

5

BASIC OPERATION

Power On/Off 

Press the power button (1) on the front panel to turn the unit on or off. 

Volume Control

To increase the volume, press the 

VOL +

 button (2a). To decrease the volume, press the 

VOL -

 button (2b).

Mute

Press the 

MUTE

 button (17) on the control panel to mute the audio output. Press 

MUTE

 again 

to restore the audio output to the previous level.

Mode

Press the 

MODE

 button (4) on the control panel to select a different mode of operation, as 

indicated on the display panel. Available modes include AM/FM Tuner, Weatherband, iPod, 
USB, AUX In (optional Auxiliary Input), BT Audio.

Reset

The reset button should be activated for the following reasons:

initial installation of the unit when all wiring is completed

function buttons do not operate

error symbol on the display

Use a ball point pen or similar object to press the 

RESET

 button (19). This may be necessary 

should the unit display an error code.
You can recover factory default settings using the RESET


function located on the system 

menu. With “RESET” flashing, press the 

INFO/ENTER

 button (18) to activate.

Audio Menu

Press the 

AUDIO/MENU

 button (3) on the control panel to access the audio menu. You can 

navigate through the audio menu items by pressing the 

AUDIO/MENU

 button repeatedly. Once 

the desired menu item appears on the display, adjust that option by pressing the 

VOL

 +/- 

buttons (2) within 5 seconds. The unit will automatically exit the audio menu after five seconds 
of inactivity. The following menu items can be adjusted.

Bass

Use the 

VOL

 buttons to adjust the bass level range from “-6” to “+6”.

Treble

Use the 

VOL

 buttons to adjust the treble level range from “-6” to “+6”.

Balance

Use the 

VOL

 buttons to adjust the balance between the left and right speakers from “L12” (full 

left) to “R12” (full right).

Fade

Use the 

VOL

 buttons to adjust the fader between the rear and front speakers from “R12” (full 

rear) to “F12” (full front).

System Menu

1.

Press and hold

 the 

AUDIO/MENU

 button (3) for more than 3 seconds to enter the system 

menu. 

2.

Press the 

VOL

 +/- buttons (2) repeatedly to navigate the system menu and select the 

desired item.

3.

Press the 

INFO/ENTER

 button (18) to adjust the selected menu item.

4.

Press the 

AS/PS


button (15) to return to the previous operation.

The following items can be adjusted:

Key Beep (On/Off): Turn the audible beep On/Off (heard when functions/buttons are 
selected). NOTE: Beep tone off will not affect Battery Alarm audible tone. 

LCD Backlight (1/10 - 10/10): Adjust LCD brightness. 

LCD Contrast (1/10 - 10/10): Set LCD contrast. 

Tuning Region (USA/Europe): Set frequency spacing for various regions. 

Weather Alert Configure: Press the 

INFO/ENTER 

button (18) to see weather alert 

options.

Weather Alert (On/Off): Determines if the weather band alert feature is activated.

Alert Volume (1/40-40/40): Set default volume for weather alert broadcasts.

Battery Alarm (On/Off): Monitor voltage on ACC line and send alert when voltage is low.

Battery Auto-Off (On/Off): Automatically turn off power to radio when battery voltage is 
low.

Bluetooth Device (Lock/Unlock, Disconnect/Connect, Delete): View, lock and delete from 
a list of previously paired mobile phone device models.

Bluetooth Pair (On/Off): Choose “YES” to automatically pair a device.

Bluetooth (On/Off): Choose “Bluetooth On” or “Bluetooth Off”. 

Volume Preset (1/40-40/40): Select an automatic turn-on volume. 

Reset to Defaults <ENTER>: Return the EEPROM to factory default set up values. Press 
the 

INFO/ENTER

 button (18) to select.

3

2a

4

7

11

6

12

8

5

15

9

10

17

1

13

18 14

2b

19

20

JHD40BT

MUTE

AS/PS

MODE

DISP

SCROLL

EQ

LOUD

VOL +

UP

DOWN

VOL -

SEEK

/TUNE

/TRK

SEEK

/TUNE

/TRK

1/

5/

6/

2/

RPT

4/

RDM

3/

INT

AUDIO

MENU

BAND

SEARCH

INFO

ENTER

16

Содержание HEAVY DUTY JPS40BT

Страница 1: ...BT Installation and Operation Manual HEAVY DUTY AUDIO SYSTEM JHD40BT MUTE AS PS MODE DISP SCROLL EQ LOUD VOL UP DOWN VOL SEEK TUNE TRK SEEK TUNE TRK 1 5 6 2 RPT 4 RDM 3 INT AUDIO MENU BAND SEARCH INFO ENTER ...

Страница 2: ......

Страница 3: ...Tuner Operation 7 Weather Band Operation 8 MP3 WMA Operation 9 Bluetooth Operation 10 Care and Maintenance 11 Troubleshooting 12 Specifications 13 Copyrights and Trademarks iPhone iPod iPod classic iPod nano iPod shuffle and iPod touch are trademarks of Apple Inc registered in the U S and other countries ...

Страница 4: ...nstalled and used in accordance with the instructions may cause harmful interference to radio communications However there is no guarantee that interference will not occur in a particular installation If this equipment does cause harmful interference to radio or television reception which can be determined by turning the equipment off and on the user is encouraged to try to correct the interferenc...

Страница 5: ...ts A2DP and AVRCP USB Playback of MP3 WMA Files Made for iPod iPhone USB Input Mute Pre set Equalizer 5 settings User Flat Pop Classical Rock Electronic Bass Treble Balance and Fader Controls Output Power 40W x 4 Wired Remote Control Ready Harley Factory Handle Controls 2 Channel Pre amp Line Level Outputs Auxiliary Audio Input Rear RCA Content List Jensen JHD40BT Radio Owner s Manual Installation...

Страница 6: ... and make certain all connections are secure to ensure proper operation 5 After completing the wiring connections turn the unit on to confirm operation vehicle accessory switch must be on If the unit does not operate recheck all wiring until the problem is corrected Once proper operation is achieved turn the accessory switch off and proceed with final mounting of the chassis 6 Carefully slide the ...

Страница 7: ...SWITCHED GREEN WHITE GRAY VIOLET GREEN BLACK WHITE BLACK GRAY BLACK VIOLET BLACK BLUE BLACK RED WIRE COLOR Do not connect to ground or 12VDC FEMALE MOTOROLA TYPE ANTENNA CONNECTOR BLUETOOTH ANTENNA WIRE FEMALE USB 2 0 WITH RUBBER BOOT 8 PIN MALE WIRED REMOTE RED FEMALE RCA CONNECTOR RED FEMALE RCA CONNECTOR WHITE FEMALE RCA CONNECTOR WHITE FEMALE RCA CONNECTOR GRAY 15 AMP FUSE WHITE WIRING ...

Страница 8: ...ft and right speakers from L12 full left to R12 full right Fade Use the VOL buttons to adjust the fader between the rear and front speakers from R12 full rear to F12 full front System Menu 1 Press and hold the AUDIO MENU button 3 for more than 3 seconds to enter the system menu 2 Press the VOL buttons 2 repeatedly to navigate the system menu and select the desired item 3 Press the INFO ENTER butto...

Страница 9: ...istening to music at low volumes this feature will boost the bass and treble ranges to compensate for the characteristics of human hearing Auxiliary Input To access an auxiliary device 1 Connect the portable audio player to the AUX IN cables routed from the rear of the radio 2 Press the MODE button 4 to select Aux In mode 3 Press MODE again to cancel Aux In mode and switch to the next mode Liquid ...

Страница 10: ...cally Store Preset Scan AS PS Automatically Store Select an AM or FM band Press and hold the AS PS button 15 for more than three seconds to automatically select strong stations and store them in all bands The new stations replace any stations already stored in that band NOTE During Auto Store AS the tuner will default to Local mode while scanning the band initially After scanning the entire band o...

Страница 11: ... will flash in the display and the tuner will scan all seven NOAA frequencies every 30 seconds How will I know I am tuned to the weather band When you select the weather band the WB icon will appear on the display panel along with the current channel indication Press the SEEK TUNE TRK or buttons 13 14 to tune to each of the seven channels until you find the weather band station broadcasting in you...

Страница 12: ...advance to the next file or press and hold to fast forward or fast reverse Playback begins when the button is released Repeat RPT Press the 2 RPT button 6 to repeatedly play the current file Press 2 RPT again to repeat all songs in the current folder Press 2 RPT a third time to resume normal playback Intro Scan INT Press the 3 INT button 7 once to play the first 10 seconds of each file in the curr...

Страница 13: ...ices are stored in FIFO First In First Out order To prevent a device from being bumped from the list when more than 5 devices are used you must lock the device To Lock Unlock a device press the INFO ENTER button to display change the Locked or Unlocked icon Disconnect To disconnect a paired device press the INFO ENTER button to temporarily remove the BT link The link can be re established through ...

Страница 14: ...l appear on the LCD Press 1 again to resume playback If you change to another mode the mobile phone audio will pause Press the MODE button 4 to return to BT mode and resume mobile phone audio playback NOTE If a Bluetooth device is disconnected due to the power being turned off or if the device is disconnected inadvertently the unit will automatically search for the matching BT mobile phone when th...

Страница 15: ... Most vessels employ this wire and resistor but it may be necessary to check them for correct operation Another method of suppression is the use of additional noise suppressors These can be obtained from most CB A radio or electronic supply shops Interference Radio reception in a moving environment is very different from reception in a stationary environment home It is very important to understand...

Страница 16: ... Frequency Range USA 530 1710 kHz Frequency Range Europe 522 1620 kHz Sensitivity S N 20dB 30 dB General Operating Voltage DC 12 Volts Grounding System Negative Ground Speaker Impedance 4 8 ohms per channel Tone Controls Bass at 100 Hz 14 dB Treble at 10 kHz 13 dB Power Output 40W x 4 Fuse Rating 15 Ampere max Chassis Dimensions 182 L x 52 2 W x 173 H Front Panel Dimensions 188 L x 58 W x 21 H ...

Страница 17: ...JHD40BT 14 ...

Страница 18: ......

Страница 19: ...ASA Electronics Corporation www asaelectronics com www jensenmarinedirect com 2013 ASA Electronics Corporation v 031113 ...

Отзывы: