background image

6


U

SING


THE

 G

RILL

Before the first use, wash grill grates in
hot soapy water, rinse and dry.  Then
“season” the surface by wiping on a
thin coating of cooking oil.  Remove
excess oil by wiping with paper towel.

This procedure should be repeated
when either:  

a)

 cleaning in the

dishwasher since the detergent may
remove seasoning or 

b)

 anytime a

sugar-based marinade (for example,
barbecue sauce) is going to be used.

Preheat the grill on 

Hi 

for 5 minutes.

Preheating improves the flavor and
appearance of meats and quickly sears
the meat to help retain the juices.

Use nonmetallic spatulas or utensils to
prevent damaging the nonstick grill grate
finish.

Excessive amounts of fat should be
trimmed from meats.

  Only a normal

amount is necessary to produce the
smoke needed for that smoked,
“outdoor” flavor. Excessive fat can
create cleaning and flare-up problems.

Allowing excessive amounts of grease
or drippings to constantly flare-up voids
the warranty on the grill grates.

Excessive flare-ups indicate that either
the grill interior needs to be cleaned or
that excessive amounts of fat are in the
meat or the meat was not properly
trimmed.

Grease drippings will occasionally
ignite to produce harmless puffs of
flame for a second or two.  This is a
normal part of the cooking process.

NEVER LEAVE GRILL UNATTENDED
DURING GRILL OPERATION.

 S

EALED

 B

URNER

 C

ARTRIDGE

(

S

)

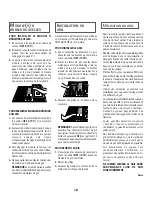
TO INSTALL SEALED BURNER
CARTRIDGE:

1.

Be sure control knobs are turned 

OFF

.

2.

Clean basin of any grease
accumulation. (See page 9 for cleaning
recommendations.)

3.

With the back raised, position the burner
cartridge with the mixer tube openings
and ignitor rods toward the orifices
and terminal receptacle. Slide the
cartridge until the tubes and ignitors
start to engage, then lower the cartridge
so that it rests on the cooktop surface.
Gently slide forward to fully engage.

TO REMOVE SEALED BURNER
CARTRIDGE:

1.

Control knobs should be in the 

OFF

position and the cooktop should be
cool.

2.

Lift up the edge of the cartridge until
the bottom of the cartridge clears the
basin. (Lifting the cartridge too high
while still engaged could damage the
ignitor rods and mixer tubes.)

3.

To disengage the cartridge, hold by the
sides and pull away from the terminal
receptacle and orifices. Lift out when
fully unplugged.

4.

Do not stack cartridges where they
may fall or be damaged.

NOTE: 

Optional Sealed Burner

Cartridge, model JGA8100, can replace
the grill burner assembly.

 G

RILL

 I

NSTALLATION

The grill assembly consists of two grill
grates and a grill burner. Only install the
grill on the LEFT SIDE of your cooktop.

TO INSTALL GRILL:

1.

Before installing grill components, be
sure controls knobs are in the 

OFF

position.

2.

Position the grill burner with mixer
tubes and ignitor rod toward the orifices
and terminal receptacle. Slide the
burner until the tubes and ignitor
engage, then lower the burner until it
rests on the mounting pins.

3.

Place the grill grates on top of the
cooktop.

NOTE: 

Before using the grill for the

first time, heat the grill burner to remove
the protective shipping coating. Heat
the grill burner on 

Hi

 for 10 minutes

and use the vent system to remove any
additional smoke during cooling.

TO REMOVE GRILL:

1.

Be sure control knobs are in the 

OFF

position and the grill components are
cool.

2.

Remove grill grates.

3.

Lift the burner up slightly. Slide the
burner away from the orifices and
terminal receptacle.

Cont.

8111P488-60

5/25/06, 9:54 AM

7

Содержание JGD8130AD

Страница 1: ...ions 1 3 Ducting Information 3 Using Your Cooktop 4 8 Care Cleaning 9 Accessories Cartridges 10 Before You Call for Service 10 Warranty 11 Guide de l utilisateur 12 Gu a del Usuario 24 USER G U I D E...

Страница 2: ...ryordamagetotheappliance as a result of improper usage of the appliance Use appliance only for its intended purpose as described in this guide To ensure proper and safe operation Appliance must be pro...

Страница 3: ...g pan to prevent exposure to burner flame Always adjust surface burner flame so that it does not extend beyond the bottom edge of the pan An excessive flame is hazardous wastes energy and may damage t...

Страница 4: ...fthisapplianceareherebywarned that the burning of gas can result in low level exposure to some of the listed 3 IMPORTANT SAFETY INSTRUCTIONS CONT This appliance has been tested for safe performance us...

Страница 5: ...the surface burner does not light check ifignitorisbroken soiledorwet Ifclogged clean the small port beneath the ignitor using straight pin SURFACE CONTROL KNOBS Use to turn on the surface burners An...

Страница 6: ...ble damage to the cooktop or pan the flame must be adjusted so it does not extend beyond the edge of the pan To prevent the cooktop from discoloring or staining Clean cooktop after each use Wipe acidi...

Страница 7: ...d ignitor rods toward the orifices and terminal receptacle Slide the cartridge until the tubes and ignitors starttoengage thenlowerthecartridge so that it rests on the cooktop surface Gently slide for...

Страница 8: ...an manually 2 Immediately turn grill controls to Off 3 Remove meat from grill Whenbastingmeatsorapplyingsauces to foods remember that excessive amounts accumulate inside your grill and do not improve...

Страница 9: ...oked Sausages Hot Dogs Brats Hi 7 to 12 minutes Turn once Polish Hi 13 to 16 minutes Turn occasionally Fresh Sausage Links Med 15 to 25 minutes Turn occasionally Patties 3 dia Med 15 to 20 minutes Tur...

Страница 10: ...couring pads or other scrubbers intended to clean outdoor charcoal grills These will remove the finish as well as scratch the grates Do not clean in self cleaning oven or use oven cleaners on the grat...

Страница 11: ...ALL FOR SERVICE SURFACE OR GRILL BURNER FAILS TO LIGHT Check to be sure unit is properly connected to power supply Check for a blown circuit fuse or tripped main circuit breaker Check to be sure burne...

Страница 12: ...Jenn Air within 30 days from the date of purchase 6 Any food loss due to refrigerator or freezer product failures 7 Costs associated with the removal from your home of your major appliance for repair...

Страница 13: ...JENN AIR JGD8130 JGD8345 GUIDE DE L UTILISATEUR GUIDE DE L UTILISATEUR Instructions de s curit importantes 13 15 Conduits 15 Cuisson sur la surface 16 20 Entretien et nettoyage 21 Accessoires et modu...

Страница 14: ...ucher un interrupteur lectrique N utiliser aucun t l phone de l immeuble Se rendre chez un voisin et t l phoner imm diatement la compagnie de gaz Suivre les directives donn es par le pr pos de la comp...

Страница 15: ...leur de surfaceavantdel allumer Veiller bienconna tre la correspondance entre les boutons de commande et les br leurs Veiller allumer le br leurcorrectetv rifierquelebr leurs allume effectivement la f...

Страница 16: ...par le gouverneur de la Californie d une liste des substances que l tat de Californie consid re comme canc rig nes ou dangereuses pour le syst me reproducteur et impose aux entreprises commerciales l...

Страница 17: ...taille d sir e CUISSON SUR LA SURFACE COMMANDES DE LA SURFACE DE CUISSON MISES EN GARDE Siunbr leurs teintdurantuneop ration de cuisson fermer l arriv e de gaz au br leur Si une forte odeur de gaz es...

Страница 18: ...e il faut r gler la flamme de sorte qu elle ne d passe pas du bord de l ustensile Pour viter la formation de taches ou un changementdecouleurdelatabledecuisson Nettoyer la table de cuisson apr s chaqu...

Страница 19: ...oulev e placer le module br leurs de sorte que les ouvertures des tubes m langeurs et les tiges d allumage soient dirig es vers les orifices et la prise Coulisser le module jusqu enclenchement des tub...

Страница 20: ...coupes moins ch res de viande pour la cuisson sur le gril Certains aliments comme la volaille et le poisson non gras peuvent avoir besoin d un surplus de graisse Badigeonner avec de l huile ou du beu...

Страница 21: ...7 12 minutes Retourner une fois Saucisse polonaise Hi Max 13 16 minutes Retourner de temps en temps Saucisse fra che Saucisses en chapelet Med Moyen 15 25 minutes Retourner de temps en temps Plates 7...

Страница 22: ...ude m lang e 1 cuill re th de d tergent vaisselle et verser le tout dans le tuyau d coulement GRILLES FONTE D ALUMINIUM AVEC FINI NON ADH RENT Laver les grilles froides NE PAS IMMERGER LES GRILLES CHA...

Страница 23: ...llumersi l allumeurestendommag souill oumouill Si l allumeur ne g n re pas d tincelles ramenerleboutondecommande laposition OFF ARR T S PARATION ENTRE LES FLAMMES ET LE BR LEUR Veiller placer correcte...

Страница 24: ...urs suivant la date d achat 6 Toute perte d aliments due une d faillance du r frig rateur ou du cong lateur 7 Les co ts associ s au transport du gros appareil m nager du domicile pour r paration Ce gr...

Страница 25: ...ACI N DESCENDENTE JENN AIR JGD8130 JGD8345 GU A DEL USUARIO Instrucciones Importantes sobre Seguridad 25 27 Informaci n sobre los Conductos 27 Cocinando en la Estufa 28 31 Cuidado y Limpieza 33 34 Acc...

Страница 26: ...otro QUE HACER SI PERCIBE OLOR A GAS No trate de encender ning n artefacto Notoquening ninterruptorel ctrico Nousening ntel fonoensuedificio Llame inmediatamente a su proveedor de gas desde el tel fon...

Страница 27: ...lientes incluyen lacubiertadelaestufaylas reasdirigidashacia la cubierta de la estufa SEGURIDAD PARA COCINAR Siempre coloque un utensilio en un quemador superior antes de encenderlo Aseg rese de usar...

Страница 28: ...usarunrespiraderomuralrecom endado por Jenn Air Aseg rese de que el regulador de tiro se mueva libremente cuando el sistema de ventilaci n est en funcionamiento Debe haber una distancia m nima de 6 cu...

Страница 29: ...ajo del encendedor usando un alfiler derecho puedesentiruntopeounamuesca Lasperillas puedenserajustadasexactamenteenlosajustes correspondientes o entre cualquiera de ellos PROGRAMACI N DE LOS CONTROLE...

Страница 30: ...er ajustada de modo que no se extienda m s all del borde del utensilio Paraevitarquelacubiertasedescoloreose manche Limpie la cubierta de la estufa despu s de cada uso Limpielosderrames cidosoazucarad...

Страница 31: ...llas del encendedor hacia los orificios y la toma de conexi n Deslice el m dulo hasta que los tubos y encendedores se enganchen luego baje el m dulo de modo que descanse sobre la cubierta de la estufa...

Страница 32: ...est n as ndose Usetenazasconmangoslargosoesp tulas para dar vuelta la carne No use tenedores pues estos agujerean la carne haciendo que se pierdan los jugos SI EL EXCESO DE GRASA CAUSA LLAMARADAS CONT...

Страница 33: ...Alto 7 a 12 minutos Dar vuelta una vez Salchicha Polaca Hi Alto 13 a 16 minutos Dar vuelta ocasionalmente Salchichas Frescas En Cadena Med Mediano 15 a 25 minutos Dar vuelta ocasionalmente En Empanad...

Страница 34: ...ess Steel Magic Spray Jenn Air Modelo A912 Pieza No 20000008 SuciedadModerada ManchasRebeldes Limpie con uno de los siguientes Bon Ami SmartCleanser o SoftScrub usando una esponja h meda o un pa o sua...

Страница 35: ...servasque tiene un gollete de roscas est ndar EL QUEMADOR SUPERIOR O PARRILLA NO SE ENCIENDE Verifique si el enchufe est firmemente insertado en el tomacorriente Verifique o vuelva a reponer el disyun...

Страница 36: ...del congelador 7 Costos relativos a la remoci n de su electrodom stico principal desde su hogar para obtener reparaciones Este electrodom stico principal est dise ado para ser reparado en el hogar y...

Отзывы: