


Welcome to the JCB Pro-‐Smart.
The Pro-‐Smart is waterproof IPX7, dustproof IP6X, and is rugged enough to withstand a
drop of 1.5M onto a hard surface. Yet it also features a touch control panel through
excellent scratch resistant glass, and is powered by Android, offering Google suite
applications, including access to thousands of Android Apps through Android Market. As
well as being a rugged mobile phone, with it you'll be able to enjoy web browsing,
messaging, music and more with its high capacity battery and expandable memory up to
32Gb.
Getting to Know Your Mobile Phone
Phone at a Glance
Note:
All the pictures in this guide are for your reference only. The actual appearance and
display depend on the mobile phone you purchase.
Key functions at your fingertips
Power/sleep
Press to turn on your mobile phone.
Press and hold to open the Phone options menu.
Press to lock or wake the screen when your mobile phone is on.
Send key
Press to go to the Call log screen. Long press and release to dial last call.
Home button
Press at any time to display the Home screen. Long press for recent apps.
End key
Press to end call.
Menu key
Touch to open a menu with options that relate to the current screen or
application.
Search key
Touch in the Home screen, and search your phone and the web. Whilst
using applications, opens a search box for searching within the
application.
Back key
Touch to display the previous screen you were working in. Use to close
onscreen keyboard.
Quick Start
Guide
TOUGHPHONE
PRO-
SMART
1
Release the battery cover
Turn both screws anti-clockwise
to release battery door and lift
cover off using the slot beneath
the camera.
2
Insert the SIM card
Insert SIM into the phone as
shown (contacts face down).
3
Insert Micro-SD card
Slide the metal clasp down and
it will hinge up from the bottom.
Place SD card into position, then
close the metal clasp, and slide up
to lock in place.
4
Replace battery cover
Position tabs on battery door
in the phone first, and close
it up. Whilst still applying
pressure to the door beneath
the screw heads, turn screws
clockwise until resistance is
felt, then add a quarter turn
more. The door must be
secured to ensure watertight
seal. Take care not to over tighten.
5
Charge for 8 hours
Please charge for 8 hours
before initial use.
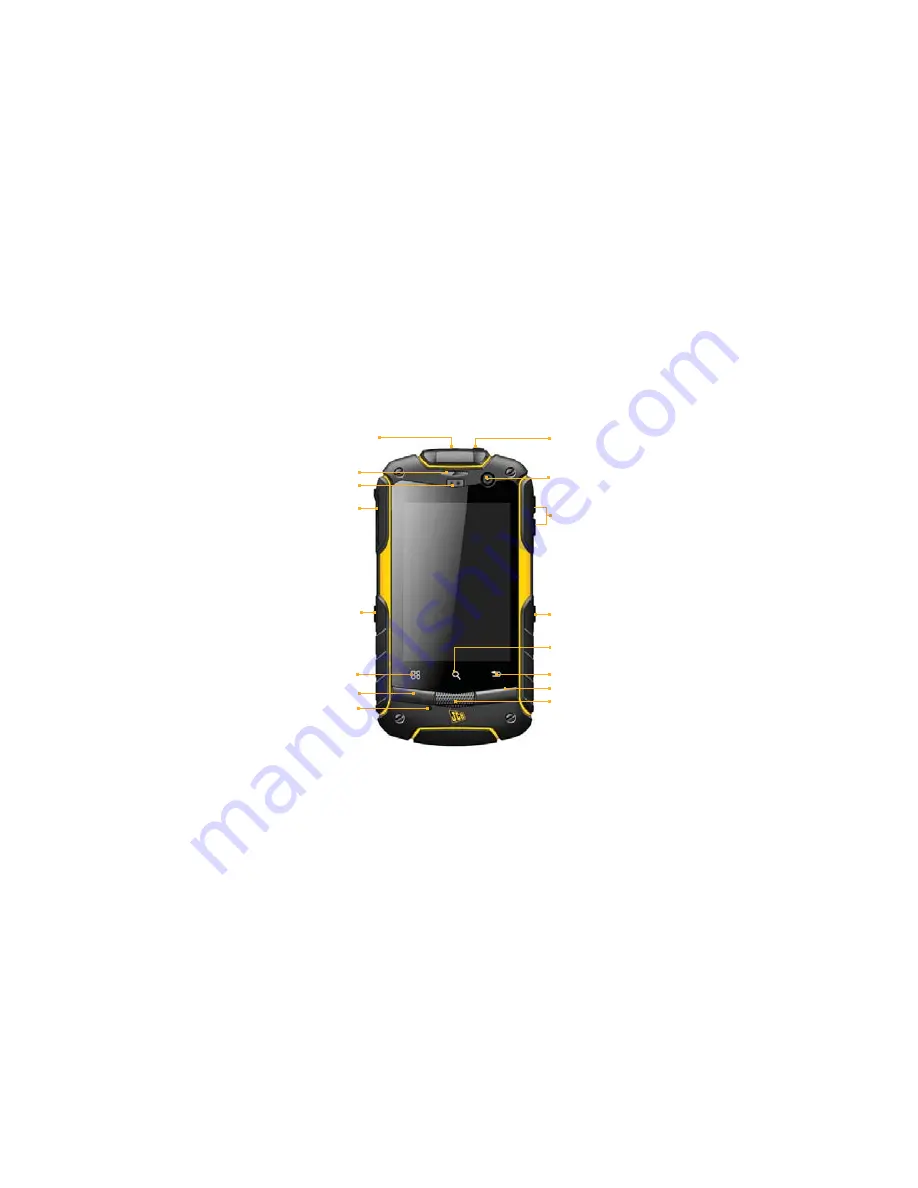
Keypad Description
Headphone
Speaker
Proximity
sensor
USB port
Torch
Menu
Send
Microphone
Power/sleep
Front
camera
Volume
control
Camera
Search
Back
End
Home
Guide De Démarrage
Rapide
TOUGHPHONE
PRO-
SMART
1
Retire
z le
cach
e d
e la
batte
rie
T ou
rnez
le
s d
eux
vis
da
ns l
e se
ns
con
tra
ire
au
x
-
aiguilles d'une montre
pou
r o
uvri
r le
ca
che
de
la
bat
teri
e
et le faire gli sser en utilisant
l'e
mpl
ace
men
t so
us l
a c
am
éra
.
2
Insérez
votre ca
rte S
IM
Insérez votre car
te SIM comme
ind
iqu
é (p
uce
ori
ent
ée
ver
s le
ba
s)
3
Insérez
votre ca
rte S
IM
Micro-SD
Pour
in
sér
er l
a c
art
e S
D, fa
ite
s g
liss
er
le cache en métal ver
s le bas et il
pivo
tera
ve
rs
le
bas
. In
sér
ez
la
car
te
SD dans la bonne position, puis
ferm
ez
le
cac
he
en
mét
al e
t fa
ite
s-le
glis
ser
da
ns s
a p
osit
ion
ori
gin
ale
jus
qu’
à c
e q
u’il
se
verr
oui
lle
.
4
Remettez le
cache de
la batterie
en place
Plac
ez
corr
ect
em
ent
le
s p
atte
s
du
cac
he
de
la
bat
teri
e p
uis
ref
erm
ez-
le.
En
main
ten
ant
de
la
pression sur le cache en dessous
des
tê
tes
de
s v
is,
tou
rnez
le
s v
is
dans le sens des aiguilles d'une
montre jusqu'à ce que vous
sentiez une résistance puis
donnez encore un quart de tour
.
Le
cac
he
doi
t ê
tre
fe
rmé
pou
r
gara
ntir
l'é
tan
ché
ité
. Fa
ite
s
atte
ntio
n d
e n
e p
as t
rop
se
rrer
les vis.
5
Charger le téléphone
penda
nt 8 he
ures
.
Veu
ille
z c
harg
er l
e
téléphone pendant huit
heures avant de l'utiliser
pour la première fois.
Fonctions
Pris
e p
our
écouteurs
Haut-parleur
Capteur de
proximité
Port
U
SB
Lampe
de poche
Menu
Envoi
Microphone
T ou
che
marche/veille
Objectif
photo avant
Réglage
volu
me
Objectif
photo
T ou
che
recherche
Retour
Fin
Accueil


