background image

13

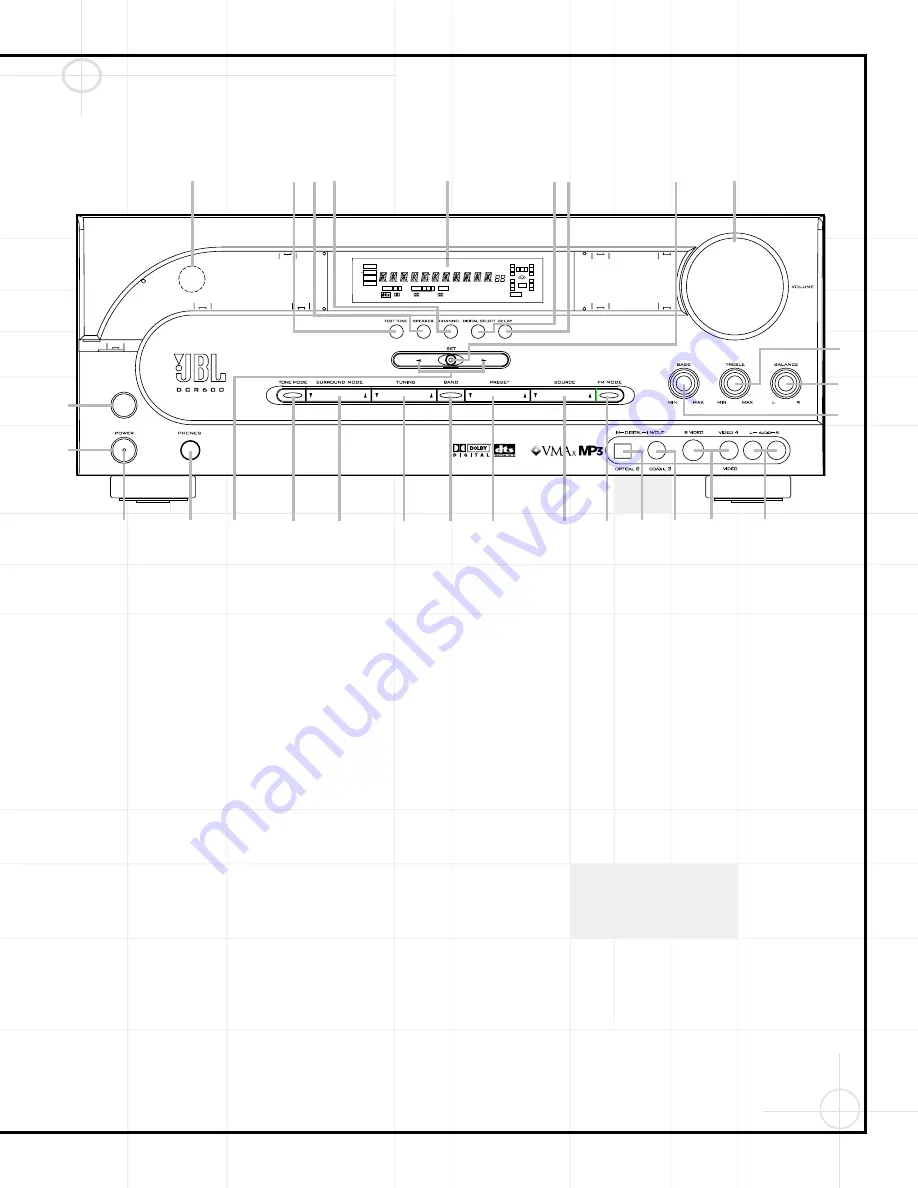
DCR600 Front Panel Controls

1

Main Power Switch:

Press this button to

apply power to the DCR600. When the switch
is pressed in, the unit is placed in a Standby
mode, as indicated by the amber 

Power

Indicator

3

surrounding the 

System Power

Control

2

. This button MUST be pressed in

to operate the unit. To turn the unit off and
prevent the use of the remote control, this
switch should be pressed until it pops out from
the front panel so that the word “OFF” may be
read at the top of the switch.

NOTE: 

This switch is normally left in the “ON” position.

2

System Power Control: 

When the 

Main

Power Switch

1

is “ON,” press this button

to turn on the DCR600; press it again to turn
the unit off. Note that the 

Power Indicator

3

in the center of the switch will turn green

when the unit is on.

3

Power Indicator: 

This LED will be illumi-

nated in amber when the unit is in the Standby
mode to signal that the unit is ready to be
turned on. When the unit is in operation, the
indicator will turn green.

4

Headphone Jack: 

This jack may be used

to listen to the DCR600’s output through a pair

of headphones. Be certain that the headphones
have a standard 1/4" stereo phone plug. Note
that the main room speakers will automatically
be turned off when the headphone jack is in use.

5

Selector Buttons: 

When you are estab-

lishing the DCR600’s configuration settings,
use these buttons to select from the choices
available, as shown in the 

Main Information

Display

Ú

.

6

Tone Mode: 

Pressing this button enables

or disables the Bass and Treble tone controls.
When the button is pressed so that the words
TONE IN appear in the 

Main Information

Display

Ú

, the settings of the 

Bass

&

and

Treble

(

controls may be used to adjust the

output signals. When the button is pressed so
that the words TONE OUT appear in the 

Main

Information Display

Ú

, the output signal

will be “flat,” without any bass or treble alter-
ation, no matter how the actual 

Bass

and

Treble

&(

controls are adjusted.

7

Surround Mode Selector: 

Press this but-

ton to change the surround mode by scrolling
through the list of available modes. Note that
depending on the type of input, some modes

are not always available. (See page 52 for
more information about surround modes.)

8

Tuning Selector: 

Press the left side of the

button to tune lower-frequency stations and
the right side of the button to tune higher-
frequency stations. When a station with a strong
signal is reached, the 

TUNED

indicator 

U

will

be illuminated in the 

Main Information

Display 

Ú

.

To tune manually, tap the button lightly and
note that the tuner will step up one frequency
increment per button press. When the button is
held for a few seconds you will note that the
unit will quickly search the frequency band.
Release it once the fast tuning starts; the tuner
will automatically scan for the next station
with an acceptable signal and then stop.

9

Tuner Band Selector: 

Pressing this button

will automatically switch the DCR600 to the
Tuner mode. Pressing it again will switch
between the AM and FM frequency bands.

)

Preset Stations Selector: 

Press this 

button to scroll up or down through the list or
stations that have been entered into the preset
memory.

1

2

3

4

5

6

7

8

9

)

!

@

#

$

%

^

&

(

*

Ó

Ô

Ò

Ú

ı

ˆ

Û

Ù

COAXIAL

THEATER

5 CH STEREO HALL 1

3- STEREO

PRO LOGIC

DIGITAL

DTS

DOLBY D

PCM
MP3

NIGHT

OPTICAL

ANALOG

LFE

0

C

L

0

1 2

1 2 3

MEMORY

PRESET

SLEEP

AUTO

5.1  LOGIC  7 CM

VMAx NF

MUTE

TUNED

ST

O

O

R

O

O

LS

O

O

RS

O

O

Содержание DVD600

Страница 1: ......

Страница 2: ... D I O V I D E O R E C E I V E R DCR600 with Dolby Digital DTS Logic 7 VMAx and MP3 Decoding S O U R C E U N I T DVD600 Five Disc Carousel DVD CD CD RW VCD Changer L O U D S P E A K E R S SCS135S Six Piece Home Cinema Speaker System with 4 Satellites 1 Center and 100 Watt Powered Subwoofer O W N E R S G U I D E TECHNICAL SPECIFICATIONS Cinema ProPack 600 System General Power Requirement AC 120V 60...

Страница 3: ...O V I D E O R E C E I V E R DCR600 with Dolby Digital DTS Logic 7 VMAx and MP3 Decoding S O U R C E U N I T DVD600 Five Disc Carousel DVD CD CD RW VCD Changer L O U D S P E A K E R S SCS135S Six Piece Home Cinema Speaker System with 4 Satellites 1 Center and 100 Watt Powered Subwoofer X 0 Y 2 0 M H Z X 0 Y 2 0 M H Z X 0 Y 2 0 O W N E R S G U I D E 2 3 1 5 6 search play skip open close pause stop 4...

Страница 4: ...Using Digital Sources 53 Dolby Digital 53 DTS 53 Selecting a Digital Source 54 Digital Status Indicators 54 Night Mode 54 Important Notes on Digital Playback 55 PCM Audio Playback 55 MP3 Audio Playback 55 Operating the Tuner 55 Station Selection 55 Preset Tuning 56 Recalling Preset Stations 56 Tape Recording 57 Operating the DVD600 DVD Changer 57 Loading Discs 57 Playback Basics 58 Using the DVD D...

Страница 5: ...wall outlet and disconnect the antenna or cable system This will prevent damage to the product due to lightning and power line surges 17 Power Lines An outside antenna system should not be located in the vicinity of overhead power lines or other electric light or power circuits or where it can fall into such power lines or circuits When installing an out side antenna system extreme care should be ...

Страница 6: ...t place the components directly on a carpeted surface Avoid installation in extremely hot or cold locations or in an area that is exposed to direct sunlight or heating equipment Avoid moist or humid locations Do not obstruct the ventilation slots on the top of any component or place objects directly over them Do not place the DVD600 in a location that is subject to direct sunlight or extreme heat ...

Страница 7: ...osite video output of the DVD changer to the receiver One 5 foot triple lead RCA patch cord with red white and yellow connectors for connecting the composite video and analog audio outputs from the receiver to your television One single lead mini phone jack for connecting the remote out jack on the receiver to the remote in jack on the DVD changer The pages that follow describe in detail the vario...

Страница 8: ... ÉLECTRIQUE NE PAS OUVRIR C US UL LISTED E191351 40KK AUDIO EQUIPMENT AC OUTLETS 120V 60Hz SERIAL NO UNSWITCHED 100W 1A MAX SWITCHED 50W 0 5A MAX MODEL NO DCR 600 NORTHRIDGE CALIFORNIA USA Manufactured under license from Dolby Laboratories Dolby Pro Logic and the double D symbols are trademarks of Dolby Laboratories Confidential Unpublished Works 1992 1997 Dolby Laboratories Inc All rights reserve...

Страница 9: ...QUE DE CHOC ÉLECTRIQUE NE PAS OUVRIR C US UL LISTED E191351 40KK AUDIO EQUIPMENT AC OUTLETS 120V 60Hz SERIAL NO UNSWITCHED 100W 1A MAX SWITCHED 50W 0 5A MAX MODEL NO DCR 600 NORTHRIDGE CALIFORNIA USA Manufactured under license from Dolby Laboratories Dolby Pro Logic and the double D symbols are trademarks of Dolby Laboratories Confidential Unpublished Works 1992 1997 Dolby Laboratories Inc All rig...

Страница 10: ...ED 100W 1A MAX SWITCHED 50W 0 5A MAX MODEL NO DCR 600 NORTHRIDGE CALIFORNIA USA Manufactured under license from Dolby Laboratories Dolby Pro Logic and the double D symbols are trademarks of Dolby Laboratories Confidential Unpublished Works 1992 1997 Dolby Laboratories Inc All rights reserved This device complies with part 15 of the FCC rules Operation is subject to the following two conditions 1 T...

Страница 11: ...eft and right speakers It is often convenient to set the center speaker on top of the television set as shown in the drawing Use the supplied support leg to aim it toward the listener by screwing the leg in to angle the speaker up or unscrewing the leg slightly to angle the speaker down The two surround speakers should be placed slightly behind the listening position and ideally should face each o...

Страница 12: ... coded them as shown in the diagram Left Front White Wire Center Green Wire Right Front Red Wire Right Rear Yellow Wire Left Rear Blue Wire Finally connect one end of the single lead RCA cable with brown connectors to the LFE Subwoofer output on the back of the DCR600 receiver and the other end to the LFE Input on the back of the SCS135S subwoofer 1 1 Assemble the supplied AM Loop Antenna as shown...

Страница 13: ...vanced settings please see the section titled Configuring the DCR600 Receiver Making the Video Connections IMPORTANT NOTE The DCR600 and DVD600 offer both S Video and composite video inputs and outputs However you must choose one type of connection or the other for all connec tions in your system This will depend on the type of connections on your television If both types of connections are availa...

Страница 14: ...lay all of the tracks on one CD or all of the chapters on one DVD in a random order selected by the DVD600 The DVD600 does not randomly play selections from all five discs inserted in its tray since this might result in the odd experience of alternating among audio tracks and disjointed video selections Simply press the Random Button once to start random play and press it again to return to standa...

Страница 15: ... the Main Information Display Ú the settings of the Bass and Treble controls may be used to adjust the output signals When the button is pressed so that the words TONE OUT appear in the Main Information Display Ú the output signal will be flat without any bass or treble alter ation no matter how the actual Bass and Treble controls are adjusted 7 Surround Mode Selector Press this but ton to change ...

Страница 16: ...rol to a suitable position for your taste or room acoustics Ó Volume Control Turn this knob clockwise to increase the volume counterclockwise to decrease the volume If the DCR600 is muted adjusting the volume control will automatically release the unit from the silenced condition Ô Set Button When making choices during the setup and configuration process press this button to enter the desired sett...

Страница 17: ...is selected and all three boxes light when Large speakers are selected When none of the boxes are lit for the center surround or subwoofer channels no speaker has been selected for one of those positions The letters inside each of the center boxes display active input channels For stan dard analog inputs only the L and R will light indicating a stereo input When a digital source is playing the ind...

Страница 18: ...utputs Connect to com posite or S Video input of a TV monitor or video projector LFE Subwoofer Output Connect to the LFE or line level input of a powered subwoofer Front Speaker Outputs Connect to matching and terminals on front left right speakers Center Speaker Outputs Connect to matching and terminals on center speaker Surround Speaker Outputs Connect to matching and terminals on left and right...

Страница 19: ...ble equipment Remote IR Input If the DCR600 s front panel IR sensor is blocked due to cabinet doors or other obstructions an external IR sensor may be used Connect the output of the sensor to this jack a Video 1 Video Outputs Connect to RECORD INPUT composite or S Video jack on a VCR or other video receiver b Video 1 Video Inputs Connect to PLAY OUT composite or S Video jacks on a VCR or other vid...

Страница 20: ...ack will stop but as long as the tray is not opened or the disc changed DVD playback will continue from the same point on the disc when the Play button is pressed again Resume will also work if the unit was turned off To stop a disc and have play start from the beginning press the button twice Pause Press to momentarily pause playback To resume playback press the button again or press the Play But...

Страница 21: ...s when the Stop button has been pressed once to put the unit in the Resume mode Playback Mode Lights to show the cur rent playback mode Lights when a disc is playing in the Normal mode Lights when the disc is in the Fast Search Forward mode For DVDs when both triangles glow steadily the disc plays at 2x normal speed When the right triangle is flashing the disc plays at 4x normal speed When the lef...

Страница 22: ...mpati ble product to this jack This will enable the remote control to operate even when the front panel Remote Sensor is blocked This jack may also be used with compatible IR remote control based automation systems AC Power Cord Connect this plug to an AC outlet If the outlet is controlled by a switch make certain that it is in the ON position 14D 14D DVD600 Rear Panel Connections Manufactured und...

Страница 23: ...a given device In order to go to the page for a particular device such as the DVD600 you will need to press the Input Selector button for that device DVD in this case located in a grouping just below the power buttons The remote will then function as if it were dedicated to the DVD600 If you would like to make an adjustment that affects the DCR600 receiver such as turning the volume up or down you...

Страница 24: ...te which will cause the remote to operate only that video device You may find it convenient to connect your VCR to the Video 1 input since it is the only video source that also features outputs for recording Press the Main Button h to return the remote to con trol of the DCR600 receiver m Video 2 Input Selector TV Pressing this button will perform three actions 1 If the DCR600 is not turned on it ...

Страница 25: ...red by pressing the Set Button and then using the Buttons y to change the setting Press the Set Button again to complete the process This button is also used when viewing a menu display from a DVD disc Press it to return to the previous menu screen Numeric Keys These buttons serve as a ten button numeric keypad to enter tuner preset positions They are also used with the DVD600 to enter data for se...

Страница 26: ...ing order R Search x 2 R Search x 4 R Search x 8 R Search x 16 Once you have selected the desired speed release the button and the disc will continue to search at fast speed To resume normal playback press the Play Button When a tape deck or VCR has been selected this button rewinds the tape Play Button Press to begin playback when the DVD600 has been selected If the disc tray drawer is open it wi...

Страница 27: ...Select Video 2 Select Video 2 Select 14 VID3 Video 3 Select Video 3 Select Video 3 Select Video 3 Select Video 3 Select Video 3 Select Video 3 Select Video 3 Select Video 3 Select 15 VID4 Video 4 Select Video 4 Select Video 4 Select Video 4 Select Video 4 Select Video 4 Select Video 4 Select Video 4 Select Video 4 Select 16 Sleep Sleep Channel Channel Channel Channel 17 Test Test Tone Input Select...

Страница 28: ...ay Day 50 Night Night Mode Select Random 51 D Skip Disc Skip Disc Skip Disc Skip 52 Preset Down Preset Tune Down Slow Reverse Intro Scan Page Page 53 CHECK Check 54 Subtitle On Off Subtitle On Off 55 REPEAT Repeat Repeat 56 A B A B 57 REW DVD R Search R Search Rewind Rewind Unknown Unknown Unknown 58 PLAY PLAY DVD Play Play F Play Play Unknown Unknown Unknown R Play Unknown Unknown Unknown 59 FF D...

Страница 29: ... 105 106 108 111 114 116 119 127 128 132 DAYTRON 128 132 CIGI LINK 200 DYNASTY 045 DYNATECH 063 ELECTROHOME 115 132 EMERSON 045 123 128 132 139 157 158 159 162 205 FUNAI 045 FUTURETECH 045 GE 087 121 123 128 133 145 159 163 GOLDSTAR 101 103 110 128 132 GRUNDIG 193 HALL MARK 128 HARMAN KARDON 201 HITACHI 123 128 132 144 147 INFINITY 148 INKEL 120 JBL 148 JC PENNEY 115 123 128 132 145 JENSEN 019 JVC...

Страница 30: ...ASAR 087 RADIO SHACK 045 128 132 180 196 197 RCA 115 123 128 133 145 161 163 REALISTIC 045 196 167 RUNCO 152 153 SAA 183 SAMPO 059 123 128 SAMSUNG 124 128 132 145 SANYO 054 SCOTT 045 128 132 SEARS 128 132 145 SHARP 077 128 132 SIEMENS 084 SIGNATURE 069 SONY 117 130 136 194 212 SOUNDESIGN 045 128 SPECTRICON 103 SSS 011 045 SYLVANIA 123 128 145 148 SYMPHONIC 184 TANDY 077 TATUNG 063 TECHNICS 080 TEC...

Страница 31: ... 018 048 ELECTROHOME 136 EMERSON 040 FERGUSON 131 FINLUX 013 040 042 105 110 112 119 134 143 FISHER 136 FUNAI 133 GE 017 142 GO VIDEO 113 117 GOLDSTAR 018 107 134 GRAETZ 136 HARMAN KARDON 018 049 HITACHI 040 048 118 130 ITT 136 JC PENNEY 018 045 134 JENSEN 048 JVC 018 048 111 130 132 KENWOOD 020 048 LLOYD 040 LXI 020 040 134 MAGIN 045 MAGNAVOX 040 MARANTZ 018 MARTA 134 MATSUI 036 MEMOREX 017 020 0...

Страница 32: ...NCO 128 SABA 136 SAISHO 143 SALORA 020 SAMSUNG 045 080 095 105 106 109 124 155 SANSUI 048 116 147 166 SANYO 017 115 SCHAUB LORENZ 136 SCOTT 105 110 112 SEARS 017 020 134 142 SHARP 129 156 SONY 062 080 081 129 SOUNDESIGN 040 SYLVANIA 040 131 SYMPHONIC 040 TANDY 017 040 TASHICO 134 TATUNG 048 TEAC 040 048 TEKNIKA 040 134 TELEFUNKEN 136 THOMAS 040 THOMSON 136 THORN 136 TMK 013 TOSHIBA 105 112 131 142...

Страница 33: ...UMENT 168 GOODMIND 112 HANLIN 056 099 100 101 117 175 208 HITACHI 001 188 JASCO 111 JERROLD 001 002 011 017 073 096 097 162 168 188 210 LINSAY 118 MACOM 191 MAGNAVOX 017 019 068 MOVIE TIME 035 039 NSC 035 190 OAK 197 PACE 179 PANASONIC 053 176 177 189 214 PANTHER 114 PHILIPS 013 019 020 085 090 PIONEER 001 041 119 171 209 POPULAR MECHANIC 116 PRELUDE 120 PRIMESTAR 162 PTS 049 RADIO SHACK 111 112 2...

Страница 34: ...e Number SPRUCER 053 081 177 189 STARCOM 002 011 163 STARGATE 120 TANDY 024 TELECAPATION 028 TEXSCAN 036 TFC 122 TIMELESS 123 TOCOM 170 205 UNITED CABLE 011 UNIVERSAL 033 034 039 042 113 VIDEOWAY 124 211 VIEWSTAR 019 025 086 089 190 ZENITH 065 125 211 ZENTEK 116 ...

Страница 35: ...STON TRACKER 463 HUGHES 437 JANIEL 366 JERROLD 454 468 484 KATHREIN 410 LEGEND 453 MACOM 317 365 369 370 371 MAGNAVOX 461 473 MEMOREX 453 NEXTWAVE 423 NORSAT 373 OPTIMUS 466 PANASONIC 366 469 PANASONIC DBS 457 PANSAT 420 PERSONAL CABLE 418 PHILIPS 375 PICO 407 PRESIDENT 381 404 PRIMESTAR 412 454 468 475 RCA 301 439 465 RCA DSS 458 REALISTIC 349 480 SAMSUNG 442 SATELLITE SERVICE 335 388 SCIENTIFIC ...

Страница 36: ...16 087 HAITAI 099 214 HARMAN KARDON 001 002 025 054 190 218 219 HITACHI 093 INKEL 216 JC PENNEY 098 147 JENSEN 153 JVC 176 195 196 KENWOOD 030 062 078 079 148 151 176 178 181 LOTTE 108 LUXMAN 077 102 LXI 164 MAGNAVOX 039 113 MARANTZ 058 084 191 192 193 MCINTOSH 194 MCS 080 098 MITSUMI 152 MODULAIRE 122 166 NAD 013 074 197 198 NAKAMICHI 199 200 201 NEC 069 NIKKO 053 055 ONKYO 037 038 045 046 171 17...

Страница 37: ...139 163 205 206 207 208 212 217 SOUNDSTREAM 124 SYMPHONIC 059 110 TAEKWANG 177 TEAC 011 058 085 086 106 107 110 121 137 146 154 THETADIGITAL 039 TOSHIBA 013 074 097 151 155 173 VECTOR RESEARCH 087 VICTOR 120 130 WARDS 095 YAMAHA 019 031 053 061 135 169 YORX 122 166 Maker Brand Name Setup Code Number JBL DCR 600 001 HARMAN KARDON 001 Remote Control Code Tables CD PLAYERS RECEIVERS Maker Brand Name ...

Страница 38: ...OOD 007 050 LOTTE 008 MAGNAVOX 009 033 056 MARANTZ 033 MITSUBISHI 023 036 NAD 010 ONKYO 015 048 OPTIMUS 011 050 PANASONIC 024 025 034 035 044 052 PHILIPS 033 056 PIONEER 012 020 038 041 046 047 PROSCAN 037 RCA 018 037 RUNCO 027 SAMSUNG 031 053 054 SANYO 013 049 SHARP 021 028 050 SONY 015 029 043 045 TECHNICS 026 THOMSON 003 004 TOSHIBA 033 047 057 YAMAHA 016 017 030 ZENITH 033 055 ZENITH DIVX 039 ...

Страница 39: ... a signal after approximately twenty minutes it will automati cally go into Standby mode If you will be away from home for an extended period of time or if the subwoofer will not be used turn this switch off to conserve electricity and for safety AC Power Cord Plug the power cord into an unswitched outlet 4 3 2 1 LFE GREEN ON RED STAND BY SUB135S CAUTION RISK OF ELECTRIC SHOCK DO NOT OPEN WARNING ...

Страница 40: ...he Dolby Pro Logic mode by pressing the Surround Mode Selector 7 on the front panel or by pressing the Surround Mode Selector t on the remote until PRO LOGIC appears in the Main Information Display W and the PRO LOGIC Indicator F lights 2 Press the Speaker Button ı on the front panel The words FNT SPEAKER will appear in the Main Information Display W 3 Press the Set Button Ô 4 Press the Buttons y ...

Страница 41: ...operly set it is normal for surround speakers to operate only occasionally Artificially increasing the volume to the rear speakers may destroy the illusion of an enveloping sound field that duplicates the way you hear sound in a movie theater or con cert hall Before beginning the adjustment process make certain that all speaker connections have been properly made The system volume should be set to...

Страница 42: ...way and the surround speakers are five feet away the optimal delay time is figured as 10 5 15 20 Thus in this example the Pro Logic delay should be set at twenty milliseconds NOTE The Theater and Hall modes use a fixed nonadjustable delay time The Dolby Digital mode also includes a separate setting for the center channel delay mode since the discrete nature of these signals makes the location of t...

Страница 43: ...BY DIG appears in the Main Information Display W 9 Press the Delay Button on the remote or front panel The words S DELAY TIME appear in the Main Information Display W 10 Press the Buttons y on the remote once so that C DELAY TIME appears in the Main Information Display W or in the on screen display 11 Press the Set Button Ô 12 Press the Buttons y on the remote or the Selector Buttons 5 on the fron...

Страница 44: ... entered to turn the unit off if the code for your product does not appear in the tables in this manual or if not all functions operate properly try program ming the remote with the Auto Search Method Auto Searching for Product Codes If the unit you wish to include in the remote is not listed in the code tables in this manual or if the code does not seem to operate properly you may wish to program...

Страница 45: ...be programmed or the Power On Button b at the same time Note that an Input Selector d h o will light red and the Program Indicator will flash 2 Enter the steps for the macro sequence by pressing the button for the actual command step Although the macro may contain up to 19 steps each button press including those used to change devices counts as a step The Program Indicator will flash to confirm ea...

Страница 46: ...ntrolling For example button number 7 is the Macro 2 button for the DCR600 but it is the Replay button for CD players and receivers Button number 32 is the Delay button for the DCR600 but the Time button for CD players and Preview Channel button for many TVs cable television boxes amd satellite services Notes on Using the Remote With Other Devices Manufacturers may use different code sets for the ...

Страница 47: ... and the Mute Button c at the same time Next release them and press the Play Button followed by the DVD Input Selector Button d NOTE To remove the Channel Control Punch Through and return the remote to its original con figuration repeat the steps shown in the exam ple above However press the VID 2 TV Input Selector m in Steps 1 and 3 NOTE Before programming the remote for Volume Channel or Transpo...

Страница 48: ... traditional composite video signals by splitting the signal into a separate luminance channel and two color difference signals With a component video connection you will see greater picture resolution and eliminate many picture imperfections such as the moiré pat terns often seen on checked patterned cloths However in order to benefit from component video you must have a video display with Y Pr P...

Страница 49: ... be the one preprogrammed into the disc itself Typically that default will be English for discs sold in Region 1 but the selection will vary at the discretion of the disc s producer Although the default will set the language that will be used when a disc is first put into play the language may easily be changed at any time by using the Audio Button t If you have no other changes to make after set ...

Страница 50: ...p Menu press the Button until the Ratings option is highlighted To change the default Ratings setting press the Button and note that the list of system defaults will be replaced with a list of the program ratings as shown in Figure 5 Some ratings will be highlighted in orange while others will be highlighted in blue Discs with a rating in the orange color band will play without any further action ...

Страница 51: ...n that the system is now unlocked If you have no other changes to make after set ting this default press the Menu Button z to remove the Setup Menu from the screen or press the Play Button to begin or resume playback Changing the Password If you feel that the password has become known to an unauthorized person you may change the password without unlocking the system To change a password you must b...

Страница 52: ... x 3 Letterbox Choose this setting if you have a standard 4 x 3 television set and prefer to see movies in their original aspect ratio You will see the entire movie but when it is presented in a letterbox fashion there will be black bars at the top and bottom of the screen Movies or other programs recorded in a 4 x 3 format will appear normal 4 x 3 Pan and Scan Choose this setting if you have a st...

Страница 53: ...xt press the Enter Button Select one of the three choices in the options box Figure 15 using the Buttons y The choices are as follows PCM Choose this setting if most of your library consists of conventional CDs Dolby Digital Choose this setting only if you do not plan on listening to any DTS selec tions Should you choose to watch a DVD movie or listen to a CD which has a DTS audio track you must r...

Страница 54: ...log or PCM stereo sources Logic 7 M enhances the listening experience by presenting a wider front soundstage and greater rear ambience Both Logic 7 modes also direct low frequency information to the subwoofer if installed and configured to deliver maximum bass impact DOLBY 3 STEREO Uses the information contained in a surround encoded or two channel stereo program to No surround channels create cen...

Страница 55: ...ll frequency range 20Hz to 20kHz and offers dramatically improved dynamic range and significant improvements to signal to noise ratios In addition digital systems have the capability to deliver an additional channel that is specifically devoted to low frequency information This is the 1 channel referred to when you see these systems described as 5 1 The bass channel is separate from the other chan...

Страница 56: ...program material the method of transmission and the way in which it was encoded When a digital signal is playing the letters in these indicators will light in response to the specific signal being received It is important to note that although Dolby Digital for example is referred to as a 5 1 system not all Dolby Digital DVDs or programs are encoded for 5 1 Thus it is sometimes normal for a DVD wi...

Страница 57: ...able of playing signals in the MP3 MPEG 1 Layer 3 format It is not compatible with other computer audio codecs The digital audio input signal may be either optical or coaxial but the signal must be in the PCM format Direct connection of USB or serial data outputs is not possible even though the signals are in the MP3 format If you have any questions about the data output format from your computer ...

Страница 58: ...is sent to the record outputs This means that any program you are watching or listening to may be recorded simply by placing machines connected to the outputs for Tape Outputs or Video 1 Outputs a in the Record mode When a digital audio recorder is connected to the Digital Audio Outputs you are able to record the digital signal using a CD R MiniDisc or other digital recording system NOTES The digi...

Страница 59: ...rawer or carousel tray appears to be stuck contact your local JBL authorized service center Do not load more than one disc in each slot in the tray and do not attempt to place a standard 5 inch 12cm disc over a smaller 3 inch 8cm disc Once the discs are loaded press the Open Close Button f to close the disc tray When the tray drawer closes the disc that was last in the center position facing outwa...

Страница 60: ...y Forward Reverse Search Step Advance and Pause features are not available with these discs Using the DVD Disc s Menu One of the unique features of the DVD system is that it offers a producer the opportunity to include a wide range of features on a disc including multiple language tracks subtitles in a variety of languages special information such as movie trailers and cast information as well as ...

Страница 61: ... yellow brackets 3 Press the Enter Button 4 Note that the number to the right of the T will be replaced with two dashes 5 Use the Numeric Keys to enter the number of the title to be accessed 6 The desired title will automatically be started Titles may also be selected during the playback of a DVD by pressing the Title Button x However the action of the disc when pressing this button will vary from...

Страница 62: ...le disc selection In this case use the Buttons y to make the selection from the menu screen and then press the Enter Button IMPORTANT NOTE The steps indicated on the page allow you to change the subtitle lan guage but they do not determine whether the subtitles are actually displayed on the screen To have the subtitles appear at any time press the Subtitle On Off Button to toggle the subtitles on ...

Страница 63: ... icon with the words IntroScan underneath it second from the left is highlighted in white between yellow brackets 3 Press the Enter Button 4 Note that the disc will immediately begin to play the first track on the disc and the musical notes in the icon will change and flash 5 The unit will play the first ten seconds of each track on the disc moving from one track to the next 6 To play a track duri...

Страница 64: ...hese steps while a disc is playing 1 Press the Repeat A B Button at the start of the sequence to be repeated Note that a Repeat A Banner Figure 23 will appear on the video screen and the Repeat A Indicator will light in the Information Display Figure 23 2 When at the end of the sequence to be repeated note that the on screen banner mes sage will change to Repeat A B Figure 24 as will the Repeat A ...

Страница 65: ...program step When all steps have been programmed press the Play Button to begin pro grammed play or the Return Button to exit the programming function and return to normal operation Bookmarks Bookmarks are a feature of the DVD600 that allows you to mark up to nine different points on a disc and to quickly return to those points later The Bookmarks feature works on both DVD and CD discs To Enter a ...

Страница 66: ...ew 7387 Hindi 7273 Language Code Hungarian 7285 Icelandic 7383 Indonesian 7378 Interlingua 7365 Interlingue 7369 Iunpiak 7375 Irish 7165 Italian 7384 Japanese 7465 Javanese 7487 Kannada 7578 Kashmiri 7583 Kazakh 7575 Kinyarwanda 8287 Kirghiz 7589 Kirundi 8278 Korean 7579 Kurdish 7585 Laothian 7679 Latin 7665 Latvian Lettish 7686 Lingala 7678 Lithuanian 7684 Macedonian 7775 Malagsy 7771 Malay 7783 ...

Страница 67: ...be away from home for an extended period of time or if the subwoofer will not be used switch the Master Power switch to the Off position 3 2 2 2 3 LFE GREEN ON RED STAND BY SUB135S CAUTION RISK OF ELECTRIC SHOCK DO NOT OPEN WARNING TO REDUCE THE RISK OF FIRE OR ELECTRIC SHOCK DO NOT EXPOSE THIS APPLIANCE TO RAIN OR MOISTURE AVERTISSEMENT POUR PR VENIR LES RISQUES D INCENDIE OU DE CHOC LECTRIQUE VI...

Страница 68: ...y for more than 3 seconds The Information Display W will light and a test pattern will appear on your TV Press Power On b to proceed 7D 5D SYMPTOM PROBABLE CAUSE SOLUTION DCR600 does not function when Main No AC Power Make certain AC power cord is plugged into Power Switch is pushed a live outlet Check to see whether outlet is switch controlled DVD600 does not turn on Main Power Switch turned off ...

Страница 69: ...0 is set in Dolby Digital or DTS mode make sure it is configured so that the center speaker is enabled In Dolby Digital or DTS modes make sure the DCR600 is configured so that the surround speakers are enabled Check all wires and connections between the DCR600 and speakers Make sure all wires are connected Make sure none of the speaker wires are frayed cut or punctured System plays at low volume b...

Страница 70: ...normal artifact of DVD playback for pictures Fast Forward or Reverse Play to jump or show some distortion during rapid play Some remote buttons do not operate Function not available for this disc Some discs do not include all DVD features during DVD play The menu is in a foreign language Incorrect menu language Change menu language selection symbol appears Requested function not available at Certa...

Страница 71: ... Distortion 0 8 1kHz 50 Modulation Selectivity 30dB at 10kHz Video Section Format NTSC Input Level Impedance 1Vp p 75 ohms Output Level Impedance 1Vp p 75 ohms Video Frequency Response 10Hz to 8MHz 3dB General Unit Power Consumption 72W idle 580W maximum Unit Dimensions Width 17 3 inches 440mm Height 6 5 inches 165mm Depth 17 1 inches 435mm Unit Weight 31 lb 14 1kg Depth measurement includes knobs...

Страница 72: ...ration 90dB THD 0 0035 Signal to Noise Ratio 100 dB Wow and Flutter below measurable limits General Unit Power Consumption 25W Unit Dimensions Width 17 3 inches 440mm Height 5 1 inches 130mm Depth 16 9 inches 420mm Unit Weight 14 4 lb 7 6kg Depth measurement includes knobs and buttons Height measurement includes feet and chassis All features and specifications are subject to change without notice ...

Страница 73: ... Weight 1 1 lb 0 5kg Center Configuration 2 Way video shielded Recommended Amplification Use with DCR600 only Impedance 8 Ohms nominal Sensitivity 86dB 1 watt 1 meter Tweeter One 1 2 titanium laminate dome Midranges Dual 3 cones Unit Dimensions Width 7 63 inches 194mm Height 3 25 inches 83mm Depth 3 75 inches 95mm Unit Weight 1 89 lb 0 86kg Subwoofer Configuration Floor firing bass reflex ported e...

Отзывы: