background image

32

O T H E R   F U N C T I O N S   ( C O N T I N U E D )

S P O R T

: Sports

• 

EDUCATE

: Educational

• 

D R A M A

: Drama

• 

CULTURE

: Culture

• 

SCIENCE

: Science

• 

V A R I E D

: Varied Speech

Programs

• 

P O P M

: Popular Music

• 

R O C K M

: Rock Music

• 

M.O.R.M.

: Middle-of-the-

Road Music

• 

L I G H T M

: Classical Music

• 

CLASSICS

: Serious Classical

Music

• 

O T H E R M

: Other Music

Listening To An External
Source

If an external audio source is con-
nected to this system (see page 15),
you can listen to the external source
through the system.

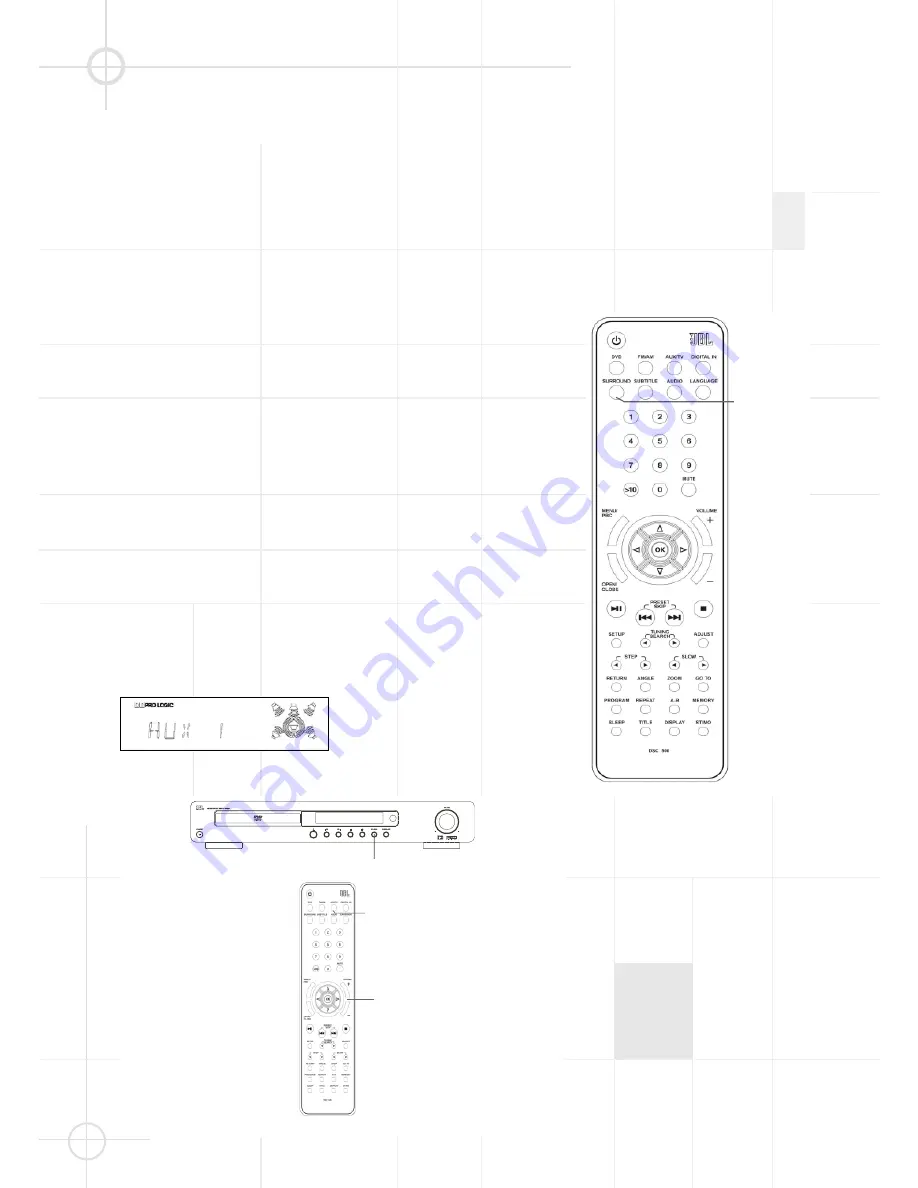
1. Press 

SOURCE

repeatedly until

AUX

or 

TV

appears on the front

panel display. You can also press

AUX/TV

on the remote once to

select the desired external source
directly.

2. Press 

SOURCE

on the front or

AUX/TV

on the remote repeatedly

until TV appears on the front panel
display. In that case, you can hear
the sound of the station received by
your TV´s tuner with the JBL DSC
system, if  the system is connected
to the TV using the SCART cable or
Audio Input Jacks (see method 1,
page 15).

3. Operate the source connected to

the system.

4. Adjust the volume level by pressing

or 

-

.

5. The system's Dolby Pro Logic

decoder may be used for enhanced
listening to a stereo source. For
details, see “Selecting Listening
Modes” below.

Selecting Surround Modes

This system has a built-in Dolby Pro
Logic decoder. It can transform a
stereo or PCM signal to Dolby
Surround so that you can enjoy
surround sound from nomal 2 channel
stereo broadcasts and recordings.
Moreover, with true (analog)
surround recordings you will only
hear the surround effect when one of
the surround modes is selected.

When listening to the source, press
the 

SURROUND

button repeatedly to 

select a listening mode. All modes
are described in the Surround Mode
Chart on the next page.

The relevant indicators appear on the
front panel display. Additionally,
speaker icons will light, indicating
which of the six speakers is operating
with the surround mode selected.

Notes:

• Before you press the surround

button, please lower the volume
level to reduce the possibility of
speaker damage.

• If you are listening to a mono

broadcast or recording, select the
Stereo setting (all surround indi-
cators disappear in the display) for
best results. Do not select one of
the surround sound settings.

SURROUND 

VOL +or  - 

SOURCE

AUX/TV 

Содержание DSC 500

Страница 1: ...rill of live performance and movie sound to the home environment by calling on JBL s professional engineering leadership SATELLITE TYPE Titanium laminate dome tweeter SUBWOOFER TYPE Bass reflex enclosure PORT DESIGN FreeFlow flared PROFESSIONAL REFERENCE Cinema Systems MODEL NUMBER DSC 500 ...

Страница 2: ...al settings and instructions for changing them are found in the second half of the manual This system was designed to provide you with many years of reliable operation with a minimum of care and maintenance Every component in your system was in perfect working condition when it left our factory If you experience any problems with the set up or operation of this system please review the Troubleshoo...

Страница 3: ...ing the On Screen Display OSD Language 25 Screen Saver Setting SCR Saver 25 TV Display Setting 25 TV Type Setting Multi NTSC PAL 26 Angle Mark Setting 26 Video Out Setting 26 Speaker Setup 27 Delay Setting 27 Audio Setup 28 Dynamic Range Setting 28 Preferences Setup 28 Selecting the Language for Audio 28 Selecting the Language for Subtitles 28 Selecting the Language for Disc Menu 28 Setting the Pa...

Страница 4: ...e copy pro tection code prevents the videotape copy from playing normally For Optimum Performance The controller is a precision device that is constructed using extremely accurate technology Soiling or friction affecting the pickup lens or disc drive can impair the image quality In the worst case neither video nor audio will be played back To obtain optimum picture quality the player should be che...

Страница 5: ...ond FWD While playing a disc page 17 press this button to select the next title chapter or track While listening to the radio page 31 press this button to tune to a higher frequency For automatic tuning press and hold it for more than 1 second A STOP page 16 Stop playing a disc G B PLAY PAUSE page 16 Play or pause a disc REMOTE SENSOR Receives the remote control signals Front Panel Display page 5 ...

Страница 6: ...io FM AM Frequency In AM mode kHz lights up In FM mode MHz lights up Disc Type Indicators The DVD VCD CD or MP3 indicator will illuminate to show the type of disc currently being played Playback Mode Indicators These indicators light to show the current playback mode Program Indicator page 20 This indicator lights when the programming functions are in use Parental Lock Indicator This indicator lig...

Страница 7: ...le not included S Video Out page 14 Connect to a TV S Video input S Video cable not included System Audio Output page 12 Connect to System Audio Input on the DSC active subwoofer AC Power Cord page 14 Connect to a 230V wall outlet Coaxial Digital Input Connect the coax digital output from a DVD player HDTV receiver LD player MD player or CD player to this jack The signal may be either a Dolby Digi...

Страница 8: ...s to select next previous title chapter or track page 17 In tuner mode press to select previous next preset station page 15 ST MO STEREO MONO Switches between mono and stereo during FM stereo reception page 32 A STOP Stops disc playback page 16 Also used to delete stored program page 22 OPEN CLOSE page 16 Opens or closes the disc tray RETURN page 18 Displays root menu when playing a DVD REPEAT pag...

Страница 9: ... and or on front panel display DVD page 16 Selects the input from a DVD or other disc format inserted in the disc tray ZOOM page 36 Zoom in to enlarge picture area SETUP page 23 Displays or exits the SETUP menu SLOW Activates slow motion when playing DVD or VCD page 17 TUNER page 15 31 Press to select radio as source If already selected press to switch between FM and AM AUX TV page 32 Selects the ...

Страница 10: ...disc Do not expose the disc to direct sunlight or sources such as hot air ducts or leave it in a car parked in direct sunlight as there can be a considerable rise in temperature in side the car After playing store the disc in its case Do not write on the label side with a ball point pen or other writing utensils Be careful not to drop or bend the disc Disc cleaning precautions Before playing clean...

Страница 11: ...on from the listener is 1m The two surround speakers should be placed slightly behind the listening position and ideally should face each other and be at a level higher than the listeners ears If that is not possible they may be placed on a wall behind the listening position facing forward The surround speakers should not call attention to themselves Experiment with their placement until you hear ...

Страница 12: ...peakers Satellites and Surrounds On shelves On the wall On optional stands FS300S Attach plate to wall The brackets should be placed if possible so that the screws will fasten into a wooden wall stud If that is not possible use properly selected wall anchors Slide speaker onto support Place speaker and support on wall plate S P E A K E R M O U N T I N G O P T I O N S ...

Страница 13: ...HT CENTER LEFT LEFT RIGHT FRONT SPEAKERS SURROUND SPEAKERS SYSTEM AUDIO INPUT WARNING AVIS FOR CONTINUED PROTECTION AGAINST A RISK OF FIRE REPLACE ONLY WITH SAME FUSE TYPE UTILSER UN FUSIBLE DE RECHANGE DE MEME TYPE 4A 250V TYPE T POWER TM Subwoofer D S C S Y S T E M C O N N E C T I O N Caution Always make certain that the controller and the subwoofer are turned off before connecting or disconnect...

Страница 14: ...ng the FM wire antenna keep it as horizontal as possible Move it until you receive the best reception If you have poor FM reception Use a 75 ohm coaxial cable not included to connect the system to an outdoor FM antenna as shown below or to the radio antenna connector on the wall for the roof antenna on your house if any Notes If you connect the system to an outdoor antenna ground it against lightn...

Страница 15: ...the Coaxial Digital Out of your device to the Coaxial Digital In on the DSC 500 DVD Aux Input for External Source You may connect a line level stereo analog audio source such as a Sat receiver tape deck phono preamp of a record player etc to the controller s rear panel AUX1 and AUX2 Input sockets to enjoy the benefits of your DSC system with other source components VCR Connection Audio Cables Not ...

Страница 16: ...ess STANDBY on the remote control to turn the system On Make sure that the Main Power Switch on the back is set to the 1 on position 2 Press either FM AM on the remote control or SOURCE on the front panel repeatedly to select the Tuner and the desired radio band AM or FM 3 Tune to the first station you wish to preset Manual Tuning repeatedly press TUNING SEARCH on the remote control until the desi...

Страница 17: ... page 18 When playing a VCD CD or MP3 disc the player will go to stop mode With CDs and MP3 discs the number of all tracks on the disc will be displayed on the front panel display and with MP3 discs the main root directory will appear on the TV screen With VCDs the message VCD STOP will appear on the front display Note While the disc is loading the player will not respond to any commands 5 While i...

Страница 18: ...rch speed by pressing SEARCH or repeatedly If the playing disc is a DVD you can select the following search speeds FF x2 FF x4 FF x6 FF x8 normal play or FR x2 FR x4 FR x6 FR x8 normal play If the playing disc is a CD VCD or SVCD you can select the following search speeds FF x1 FF x2 FF x3 FF x4 normal play or FR x1 FR x2 FR x3 FR x4 normal play Notes This function is not available for MP3 The lar...

Страница 19: ...ppears The contents of the root menu vary from disc to disc 2 While the root menu appears on the screen press D E to select the title or chapter you want to play Depending on the disc you can use the number buttons 0 9 10 to select the title or chapter 3 Press OK The player starts playing the selected title or chapter Notes Depending on the DVD disc you may not be able to enter the root menu For s...

Страница 20: ...topped Some DVDs do not allow repeat playback function A B Repeat Playback You can play a specific portion in a chapter or track repeatedly This is useful when you want to memorize lyrics or repeatedly watch a portion of the DVD 1 When playing a disc press A B one time to set the starting point A of the specific portion you want to play repeatedly The A indicator appears on the front panel display...

Страница 21: ...he corresponding track number selected will appear in the display 4 If you have programmed 99 tracks and try to add one more P99 the FULL indicator will appear on the TV screen and the front panel display 5 After you have created a program press B to play the program Note If you press STOP A twice or other buttons unrelated to the program mode the system will interrupt and exit the program setting...

Страница 22: ...re with VCD only time will be shown no title 2 Use the number buttons 0 9 10 to input the desired time code For example key in 0 1 2 3 4 5 3 Press OK to start playing from the point of 01 23 45 This is not needed with VCD s the player will skip to the time selected at once 4 Press GO TO again to exit time menu screen Notes If the title number chapter number or time code you input does not exist on...

Страница 23: ...number or time may not appear or you may not be able to change the display When playing a CD VCD or SVCD 1 Press DISPLAY for track number selected total track number on disc and the single track elapsed time 2 Press Display repeatedly for single track remaining time then total disc elapsed time and then total disc remaining time on screen and on the front panel display not with VCD 3 Press DISPLAY...

Страница 24: ...e Preferences Page cannot be selected while a disc is playing If a disc is playing press SETUP again to exit the SETUP Menu page and press STOP to stop playback Then press SETUP again to re enter the Main Page The Preferences Page can now be selected Use DE to select one of the settings on the page The options for the setting will appear in the right column One of those options will already be sel...

Страница 25: ...CES GENERAL PAGE TV DISPLAY NORMAL PS NORMAL LB 16 9 TV TYPE MULTI NTSC PAL ANGLE MARK ON OFF VIDEO OUT S VIDEO SCART RGB OSD LANG ENGLISH FRENCH ITALIAN GERMAN SPANISH SCR SAVER ON OFF MAIN PAGE SPEAKER SETUP PAGE CNTR DELAY 2M 1 5M 1M 0 75M 0 5M OFF REAR DELAY 5M 4M 3M 2M 1M OFF TEST TONE ON OFF MAIN PAGE AUDIO SETUP DYNAMIC FULL 7 8 6 8 5 8 4 8 3 8 2 8 1 8 OFF MAIN PAGE PREFERENCES PAGE AUDIO E...

Страница 26: ...er Turns the screen saver option on or off default is on If you turn the screen saver on the screen saver image appears when you leave the system in pause or stop mode for more than 1 minute The screen saver is useful to prevent your display from becoming damaged ON Turns the screen saver on OFF Turns the screen saver off TV Display Setting Path Main Page General Page TV Display Selects the aspect...

Страница 27: ...rk Some DVD movies contain scenes which were filmed from multiple angles simultaneously If the scene you are watching was shot from multiple angles the angle icon will appear on the screen You may then press the angle button on the remote to select the alternate angles The default Angle Mark setting is On If you change the setting to Off the angle icon will not appear even if the scene was shot fr...

Страница 28: ...A measured above Press OK to confirm your selection Rear Delay If you wish to adjust the delay setting for the rear loudspeakers follow the steps below 1 Press SETUP to enter SETUP MENU Select SPEAKER SETUP then press OK 2 Select REAR DELAY using DE then press to go to the right option list Select the distance that corresponds to the lenght of arrow B measured above Press OK to confirm your select...

Страница 29: ...t that is not recorded on the DVD one of the recorded languages is automatically selected You can select any language recorded on the disc by pressing LANGUAGE when playing a DVD see page 30 Selecting the Language for Subtitles Path Main Page Preferences Page Subtitle Selects the preferred language for subtitles as default ENGLISH SPANISH FRENCH ITALIAN GERMAN OFF Notes When you select a preferred...

Страница 30: ... played no matter what setting is selected Changing the Password Path Main Page Preferences Password Change To change the password from the original factory setting of 3308 follow the path shown above to select the Change heading Press OK for the Password Change Page Use the number keys on the remote to enter the old password 3308 Only XXXX will appear as you enter the numbers If you enter an inco...

Страница 31: ...ed off even if you set the subtitle function to off During some scenes the subtitles may not appear immediately after you turn them on Some DVD s allow you to make subtitle selections and turn subtitles on or off only via the disc menu Use D E and OK The maximum number of subtitle languages on a DVD is 32 You can set a preferred language for subtitles in the SETUP menu see page 29 Audio Language F...

Страница 32: ... abbreviations used to indicate each PTY along with an explanation of the PTY NEWS News AFFAIRS Current Affairs INFO Infomation NUMBER BUTTONS STATION VOLUME AND TUNING SOURCE STANDBY FM AM DISPLAY Listening To The Radio To listen to preset radio stations Store radio stations in the system s memory first see Presetting Radio Stations on page 15 1 Press SOURCE on the controller repeatedly until FM ...

Страница 33: ... level by pressing VOLUME or 5 The system s Dolby Pro Logic decoder may be used for enhanced listening to a stereo source For details see Selecting Listening Modes below Selecting Surround Modes This system has a built in Dolby Pro Logic decoder It can transform a stereo or PCM signal to Dolby Surround so that you can enjoy surround sound from nomal 2 channel stereo broadcasts and recordings Moreo...

Страница 34: ...distinct outputs Left Center Right and a Mono Surround channel Use this mode for accurate reproduction of programs bearing the Dolby Surround DTS Stereo UltraStereo or other Surround logos Surround encoded programs include videocassette DVD and LD movies TV and cable programs radio programs and audio CDs Dolby Pro Logic processing may also be used to provide a pleasing surround effect with some st...

Страница 35: ...ectories appear on the screen if the disc contains several directories see figure 1 below With discs without directories a listing of up to 12 tracks on the disc will appear on the screen as shown in fig 2 below showing the names ID tags of all tracks currently listed Figure 1 Figure 2 To select a track press the D E arrow buttons until the desired track name is highlighted possible in stop mode o...

Страница 36: ...ote You must make the adjustment while the treble level appears in the display If the treble level indicator disappears the setting will not be changed When you change the setting the new setting becomes the default setting until you change it again To raise or lower the master volume press the VOLUME or button on the remote control after the treble level indicator has disappeared The level of all...

Страница 37: ...o magnification levels are available On each press of ZOOM the following message will appear on the TV screen Notes If you press the E D buttons the zoom point shifts allowing you to pan the zoomed picture ZOOM 2 ZOOM OFF ZOOM 1 5 Some discs may not respond to the zoom feature Zooming does not work on subtitles or menu screens included on DVDs The magnification level varies depending on the TV DIS...

Страница 38: ...ctive circuitry has been activated because of a short circuit Turn off the system eliminate the short circuit problem and turn on the power again The audio interconnect is damaged Replace it with a new one The system is in pause mode or in slow motion play mode or fast forward or fast reverse Press B to return to normal play mode Check the speaker settings see page 30 The left and right sounds are...

Страница 39: ... or play mode turn the PBC Playback Control off by pressing MENU PBC on the remote an appropriate message will appear on the TV screeen not available with DVD Messages do not appear on the TV screen in the language you want Select the language for OSD in the SETUP menu see page 25 For all messages from the DVD DVD menu subtitles in the proper language the disc must have the language you selected i...

Страница 40: ...els are recorded discretely and processed digitally Manufactured under license from Digital Theater Systems Inc US Pat No 5 451 942 and other worldwide patents issued and pending DTS and DTS Digital Surround are trademarks of Digital Theater Systems Inc 1996 Digital Theater Systems Inc All rights reserved MPEG AUDIO International standard coding system to compress audio digital signals authorized ...

Страница 41: ... EIAJ 2kHz CD More than 85 dB EIJA FM Tuner System PLL quartz locked digital synthesizer system Tuning range 87 50 108 00 MHz Antenna terminals 75 ohms unbalanced Intermediate frequency 10 7 MHz AM Tuner System PLL quartz locked digital synthesizer system Tuning range 522 1620 kHz 9 kHz interval Video Outputs CVBS Video 1 Vp p 75 ohms S video Y 1 Vp p 75 ohms C PAL 0 3 Vp p 75 ohms NTSC 0 286 Vp p...

Страница 42: ...mm paper cone magnetically shielded High frequency driver 12 mm Titanium laminate dome magnetically shielded Dimensions HxWxD 83 x 194 x 95 mm 3 3 x 7 6 x 3 7 Weight 0 8 kg 1 88 lb Active Subwoofer Frequency response 6 dB 35 160 Hz Built in amplifier power 100 Watts RMS Bass driver 200 mm paper cone long throw woofer Design principle Bass reflex with FreeFlow flared port Dimensions HxWxD 450 x 250...

Страница 43: ... No YOM200002 0001 O W N E R S G U I D E PRODUCT LINE DSC 500 230V DESIGN GOAL Bring the thrill of live performance and movie sound to the home environment by calling on JBL s professional engineering leadership SATELLITE TYPE Titanium laminate dome tweeter SUBWOOFER TYPE Bass reflex enclosure PORT DESIGN FreeFlow flared PROFESSIONAL REFERENCE Cinema Systems MODEL NUMBER P R O S O U N D C O M E S ...

Отзывы: