


ENGLISH
OPERATION MANUAL
JB SYSTEMS
®
4/5
EZ-CON 72
6. [CHASE] BUTTONS ([CHASE1
… 6]):
Used to select a chase to run or to program.
7. [PAGE
▲
] BUTTON:
Used to go up through the pages from 1 to 9
8. [PAGE
▼
] BUTTON:
Used to go down through the pages from 9 to 1
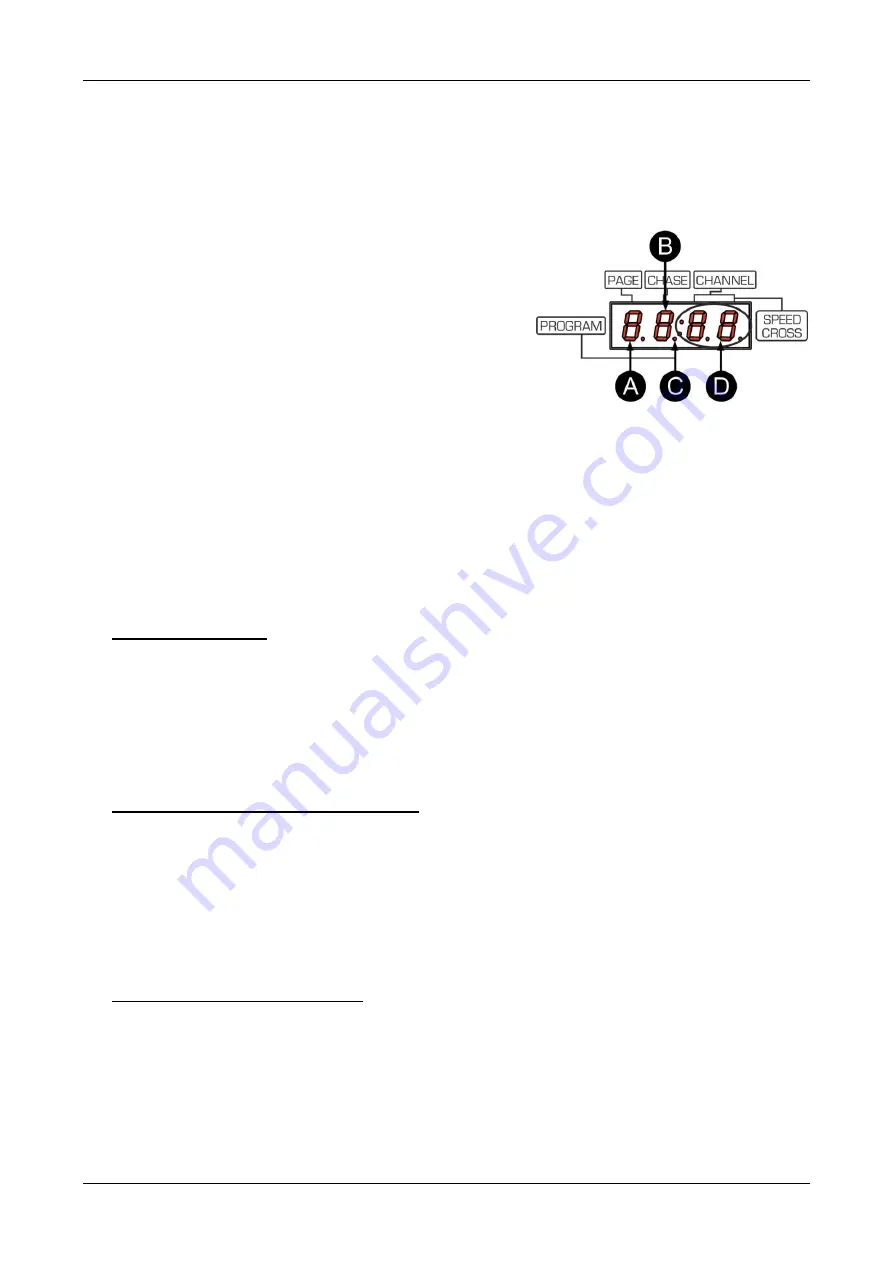
9. INFORMATION DISPLAY 2:
(12)
A. Digit 1 shows the number of the active page.
B. Digit 2 shows the number of the active chase.
C. This dot will lit when the controller is in program mode.
D. Digit 3-4 show the number of the active channel.
10. [ADD] BUTTON:
Used to add or select scenes (steps) to the
chases depending of the working mode.
11. INFORMATION DISPLAY 1:
(11) Shows the value of the
channels or the scene (step).
12. [DELETE] BUTTON:
Used to delete or select scenes (steps)
depending of the working mode.
13. [M-DMX] OUTPUT:
Please note that this USB-connector is
NOT used for updates or to connect the unit to a PC! Instead
this USB-connector makes it very easy to add wireless DMX
to the unit! Just add the (optional) WTR-DMX DONGLE from
BRITEQ
®
and you will get wireless DMX! No extra settings to be made in the setup menu, just follow the
procedure in the user manual supplied with the WTR-DMX DONGLE from BRITEQ
®
. The separate
WTR-DMX DONGLE is available from WWW.BRITEQ-LIGHTING.COM (order code: B04645)
14. DMX OUTPUT:
Sends DMX-signals to the connected units.
15. [UPDATE] CONNECTOR:
This micro USB connector can only be used for updating the internal
firmware. Do NOT put in a power adapter nor any other device as this will cause damage to the internal
electronics.
16. POWER SWITCH:
used to switch the unit ON/OFF
17. MAINS INPUT
with IEC14 socket and integrated fuse holder, connect the supplied mains cable here.
HOW TO SETUP
1. PROGRAM A CHASE:
A.
Chases can only be
programmed while the unit is set in “program mode”. So first enter “program
m
ode” by pressing the [PROGRAM] button (4)
→
red “program DOT” (C) will lit.
B.
Select the desired chase to program by pressing one of the chase buttons (6).
C.
Use the CHANNEL faders (1) to set the desired scene. (scene is present on the DMX-output)
D.
Press the [ADD] button (10) to save the scene. The displays (9, 11) will blink 2 times to confirm that
the scene is saved.
E.
Repeat steps C and D to program other scenes. The maximum is 40 scenes per chase.
F.
Quit the
“program mode” by pressing the [PROGRAM] button (4).
2. MODIFY A PROGRAMMED CHASE/SCENE:
A.
Chases/scenes can only be modified while the controller
is set in “program mode”. So first enter
“program mode” by pressing the [PROGRAM] button (4)
→
red “program DOT” (C) will lit.
B.
Select the desired chase to modify by pressing the corresponding chase button (6).
C.
Select the desired scene to modify by pressing the [DELETE] (12) or [ADD] button (10).
D.
Modify the scene by putting the channel faders (1) in the wanted position and save the new scene by
keeping the [BLACKOUT/SHIFT] button (5) pressed and press the [ADD] button (10). The displays
(9, 11) will blink 2 times to confirm that the scene is saved.
E.
Repeat steps B, C and D to modify other scenes.
F.
Quit the
“program mode” by pressing the [PROGRAM] button (4).
3. DELETE A PROGRAMMED SCENE:
A.
Chases/scenes can only be deleted while the controller
is set in “program mode”. So first enter
“program mode” by pressing the [PROGRAM] button (4)
→
red “program DOT” (C) will lit.
B.
Select the desired chase to delete by pressing the corresponding chase button (6).
C.
Select the desired scene to delete by pressing the [DELETE] (12) or [ADD] button (10).
D.
Delete the scene by keeping the [BLACKOUT/SHIFT] button (5) pressed and press the [DELETE]
button (12). The displays (9, 11) will blink 2 times to confirm that the scene is deleted.
E.
Repeat steps B, C and D to delete other scenes.
F.
Quit the
“program mode” by pressing the [PROGRAM] button (4).


