


Program key setting
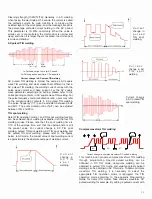
MMA (DC
)
Note:
t0—Standby: No welding current; output voltage is the no-load
voltage.
t1—Arc ignition: Welding current is arc ignition current (I1).
t3—Arc burning: Welding current is the pre-set current (I2).
t4—Short-circuit transfer: Welding current is the short-circuit
transfer current (I3).
In MMA mode, 4 parameters that can be adjusted directly
and 1 parameter that can only be adjusted through
programming are available for this machine. These are
shown below.
Current (I2)
: This is the welding current when arc is burning,
and users can set it according to their own technical
requirements.
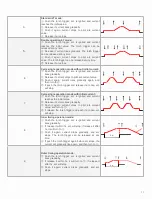
Arc force
: It refers to the ascending slope of the current in
short circuit, and it is set as the amperage increased per
millisecond in this machine. The current will rise from the
pre-set value by this slope after short circuit occurs. (E.g.
When the pre-set current is 100A and the arc force is 20, the
current will be 200A 5ms after short circuit occurs.) If it is still
under short circuit when the current increases to the
allowable maximum value 250A, the current will not rise any
more. If the short circuit status lasts for 0.8s or more, the
machine will enter into electrode sticking process: to wait the
disconnection of the electrode under low current. Arc force
should be set according to the electrode diameter, pre-set
current and the technical requirement. If the arc force is high,
the molten drop can be transferred quickly, and electrode
sticking seldom occurs. However, too high arc force may
lead to excessive spatter. If the arc force is low, there will be
little spatter, and the weld bead will be shaped well.
However, too small arc force may lead to soft arc and
electrode sticking. Therefore, the arc force should be
increased when welding with thick electrode under low
current. In general welding, the arc force may be set at 5~50.
Arc ignition current
(I1) and arc ignition time (T1): Arc
ignition current is the output current of the machine when the
arc is ignited. Arc ignition time is the time the arc ignition
current lasts. When in high current ignition mode, the arc
ignition current is generally 1.5~3 times the welding current,
and the arc ignition time is 0.02~0.05s. When in low current
ignition mode, the arc ignition current is generally 0.2~0.5
times the welding current, and the arc ignition time is
0.02~0.1s.
Operation hints
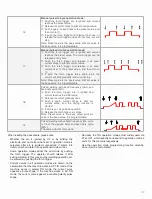
Arc ignition modes in MMA
Low current arc ignition: This can be also called lift/soft arc
ignition. Set the arc ignition current (I1) to be a value lower
than I2 and the machine will enter into low current arc
ignition mode. Touch the work piece with the electrode, and
lift the electrode to the normal position to weld after arc is
ignited.
High current arc ignition: This can be also called contact/
thermal arc ignition. Set the arc ignition current (I1) to be a
value not lower than I2 and the machine will enter into high
current arc ignition mode. Touch the work piece with the
electrode, and normal welding can be carried out without
lifting the electrode.
Arc breaking voltage (U1):
This parameter is used for
setting the arc breaking voltage during welding. It is specially
designed to meet the requirement in HF intermittent welding,
and its resolution is 0.1V. The arc breaking voltage indicates
the maximum allowable arc voltage during welding, that is to
say, welding can be continued when the arc voltage is lower
than U1, or else welding will stop immediately. This
parameter cannot be simply adjusted like other parameters,
and should be adjusted by the following method.
Operation hints
Arc breaking voltage programming
Enter into the amendment state: Press the MMA parameter
selecting key and turn on the machine, and the parameter
display meter will flash “P-1”, which will disappear 5s later.
At this time, the voltage LED will turn on, and the machine
will enter into arc breaking voltage amendment state.
Amend the arc breaking voltage: After entering into arc
breaking voltage amendment state, what the parameter
display meter shows is the e
ff
ective arc breaking voltage
before amendment. You can amend it to your desired value
by turning the knob.
Exit the amendment state: Exit by pressing the MMA
parameter-selecting key after amendment. At this time, the
new arc breaking voltage comes into being and it can be
automatically saved.
Note: In general welding, the arc breaking voltage should be
above 45V. If it is too low, arc breaking will occur during
welding.
13
Содержание 315P AC/DC Digital
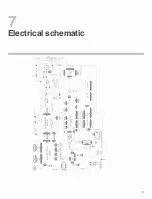
Страница 27: ...Electrical schematic 7 25...
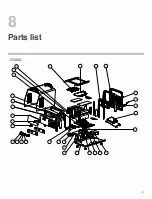
Страница 28: ...Parts list 8 JT 200D 26...
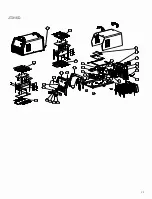
Страница 30: ...JT 315D 28...


