background image

japa

 485


User manual


Translation 

20 

485 1.0-2014 


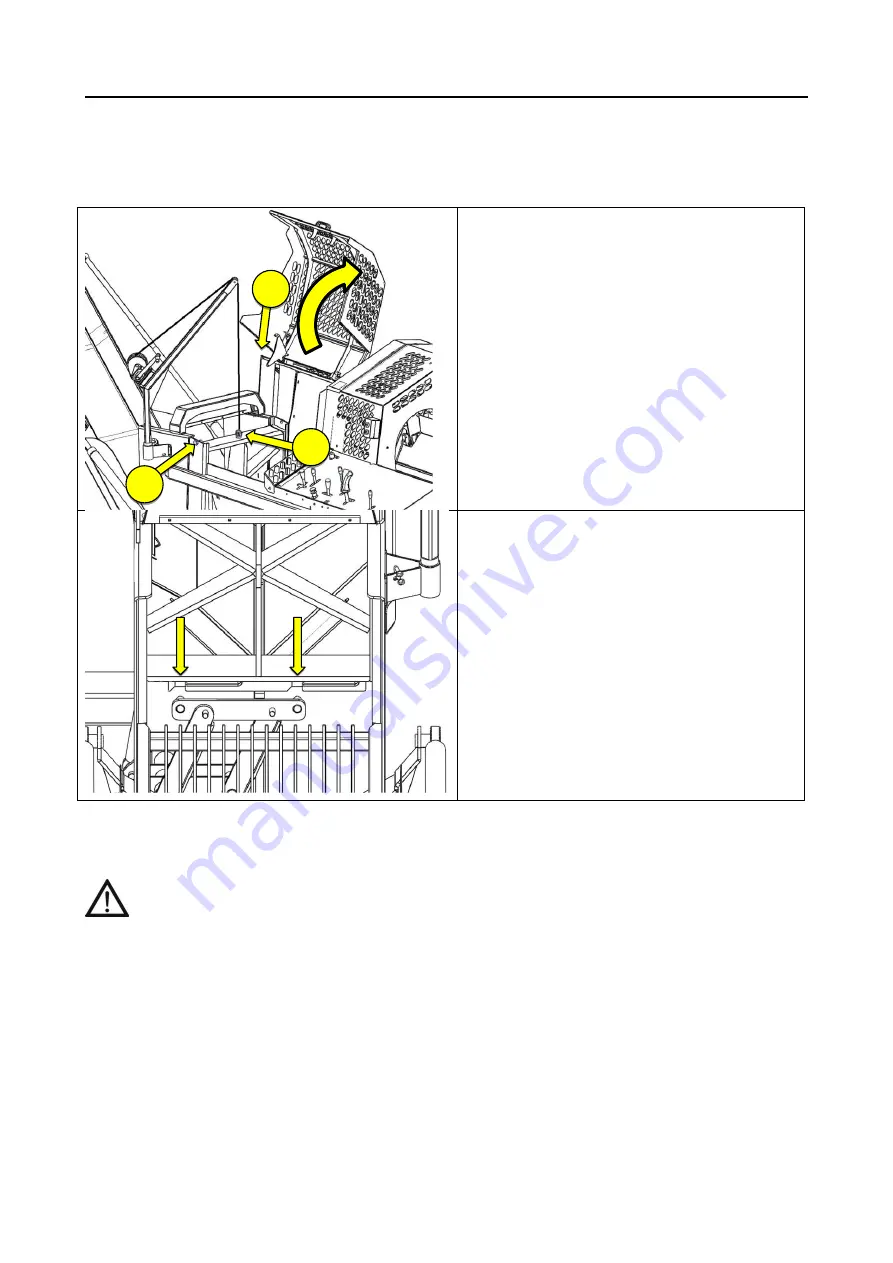
3.8 Replacing the splitting knife 

 
Always use work gloves when handling the splitting knife. 


A.  Fully  open  the  protective  mesh  of  the  splitting 
area. 
 
B.  Remove  the  locking  screw  (1)  of  the  splitting 
knife rail. 
 
C. Use the hydraulics to lift the knife to the upper 
position. 
 
D.  Attach  the  eye  screw  (2)  to  the  threaded 
opening splitting knife, and fasten the  winch  wire 
to the  screw.  The  eye  screw  is  stored  in  the  tool 
box behind the machine. 
 
E. Use the winch to lift the splitting knife out of its 
cradle, and lower it onto the ground on its side. 


F. Lift the new knife up with the winch, and lower 
it carefully into the knife cradle. 
 
G.  Lower  the  knife  further  and  ensure  that  its 
slots connect properly with the lifting mechanism.  
 
H.  Disconnect  the  eye  screw  (2)  and  winch  wire 
from the splitting knife. 
 
B.  Attach  the  locking  screw  (1)  of  the  splitting 
knife rail. 
 
J.  Release  the  hook  (3)  and  close  the  protective 
mesh of the splitting area. 


DO NOT WALK UNDER A SPLITTING KNIFE SUSPENDED FROM THE WINCH! 


Содержание 485

Страница 1: ...ENGLISH japa 485 User manual TR Tractor drive TRE Electricity and tractor drive 6 0t 8 0t ...

Страница 2: ...ansport position 13 2 7 Connections 14 3 Operating the machine 15 3 1 Acknowledging the hazards and responsibilities involved 15 3 2 Before use 15 3 3 Safety mechanism 15 3 4 Control panel 16 3 5 Cutting device 17 3 6 Blade lubrication 18 3 7 Splitting device 19 3 8 Replacing the splitting knife 20 4 Accessories 21 4 1 Splitting knives 21 4 2 Dust extractor 21 4 3 Hydraulic timber deck 21 4 4 Clea...

Страница 3: ...4 5 Adjusting the switching of splitting power 31 5 5 Annual maintenance 1 000 hrs 31 5 5 1 Extended maintenance interval 33 5 5 2 Lubricant table 33 5 6 Storage 33 5 7 Maintenance log 33 6 Troubleshooting 34 7 Product disposal 36 8 Technical specifications 37 8 1 Electric motor connection diagram TRE models 38 8 2 Hydraulics diagram 40 ...

Страница 4: ...he workings of the machine at the time of printing However the manufacturer develops and updates the machine continuously and therefore reserves the right to change the machine s features and safety related properties without separate notification In order to receive quick and efficient assistance when ordering spare parts and encountering any possible fault situations you must indicate the inform...

Страница 5: ...ration applies to the following machines JAPA 485 TR 24 t Tractor drive JAPA 485 TRE 24 t Tractor electrical drive The following directives have been observed in the construction of each machine Machinery Safety Directive 2006 42 EC brought into effect through Government Decree 400 2008 Conformity evaluation conducted by MTT Mittaus ja standardisointi Vakola Vakolantie 55 FI 03400 Vihti Laitila 1 ...

Страница 6: ...s the logs into six eight or twelve pieces We place great emphasis on the reliability of our products the Japa 485 does not contain any V belts ONLY ONE PERSON MAY OPERATE THE MACHINE AT A TIME 1 4 Instruction and warning labels on the machine Fork lift point Lifting point Beware of the rotating shaft The maximum allowed rotation speed and direction of the power take off shaft Wear ear protection ...

Страница 7: ...t conveyor control Adjustment of the saw bar lowering speed Do not walk under the conveyor The safety distance is 5 m Speed adjustment for the output conveyor Splitting knife adjustment Control for additional hydraulics 1 5 The machine s type plate The machine s type plate is located behind the machine on the tractor side Serial number Machine type Production year and date Weight of the machine Vo...

Страница 8: ...timber deck for example x Hydraulic 22 chainsaw with a separate chain lubrication system x Cutting control with a joystick x 8 way splitting knife x 6 way splitting knife o 12 way splitting knife o Hydraulic knife lifter x Hydraulic 4 m output conveyor with turning device x Speed adjustment for the output conveyor x Hydraulic oil cooler x 230V 10A mains power socket TRE Hydraulic timber deck JA479...

Страница 9: ... disconnect the power cable Check the operation of the safety equipment Do not use the machine if part of the mechanism is not functioning properly The machine may only be transported in the transport position This is the responsibility of the driver If the firewood processor is to be transported on the road the widest parts of the machine must be marked with alternating red and yellow stripes The...

Страница 10: ...e is 109 dB while the maximum sound pressure at the operator s position during a work cycle is 95 dB The estimated standard deviation of the reproducibility of the sound power level is 1 5 dB If the machine is driven with a tractor the tractor may be the dominant source of noise in the working area Always use sufficient ear protection earmuffs or plugs We recommend using a logger s helmet ...

Страница 11: ...through the retailer The guarantee does not cover Damage caused by normal wear and tear for example blades mats and belts improper use or use contrary to the instruction manual Damages caused by negligence of maintenance or storage procedures detailed in the instruction manual Damages caused during transport Cutting blades V belts and oil and normal adjustment care maintenance or cleaning procedur...

Страница 12: ...as sustained damage in transit or it is missing components contact the transport company and retailer immediately 2 2 Main components of the machine 1 Output conveyor 6 Blade guard 2 Knife replacement winch 7 Wood gripper 3 Splitting area guard 8 Control panel 4 Front panel 9 Input opening guard 5 Log length measurement device 10 Input conveyor 1 3 4 5 6 7 8 2 9 10 ...

Страница 13: ... machine before commencing the lifting operation C CAT1 three point lifting device linkage The three point linkage is located at the rear of the machine First connect the lifting arms and then the push arm Ensure the arm connection is in place and lock the device to the middle with the side limiters During tractor operation always connect the machine to the lifting devices and centre it with side ...

Страница 14: ...e designated holes C Detach the transport position chain from the slot D Start the machine and lower the conveyor with the hydraulics control valve E Turn off the machine Fold the conveyor straight This should be done by two people using the lifting handles on the conveyor Move the belt transport support into the hole in the hinge and lock the joint F Start the machine and use the hydraulics to li...

Страница 15: ...or s light socket and switch on the tractor s parking lights Remember to turn off the tractor lights after use B E electrical drive Electric motor 15kW 400V 32A connect only to a fault current protected socket Note the motor s correct rotation direction and the reverser of the socket The direction can be changed by turning the disc in the middle of the socket 180 The correct rotation direction is ...

Страница 16: ...is required when using the hydraulic dust extractor JA47950 or cleaning drum JA475H NOTE Also connect the overflow hoses of the output conveyor to the overflow line with a T branch NOTE Always adjust the conveyor s relief valve if you connect or disable continuous output accessories 5 4 4 C Additional hydraulics controlled with a separate valve Additional hydraulics can be used to control the chai...

Страница 17: ...onents and guards are in place 6 Check the machine s hydraulic and blade oil levels and add oil if necessary 7 Ensure that no unauthorised persons are in the danger zone 8 Ensure that no unnecessary items have been left in the splitting or cutting area after transport for example 9 Start the machine 10 Check that the machine s controls work as intended The machine s controls and their intended ope...

Страница 18: ...t conveyor 3 Lifting and lowering the splitting knife 4 Adjustment of the saw bar lowering speed 5 Starting stopping and reversing the splitting mechanism 6 Lifting the wood gripper 7 Control lever for the input conveyor and sawing 8 Control lever for hydraulics power take off 9 Control lever for electrical drive TRE model only 1 2 3 4 2 5 6 2 7 8 9 ...

Страница 19: ...scale Loosen the locking nuts that hold the hydraulics valve in place and move the stop to the desired length Tighten the locking screws Input conveyor forward Input conveyor reverse Sawing When the lever is pulled the saw is activated and begins its downward motion To deactivate the saw and return it to the upper position release the lever When feeding in new logs for sawing push the wood gripper...

Страница 20: ...ication oil through the sight glass Add oil if necessary The capacity of the blade oil tank is 9 litres A Blade lubrication system 1 Filler opening 2 Sight glass DO NOT PLACE YOUR HAND NEAR THE CUTTING BLADE WHEN THE MACHINE IS RUNNING DO NOT HOLD THE SAW HANDLE IN ONE POSITION LEAVING THE CHAIN RUNNING CONSTANTLY USE PURE MINERAL OILS INTENDED FOR BLADE LUBRICATION ONLY DO NOT USE BIO OR WASTE OI...

Страница 21: ...s or down knife lowers Once the sawing is complete the wood moves to the bottom of the splitting groove after which the splitting can be activated by pushing the splitting activation lever to position 1 If a piece of log falls into an upright position align it with the pusher close the splitting mesh and activate the splitting by pushing the splitting activation lever to position 1 IF THE LOG TWIS...

Страница 22: ...screw The eye screw is stored in the tool box behind the machine E Use the winch to lift the splitting knife out of its cradle and lower it onto the ground on its side F Lift the new knife up with the winch and lower it carefully into the knife cradle G Lower the knife further and ensure that its slots connect properly with the lifting mechanism H Disconnect the eye screw 2 and winch wire from the...

Страница 23: ...dust extractor 220 V or a hydraulic one The electric dust extractor is connected to the machine s mains power socket while the power for the hydraulic dust extractor is supplied by the conveyor hydraulics see section 2 7 PART NUMBER JA47940 DUST EXTRACTOR ELECTRICAL JA47950 DUST EXTRACTOR HYDRAULIC 4 3 Hydraulic timber deck The hydraulic timber deck is perfect for big logs and large quantities of ...

Страница 24: ...ulic cleaning drum to the output conveyor hydraulics see section 2 7 PART NUMBER JA475 CLEANING DRUM ELECTRICAL JA475H CLEANING DRUM HYDRAULIC 4 5 Sacking rack The sacking rack designed for easy firewood processing facilitates the transport and storage of firewood Thanks to the turning output conveyor up to three racks can be placed next to each other behind the 485 firewood processor The rack can...

Страница 25: ... machine is used for less than 200 hrs year the 200 hr maintenance is performed as the annual maintenance and the 1 000 hr maintenance is performed every other year MAINTENANCE TARGET TASK INTERVAL INTERVAL INTERVAL SUBSTANCE ITEM 10 hrs 200 hrs 1 000 hrs A Splitting valve Lubrication x Lubrication oil B Cutting blade Check Replace x As necessary C Splitting knife Check Sharpen x As necessary D E ...

Страница 26: ...ccordance with section 3 2 Only perform these tasks when the machine is inactive and the power source is disconnected A Check the fluid levels Volume of the blade lubrication tank 9 l hydraulic oil check using the dipstick fill through cap B Capacity 140 l B Cleaning Clean the top of the machine the area below the machine and the conveyor of dust and debris Pay particular attention to the area bel...

Страница 27: ...TION Adjustment tooth depth Top plate cutting angle Side plate angle Top plate filing angle File guide angle Chain replacement When installing a new chain soak the chain in oil overnight This ensures that the oil penetrates all sections of the chain Do not use a worn drive wheel or saw bar with a new chain We recommend that you replace the saw bar after every other chain and the drive sprocket aft...

Страница 28: ...r every 20 30 days of use Clean the machine and check the adjustments to prevent any problems from occurring A Spindle mover joint B Valve lock end Lubricating the spindle mover joint Lift the edge of the spindle mover s rubber cover and spray lubrication oil on both edges of the hinge pin and on the ball end At the same time ensure that the rubber cover is undamaged Lubricating the valve lock end...

Страница 29: ...nt amount of oil when the oil level is at the lower edge of the inspection opening If necessary add oil through the breather cap B DEACTIVATE THE MACHINE AND DISCONNECT THE POWER SOURCE BEFORE PERFORMING MAINTENANCE UNLESS OTHERWISE INSTRUCTED AFTER MAINTENANCE ALWAYS REATTACH ALL THE GUARDS YOU HAVE REMOVED AND CHECK THE OPERATION OF THE SAFETY DEVICES BEFORE BEGINNING OPERATION BE PARTICULARLY C...

Страница 30: ...motor B Saw valve turner C Control shaft turner D Saw valve control shaft E Saw valve Saw valve control In the neutral position the valve control is in the horizontal position During sawing the control shaft turns and the valve is opened If the saw keeps running when the saw bar is in the upper position adjust screw B in such a way that the valve is in mid position when the bar is up IF THE SAW KE...

Страница 31: ...itting control lever C affects the trigger bar B which turns the valve to the splitting reverse position The outer end stop of the splitting mechanism A determines the length of the stroke The inner end stop F determines the neutral position of the pusher The purpose of the valve turner H is to stop the trigger bar motion so that the splitting valve is not exposed to extra stress caused by the tri...

Страница 32: ...te 3 and therefore pushes the logs completely across the splitting groove 5 4 3 Adjustment of the speeding valve All 485 models feature an automatic speeding valve which adjusts the power and speed of the splitting cylinder Without resistance the working motion proceeds at half power and full speed If resistance is detected the cylinder speed decreases and pushes at full power 1 Remove the protect...

Страница 33: ...the switch function does not work and the splitting only applies 8 tonnes of force adjust the mechanism 1 Loosen the locking nut 2 Adjust the cartridge by using a hex key to turn it of a rotation at a time anticlockwise 3 Retighten the locking nut and test the splitting force Repeat step 2 until the switching of the splitting force begins to function 5 5 Annual maintenance 1 000 hrs The 1 000 hr m...

Страница 34: ...lso drain the tank through the filler opening with a suction pump Replace the oil filters A Add 140 l of fresh hydraulic oil through the filler cap D ALWAYS DEACTIVATE THE MACHINE AND DISCONNECT THE POWER SOURCE BEFORE PERFORMING MAINTENANCE AFTER MAINTENANCE ALWAYS REATTACH ALL THE GUARDS YOU HAVE REMOVED AND CHECK THE OPERATION OF THE SAFETY DEVICES BEFORE BEGINNING OPERATION DISPOSE OF THE WAST...

Страница 35: ... at least every other year 5 5 2 Lubricant table HYDRAULIC OIL TRANSMISSION OIL BLADE LUBRICATION OIL GRADE ISO VG 46 VG 32 SAE 80W 90 API GL 4 CHAIN OIL AMOUNT 140 litres 500 ml 9 litres 5 6 Storage Perform the daily and monthly maintenance tasks of the firewood processor before storage and oil the blade and knife lightly with spray oil for example to prevent rust Conduct the 200 hr maintenance b...

Страница 36: ... 3 Increase the saw bar lowering speed 3 4 Check the level of hydraulic oil 5 3 A Perform blade maintenance 5 3 1 Check the saw valve 5 4 1 The saw cuts poorly The splitting area guard is slightly open The saw bar is damaged worn and the blade does not cut straight Remove debris and close the guard 3 3 Perform blade maintenance replace the saw bar 5 3 1 The saw does not stop The saw valve does not...

Страница 37: ...ower take off speed is too high Too little too much oil The cylinder bottoms out The saw valve does not return to the middle position MAX RPM 500 2 5 A Add remove oil 5 3 A Adjust the splitting device 5 4 2 Check the adjustments 5 4 1 The log rises up during splitting The stroke length is too short which leaves the previous log attached to the knife Check the stroke length of the piston 5 4 2 The ...

Страница 38: ... disposed of appropriately at the end of its service life Drain the oil in the machine into a container Take the oil to a recycling point Take the machine frame to a metal recycling point Observe national legislation More information on recycling can be obtained from national authorities ...

Страница 39: ...g force 8 t 24 t 8 way knife Standard 6 way knife Accessory 12 way knife Accessory Hydraulic oil tank 140 litres Blade lubrication oil tank 9 litres Input conveyor length width 2 5 m 300 mm Output conveyor length width 4 0 m 400 mm Max lifting height 305 cm 45 degrees Weight 2 000 kg Max height in working position 325 cm Max height in transport position 260 cm Max length in working position 665 cm...

Страница 40: ...japa 485 User manual Translation 38 485 1 0 2014 8 1 Electric motor connection diagram TRE models ...

Страница 41: ...japa 485 User manual Translation 39 485 1 0 2014 IN THE EVENT OF ELECTRICAL PROBLEMS CONTACT AN AUTHORISED ELECTRICIAN ...

Страница 42: ...japa 485 User manual Translation 40 485 1 0 2014 8 2 Hydraulics diagram ...

Страница 43: ...japa 485 User manual Translation 41 485 1 0 2014 ...

Страница 44: ...japa 485 User manual Translation 42 485 1 0 2014 ...

Страница 45: ...Translation 43 485 1 0 2014 ...

Страница 46: ...Translation 44 485 1 0 2014 ...

Страница 47: ...Translation 45 485 1 0 2014 ...

Страница 48: ...Translation 46 485 1 0 2014 ...

Отзывы: