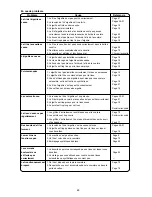
Janome Threadbanger TB-30 Скачать руководство пользователя страница 75

75

SECCION IV.

MANTENIMIENTO DE LA
MAQUINA

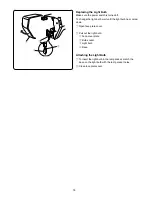
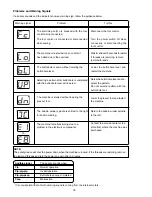
Nettoyage de la piste du crochet et des griffes
d’entraînement

Limpieza del garfio y de los dientes de transporte
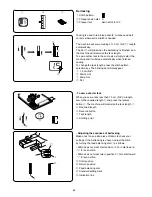
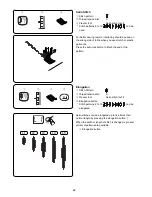
Ensamble el garfio

q

Porta canillas

w

Parador

e

Tecla

r

Clavias guiadoras de la placa de la aguja

t

Destornillador

y

Agujero guía

z

Inserte el portacanillas de modo que el saliente quede junto
al tope.

x

Inserte la canilla y coloque la placa de aguja con un tornillo.

c

Después de limpiar la máquina, asegúrese de que la aguja
y el prensatelas estén instalados.

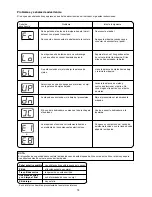
Remontage de la piste du crochet

q

Support de la canette

w

Butée

e

Buton

r

roche de guidage de la plaque d’aiguille

t

Tournevis

y

Trou de repère

z

Insérez le support de la canette de façon à ce que le bouton
s’ajuste contre la butée dans la piste du crochet.

x

Insérez la canette.

c

Après avoir nettoyé la machine, assurez-vous que l’aiguille
et le pied presseur sont bien fixés.

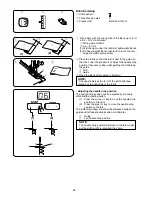
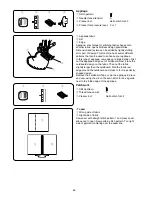
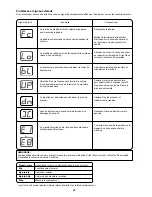
Pulse el botón de aguja arriba/abajo para alzar la aguja.
Después, desenchufe la máquina de coser.
No desensamble la máquina de una manera que no esté
explicada en esta página.
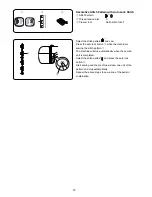
Quite la placa de cobertura deslizando hacia la derecha el
botón para soltar la placa de cobertura del garfio.
Saque la canilla. Cepille el polvo y las hilas. (También puede
usar una aspiradora).

z

Quite el tornillo 

w

 de fijación del lado izquierdo de la placa

de la aguja 

e

 con el destornillador 

q

 que se suministra con

la máquina.
Quite la placa de aguja 

e

.

x

Retire la canilla. Alce el portacanillas 

y

 y quítelo.

c

Limpie el garfio con una tela suave.

v

Limpie los dientes de transporte y el garfio con el cepillo
para hilas.

b

Limpie el centro del garfio con un trapo seco.

* También puede usar una aspiradora.
* Esta máquina de coser no necesita engraser.

Appuyez sur la touche Aiguille haute/basse pour relever
l’aiguille et débranchez la machine.
Ne démontez rien de plus que ce qui est indiqué sur cette page.
Retirez la plaque en faisant coulisser le bouton de dégagement
du couvercle du crochet vers la droite.
Sortez la canette. Brossez la poussière et les peluches. (Vous
pouvez aussi utiliser un aspirateur.)

z

Retirez la vis 

w

 de fixation située du côté gauche de la

plaque d’aiguille 

e

 à l’aide du tournevis fourni avec la

machine.
Enlevez la plaque d’aiguille 

e

.

x

Sortez la canette. Soulevez le support de canette 

y

 et

retirez-le.

c

Nettoyez le crochet avec un chiffon doux.

v

Nettoyez les griffes d’entraînement et la piste du crochet
avec la brosse.

b

Essuyez le centre de la piste du crochet avec un chiffon sec.

* Vous pouvez également utiliser un aspirateur.
* Cette machine n’exige pas l’huilage.

q

Tournevis

w

La vis

e

La plaque d’aiguille

r

Brosse à peluches

t

Piste du crochet

y

Support de la canette

u

Griffes d’entraînement

i

Un chiffon doux et sec

q

Destornillador

w

El tornillo

e

La placa de aguia

r

Cepillo de limpieza

t

Garfio

y

Porta canillas

u

Dientes del transporte

i

Un paño suare y seco

ATENCIÓN:

• Apague la máquina antes de cambiar la bombilla.
• NO desarme la máquina, excepto en la forma descrita en

esta sección.

AVERTISSEMENT :

• Mettez la machine hors tension avant de remplacer l’ampoule.
• NE PAS démonter la machine si ce n’est en suivant les

consignes décrites dans cette section.

PARTIE IV. ENTRETIEN DE VOTRE

MACHINE

PRECAUCIÓN:

• No deje la máquina en un lugar con mucha humedad, cerca

de un radiador de calor ni expuesta a luz solar directa.

Nota:

Limpie el exterior de la máquina con un paño suave y un
jabón neutro.
Después de limpiar la máquina, no olvide colocar la aguja y
el prensatelas.

ATTENTION:

• Ne rangez pas la machine dans un endroit à forte humidité,

près d’un radiateur de chaleur, ou dans l’ensoleillement
direct.

Remarque:

Nettoyez l’extérieur de la machine avec un chiffon et un savon
doux.
Après avoir nettoyé la machine, prenez soin de fixer
correctement l’aiguille et le pied.

Содержание Threadbanger TB-30

Страница 1: ...Seam Guides on the Needle Plate 34 Turn a Square Corner 34 Quilting 34 Sewing on Heavy Fabrics 36 Manual Stitch Length 36 Variable Needle Position 36 Pintucking 38 Automatic Reverse Stitch 38 Triple...

Страница 2: ...coichado 35 Manera de coser telas pesadas 37 Ajuste manual de la longitud de puntada 37 C mo cambiar la posici n de la aguja 37 Remate 39 Puntada invertida autom tica 39 Puntada el stica triple 39 Pun...

Страница 3: ...droit 35 Matelassage 35 Coudre les tissus pais 37 R glage manuel de la longueur du point 37 Les diff rentes positions de l aiguille 37 Nervures 39 Point arru re automatique 39 Point extensible triple...

Страница 4: ...on 7 Up down needle position button 8 Auto lock button 9 Reverse stitch button 0 Start stop button 1 Feed balancing dial 2 Hook cover release button 3 Hook cover plate 4 Foot holder 5 Presser foot 6 N...

Страница 5: ...alanca de ojales 7 Brazo libre 8 Palanca elevadora de garras transportadoras 9 Pedal 0 Enchefe de la m quina q Plateau extensible bo tier de rangement des accessoires w Plaque de l aiguille e Enfilage...

Страница 6: ...Bobbin w Needle set e Overcast foot M r Satin stitch foot F t Zipper foot E y Automatic buttonhole foot R u Overedge foot C i Blind hem foot G o Screwdriver 0 Quilter 1 Seam ripper Buttonhole opener 2...

Страница 7: ...rnilador 0 Acolchador 1 Cortador Abreojales 2 Cepillo de limpieza 3 Tapa carretes grande 4 Tapa carretes peque ol Accessoires Standard q Canette w Jeu d aiguille e Pied a surfilage M r Pied de point p...

Страница 8: ...any parts When cleaning the machine Do not place anything on the foot control when not sewing Using the foot control q Foot control plug w Machine socket e Power supply plug r Power switch t Machine...

Страница 9: ...ur d alimentation et d branchez la machine lorsque vous laissez la machine sans surveillance lorsque vous installez ou d montez des l ments lorsque vous nettoyez la machine Ne placez rien sur la p dal...

Страница 10: ...needle position is set down position e e e e e Reverse stitch button When stitches are selected the machine will sew in reverse while the reverse stitch button is pressed If you press the reverse sti...

Страница 11: ...ina dar puntadas en sentido contrario mientras se mantenga pulsado el bot n de inversi n Si pulsa el bot n de inversi n mientras tiene seleccionada otra puntada excepto la m quina dar inmediatamente u...

Страница 12: ...ern Note Raise the needle above the fabric when selecting the stitch pattern 1 2 t t t t t Elongation button Stitches can be elongated up to five times their normal length by pressing this button see...

Страница 13: ...puntada Pulse este bot ns o para cambiar el ancho de la puntada o la posici n de la aguja El bot n es verde encendido y el indicador demostrar la longitud de la puntada y y y y y Bouton de s lection...

Страница 14: ...ead Cutter q Thread cutter You do not need a pair of scissors to cut the thread after sewing Simply use the built in thread cutter Extension Table Detaching the table Pull the table away from the mach...

Страница 15: ...rtahilos q Cortahilos No necesita tijeras para cortar el hilo despu s de coser S lo necesita el cortahilos pr ctico Coupe fil q Coupe fil Vous n avez pas besoin d un paire de ciseaux la fin d une cout...

Страница 16: ...arrying handle when carrying your sewing machine To use the carrying handle pull it up as far as it will go Press down the carrying handle to store it Presser Foot Pressure Adjusting Lever The presser...

Страница 17: ...tion w Pour soulever les griffes d entra nement Appuyer sur le levier dans la direction de la fl che comme sur l illustration et tourner la roue manuelle vers vous Les griffes d entra nement doivent t...

Страница 18: ...hetic 50 80 Cotton 50 Silk 50 Cotton 40 50 Synthetic 40 50 Silk 30 Cotton 50 9 65 11 75 11 75 14 90 14 90 14 90 16 100 16 100 CAUTION Turn off the power switch when changing a needle q Needle clamp sc...

Страница 19: ...ilizar aguja e hilos finos al coser telas ligeras para evitar da os a la tela Las telas gruesas requieren una aguja de tama o suficiente para traspasar la tela sin deshilachar el hilo de la aguja Siem...

Страница 20: ...ch when changing the presser foot q Thumb screw w Foot holder e Presser bar To remove Remove the thumb screw q by turning it counterclockwise with a screwdriver To attach Match the hole in the foot ho...

Страница 21: ...z le pied presseur choise afin que la broche e au pied soit align e avec l encoche w sous le support de pied Abaissez la barre du presseur pour effectuer l accrochage C mo quitar poner el prensatelas...

Страница 22: ...he machine when it has wound a few layers and then cut the thread close to the hole in the bobbin m Depress the foot control again When the bobbin is fully wound it stops automatically Return the bobb...

Страница 23: ...canette sur I enrouleur de canette b Poussez la canette vers la droite Auf der Anzeige erscheint n En tenant I extr mit libre du fil la main appuyez sur la p dale de contr le Arr tez la machine apr s...

Страница 24: ...uide the thread into the first notch w on the front side of the bobbin holder Draw the thread to the left sliding it between the tension spring blades c Continue to draw the thread lightly until the t...

Страница 25: ...atr s y por encima de la placa de aguja Observe el esquema de enhebrado r situado en la tapa de acceso a canilla y compruebe si ha enhebrado correctamente Insertion de la canette q Extr mit du fil w...

Страница 26: ...front to back or use a needle threader z x c v q z x c v w z c x v q r w t NOTE The needle threader can be used with a 11 to 16 needle or a blue tipped needle Thread size 50 to 90 should also work we...

Страница 27: ...levier releveur de fil v Par la gauche glissez le fil derri re le guide situ sur la barre d aiguille Enfilez l aiguille de l avant vers l arri re ou utilisez I enfile aiguille REMARQUE L enfile aigui...

Страница 28: ...bottom of a seam notice that the stitches are evenly balanced When adjusting the needle thread tension the higher the number the tighter the top thread tension Results depend on stiffness and thicknes...

Страница 29: ...r La puntada recta ideal cierra los hilos entre las dos telas tal como se ve en la figura ampliada Si observa la parte superior e inferior de la costura se dar cuenta de que no hay hilos flojos o apre...

Страница 30: ...of the fabric See the illustrations for the correct appearance To match this appearance adjust the needle tension as necessary Correct tension q Right side Top side of fabric w Wrong side Bottom side...

Страница 31: ...ne sur le c t envers du tissu Reportez vous aux figures ci dessous pour voir quoi ressemble un point ex cut correctement R glez la tension du fil de dessus pour obtenir l aspect d sir Tension correcte...

Страница 32: ...around the needle to change sewing direction as desired Lower the presser foot q Up down needle position button w Presser foot lifter q w e SECTION III BASIC SEWING q w e q w Straight Stitch q Stitch...

Страница 33: ...final de la tela pulse una vez el bot n de puntada invertida q La m quina coser cuatro putadas hacia atr s cuatro hacia adelante y se parar autom ticamente Finit on d une couture q Bouton de marche ar...

Страница 34: ...titching and lower needle down into the fabric by pressing the Up Down needle position button when the fabric edge facing you lines up with the cornering guide as shown Raise the presser foot and turn...

Страница 35: ...coser en la nueva direcci n Tourner angle droit q Touche aiguille haute basse w Levier du pie presseur e Rep re pour tourner Pour piquer en angle droit 1 6 cm 5 8 du bord du tissu Arr tez de piquer et...

Страница 36: ...r a few stitches Manual Stitch Length Press or to adjust the stitch length To decrease length press To increase length press The pre programmed stitch length setting is suitable for most of your sewin...

Страница 37: ...stes para acomodarlos a diferentes caracter sticas de tejido o para obtener los efectos que desee Mantenga pulsada la tecla o hasta poder ver en la pantalla el ajuste que desea La longitud de puntadas...

Страница 38: ...mediately and stop automatically Pintucking q Stitch pattern w Thread tension dial A e Presser foot Blind hem foot G q w e Fold the fabric with wrong side together Place the fabric so that the fold is...

Страница 39: ...nal Ce point solide et durable est recommand pour les coutures o la solidit et l lasticit sont n cessaire au confort et la r sistance dans le temps Utilisez le pour renforcer les coutures d entre jamb...

Страница 40: ...F Lower the needle close to the front edge of the fabric and lower the presser foot The machine will sew several locking stitches in place and continue sewing forward By pressing the reverse button r...

Страница 41: ...es les vestes les chasubles et les tenues en jean Point sellier q Motif de point w Tension du fil de l aiguille A e Pie presseur Pied point lanc F Baje la aguja para acercarla al borde frontal de la t...

Страница 42: ...eedle thread tension A e Presser foot Zigzag foot A To change the width and length Zigzag stitch is useful for overcasting applique mending etc When you change the zigzag width make sure the needle po...

Страница 43: ...d chiffre r Point dense plus petit chiffre t Point plus long plus grand chiffre y Largeur u Longueur Surfilage q Motif de point w Tension du fil de l aiguille A e Pied presseur Pied zigzag A Pied surj...

Страница 44: ...ng the overedge foot to stitch and overcast seams in one step It is ideal for 1 4 0 6 cm seams on knits when attaching ribbing or on medium to heavyweight woven fabrics where you want a narrow seam Pl...

Страница 45: ...bine les points droitss et zigzag et l aide du pied presseur s surfiler coud et surfile en m me temps C est la fois un point extensible pour les jersey et un point extra solide pour les tissages Urili...

Страница 46: ...o the needle will enter the left hole of the button q v Turn the handwheel so that the needle will enter the right hole of the button w Readjust the stitch width if necessary b Stitch several times n...

Страница 47: ...erminar de coser corte el hilo dejando de 10 a 15 cm de hilo m Pase este hilo a la parte inferior de la tela y haga un nudo q Agujero izquierdo del bot n w Agujero derecho del bot n Suba los dientes d...

Страница 48: ...he foot when lowering the presser foot e Button holder r Buttonhole lever The buttonhole size is automatically set by placing the button in the rear of the automatic buttonhole foot The button holder...

Страница 49: ...l bot n e hacia atr s y coloque el bot n en su interior Empuje firmemente el alojamiento con el bot n dentro x Baje la palanca de ojales r tan bajo como se pueda Pr paration la couture q Rainure w Bro...

Страница 50: ...lowing order a Step 1 and 2 Front bartack and left row s Step 3 Right row d Step 4 Back bartack and locking stitches at the end f Indicator window shows each sewing step and a dot will blink when the...

Страница 51: ...ressort 0 Diff rence de longueur Si selecciona otro patr n sin levantar el prensatelas en la pantalla aparecer el mensaje UP para advertirle que debe levantar el prensatelas x Retire la tela y ponga...

Страница 52: ...nhole 7 0 stretch buttonhole 5 0 knit buttonhole 5 0 Press or to adjust the stitch width of the entire buttonhole ranging between 2 5 to 7 0 depending on the selected buttonhole q Narrower width by pr...

Страница 53: ...ostura es el misomo que el ojals autom ticos r Punto de incio de costura t Remate Boutonni re bout rond q Motif de point w Tension du fil de l aiguille A e Pied presseur Pied boutonni re automatique R...

Страница 54: ...buttonhole foot R Resembles a Hand Worked buttonhole Ideal on fine fabrics featured in Heirloom sewing or couture fashions q w e Stretch Buttonhole q Stitch pattern w Thread tension dial A e Presser f...

Страница 55: ...osa el remate trasero y la fila derecha 3 Fijaci n de la puntada el extermo Ojal el stico q Patr n de puntada w Tensi n del hilo A e Prensatelas Prensatelas para ojal autom tico R Dise ado para telas...

Страница 56: ...the filler cord into the forks w on the front of the automatic buttonhole foot to hold them tight Lower the needle into the garment where the buttonhole will start and lower the foot q Spur w Forks x...

Страница 57: ...de relleno en el puntal q de la parte posterior del pie para ojales Traiga los extremos hacia usted por debajo del pie dejando libre el extremo delantero Enganche los extremos del cord n de relleno e...

Страница 58: ...u Zipper tape i Wrong side of the fabric o End of the opening Place the right sides of the fabric together and sew up to the end of the zipper opening with a 2 cm 13 16 seam allowance Reverse the sti...

Страница 59: ...e glissi re Fixez la couture en cousant des points arri re Augmentez la longueur de point manuellement 5 mm et d tendez la tension sur 1 pour coudr l ouverture de la fermeture glissi re avec des point...

Страница 60: ...the zipper and open the upper fabric flat over the zipper Baste the upper fabric and zipper tape together 0 Basting stitch b Detach the foot and attach it with the pin on the left Backstitch across th...

Страница 61: ...Al terminar retire el hilv n x Fije el prensatelas para cremalleras E con el pasador a la derecha Cosa el pliegue de la tela y la cinta de la cremallera guiando los dientes de la cremallera por el bo...

Страница 62: ...w 2 e r Blind Hemming q Stitch pattern w Thread tension dial A e Presser foot Blind hem foot G z x c t r 1 2 q w e z Fold a hem with the wrong side of the fabric up to form a 0 4 0 7 cm allowance q Wr...

Страница 63: ...sez le pied presseur R glez le mouvement de l aiguille avec la touche de r glage de la largeur de point afin que l aiguille perce simplement le bord pli du tissu lorsqu elle se d place vers la gauche...

Страница 64: ...disappear q 1 5 cm 5 8 w Start point e End point r Dot q t y u i o 0 w e r 1 2 3 To sew a shorter tack When you sew a tack less than 1 5 cm 5 8 in length sew to the required length t and press the rev...

Страница 65: ...fijado la longitud del zurcido u t Longitud del embaste y Punto inicial u Longitud deseada i Selector de retroceso Pour coudre une faufilure plus courte Pour coudre une faufilure de moins de 1 5 cm d...

Страница 66: ...rst cut the applique design out of cardboard Next place the cardboard design on the fabric Then cut the fabric slightly larger than the cardboard Fold the fabric raw edge around the cardboard and pres...

Страница 67: ...tion Dans ce genre d application les bords bruts sont repli s en dessous Pour finir le bord brut d coupez la forme de l application dans du carton l ger Collez une triplure fine sur l envers du tissu...

Страница 68: ...ess the auto lock button to finish the end of the pattern q w e Elongation q Stitch Pattern w Thread tension dial A e Presser foot Satin stitch foot F r Elongation button Stitch patterns 9 to 12 can b...

Страница 69: ...a touche bouton d arr t automatique la fin de la couture Alargamiento q Patr n de puntada w Tensi n del hilo de la aguja A e Prensatelas Prensatelas para puntada decorativa F r Bot n de alargamiento T...

Страница 70: ...and sew Press the auto lock button w while the machine is sewing the stitch pattern q The machine will stop automatically when the second unit is completed Select the stitch pattern and press the auto...

Страница 71: ...onner le motif et appuyer sur le bouton d arr t automatique w Appuyer sur la commande p dale et la machine coudra un seul point du motif et s arr tera automatiquement R p ter cette proc dure pour coud...

Страница 72: ...ark e Indication line The machine comes with the feed balancing dial set in the position as shown q w e 1 2 1 When patterns are too compressed correct by turning the dial in the direction of 2 When pa...

Страница 73: ...a w Marca de posici n est ndar e L nea de indicaci n La m quina est ajustada con la posici n del eje equilibrador de puntada con la marca de ajuste tal como se muestra Ajuste de patrones de puntada el...

Страница 74: ...ine Remove the cover plate by sliding the cover plate release button to the right Take out the bobbin Brush out dust and lint You may also use a vacuum cleaner z Remove the set screw w on the left han...

Страница 75: ...guille et d branchez la machine Ne d montez rien de plus que ce qui est indiqu sur cette page Retirez la plaque en faisant coulisser le bouton de d gagement du couvercle du crochet vers la droite Sort...

Страница 76: ...wait until the light bulb has cooled down z Open face plate cover x Pull out the light bulb q Face cover plate w Bulb socket e Light bulb r Base Attaching the Light Bulb z To insert the light bulb in...

Страница 77: ...se de la l mpara correspondan con los agujeros del recept culo x Cierre la tapa frontal Comment changer l ampoule d clairage Assurez vous que l alimentation lectrique est d branch e Avant de changer l...

Страница 78: ...electronic components Contact the service center or the store from where the machine was purchased Warning signal Selecting a pattern after buttonhole is completed with the buttonhole lever still low...

Страница 79: ...t relos La m quina no funciona correctamente debido a un problema de los componentes electr nicos P ngase en contacto con el centro de asistencia t cnica o con la tienda donde adquiri la m quina Se al...

Страница 80: ...t de 3 minutes Il est tout fait normal que les moteurs internes mettent un faible bourdonnement Signal sonore L avertisseur sonore se d clenche dans les cas suivants Bip Fonctionnement normal bip bip...

Страница 81: ...not suitable for the work being sewn 3 A Blue Tip needle is not being used for sewing stretch very fine fabrics and synthetics 4 The needle thread is not threaded properly 5 A poor quality needle is...

Страница 82: ...4 La tela no es llevada atr s al terminar de coser 5 El hilo de la aguja no est enhebrado correctamente 1 La aguja est insertada incorrectamente 2 El tornillo de la abrazadera de la aguja est suelto...

Страница 83: ...l aiguille n est pas enfil correctement 5 Vous utilisez une mauvaise aiguille 1 L aiguille n est pas install e correctement 2 La vis de blocage de l aiguille est desserr e 3 Le tissu n est pas tir ve...

Страница 84: ...INSTRUCTION BOOK MANUAL DE INSTRUCCIONES MANUEL D INSTRUCTIONS...

Страница 85: ...ne to the nearest authorized dealer or service center for examination repair electrical or mechanical adjustment 4 Never operate the appliance with any air opening blocked Keep ventilation openings of...

Страница 86: ...es necesario examinarla repararla o someterla a ajustes el ctricos o mec nicos 4 No utilice nunca la m quina si tiene bloqueada alguna v a de ventilaci n Mantenga las v as de ventilaci n de esta m qu...

Страница 87: ...ner cette machine au distributeur autoris ou au service technique le plus proche afin de la faire examiner ou r parer ou de faire proc der certains r glages lectriques ou m caniques 4 Ne jamais faire...

Страница 88: ...807 800 036 Printed in Taiwan Impreso en Taiwan Imprem en Taiwan...

Отзывы: