39
Manual settings
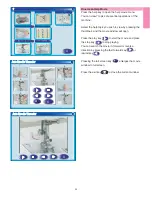
Altering buttonhole width
Press the adjust key and the manual setting window
will open.
Press the “+” key to increase the buttonhole width.
Press the “–“ key to decrease the buttonhole width.
Press the OK key to register the settings.
Altering buttonhole stitch density
Press the “+” key to make the buttonhole stitches less
dense.
Press the “–“ key to make the buttonhole stitches
denser.
Corded buttonhole
To sew a corded buttonhole, follow the same
procedure as for the sensor buttonhole; refer to the
instructions on page 37.
Select the pattern B1.
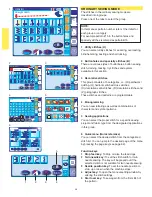
With the Automatic buttonhole foot R raised, hook the
filler cord on the spur on the back of the buttonhole
foot.
Bring the ends of cord toward you under the
buttonhole foot clearing the front end.
Hook the ends of the filler cord into the forks on the
front of the automatic buttonhole foot R to hold them
tight.
1 Spur
2 Forks
Lower the needle into the garment where the
buttonhole will start and lower the foot.
Press the start/stop button or foot control to sew the
buttonhole.
Each side of the buttonhole and the bartacks will be
sewn over the cord. The machine stops automatically
when finished.
Remove the fabric from the machine and cut the
sewing threads only.
Pull the left end of the filler cord to tighten.
Cut the filler cord as close to the buttonhole as possible.
NOTES:
Set the stitch width in accordance with the thickness
of the cord used.
Cut the filler cord if it is stitched to the fabric and cannot
be pulled, cut the filler cord at both ends.
To cut the buttonhole opening, refer to the instructions
on page 37.
Adjust
5.0
0.45
3.4
OK
Default
1
2


