32
3.5
2.20
4.2
OK
Default
Adjust
15
OK
Default
mm
40
30
20
10
mm
Cloth Guide
CAUTION:
Always provide sufficient space to the left of the
machine when using the cloth guide.
Do not use the cloth guide when the buttonhole foot R
is attached.
If you wish to use the optional clothsetter table with the
cloth guide, attach the extension table to prevent the
carriage from hitting the table.
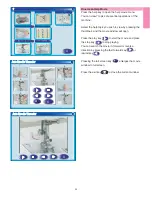
Attaching the cloth guide
Insert the pins on the cloth guide into the carriage
holes. Turn the attaching knob clockwise to secure the
cloth guide.
Remove the fillet if necessary.
1 Pins
2 Cloth Guide
3 Carriage Holes
4 Attaching knob
Setting the cloth guide position
Press the adjust key to open the manual setting
window.
Press the cloth guide key.
The visual touch screen will show a warning message.
Press the
OK
key.
The cloth guide adjustment window will open.
Press the “+” or “–” key to move the cloth guide to the
desired position.
The cloth guide position is indicated on the scale bar
and the distance from the center needle drop position
is indicated by millimeter or inch.
Press the
OK
key to register the setting and close the
cloth guide adjustment window.
NOTE:
The machine will not run if the cloth guide adjustment
window is open.
Press the default key to return the cloth guide to the
default position (15 mm or 5/8”).
Make sure to return the carriage to the stored position
by pressing the cloth guide storage key and
remove the cloth guide after sewing is finished.
Overcasting with the Cloth Guide
Select pattern U10 and use the overedge foot C.
Set the cloth guide position at 2 mm (1/16
˝
) and sew.
4
Utility(U)
6
2
3
5
7
8
9
10
11
12
13
14
15
16
A
17
1
Straight Stitch
19
18
B
2
OK
Default
mm
40
30
20
10
mm
1
4
3
2


