www.janitza.de
67
Busbar tap-off unit
Fig. 7: AKM view
of the front (1, 2, 3, 4)
INFORMATION
The extremely high diversity in local construction
site conditions cannot be illustrated in this docu-
ment. We therefore recommend that you have the
local conditions checked by qualified installation
personnel.
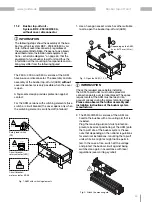
7. Please note that with an open AKM, depending
on the national regulations, the tap-off sites of
the busbars may be live (see warning symbol)!
Fig. 8: AKM open
8. Assemble and install your cables to the con-
sumers/operating equipment as shown in the
following figures. The illustrations of the actual
AKM and the cable outlet may differ!
Fig. 9: Opening the cable inlet
4x 10 mm
Fig. 10: Removing the cable inlet with cable grommets
(strain relief integrated)
Fig. 11: Mounting the cable holder
2x 10 mm (8 Nm)
Fig. 12: Cut the cable grommets to size according to the
cable cross section and feed the cable through
Fig. 13: Mount cable inlet with cable grommets
2x 10 mm
(8 Nm)
3
4
5
6
Содержание AKM 96RM-E
Страница 13: ...www janitza de 13 Stromschienen Abgangskasten ...
Страница 33: ...www janitza de 33 Stromschienen Abgangskasten ...
Страница 51: ...www janitza de 51 Busbar tap off unit ...
Страница 71: ...www janitza de 71 Busbar tap off unit ...


