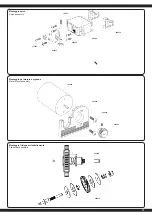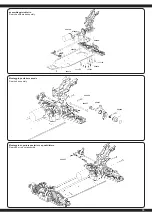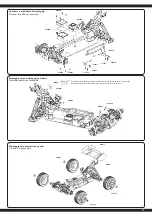
2
1
2
6
5
3
4
1
2
1
2 3
4
IT
- Avete acquistato un modello RTR. Ciò signifi ca che il veicolo è in gran parte pronto
per l‘uso immediato. Tuttavia, è essenziale controllare che il modello non presenti
possibili danni meccanici o elettrici o difetti prima e dopo ogni utilizzo. È inoltre
necessario verifi care la libertà di movimento di tutti gli elementi mobili e la tenuta
dei collegamenti a vite.
GB
- You have purchased a RTR model, which means it should be ready for immediate use after
charging all batteries. You need to check the car, electronics and all plastic parts after each use to
make sure no parts are damaged. Also all the moving parts must be checked for their clearance,
bolts and screws that they are tight.
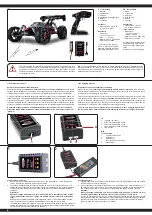
IT - Lieferumfang
1. Modello
2. Telecomando
3. Antenna
4. Connettore di collegamento
5. Batteria
6. Caricatore
Accessori:
• Telecomando: 4 x AA 1,5V,
Nr. 14 0267 (4 pezzi)
Dati tecnici:
• Dimensioni:
~ 515 x 275 x 205 mm
• Peso:
~ 2360 g
• Batteria: LiPo 7,4 V 5000mAh
• Motor: 420W, 3000KV
Le informazioni non sono ga-
rantite. Ci riserviamo il diritto di
apportare modifi che tecniche e
la possibile presenza di errori.
GB - Box contents
1. Model
2. Transmitter
3. Antennas
4. Binding Plug
5. Battery
6. Charger
Accessories:
• Transmitter: 4 x AA 1,5V,
No. 14 0267 (4 pieces)
Technical data:
• Dimensions:
~ 515 x 275 x 205 mm
• Weight: ~ 2360 g
• Battery: LiPo 7,4V, 5000 mAh
• Motor: 420W, 3000KV
No responsibility is taken for the
correctness of this information.
Subject to change without prior
notice.
Errors and omissions excepted.
Note importanti sull‘idoneità della batteria:
Assicurarsi di utilizzare solo
batterie ai Polimeri di Litio con connettore XH balancer.
Solo queste
possono essere utilizzate con il caricatore. Altri collegamenti e tipi di batterie non possono essere
utilizzati (si può verifi care il rischio di incendio dovuto all‘inversione di polarità o al sovraccarico).
Si prega di contattare il produttore della vostra batteria per sapere se la vostra batteria è adatta. Uti-
lizzare solo batterie LiPo
con una capacità di almeno 1600mAh
(altrimenti c‘è il rischio di incendio
a causa della corrente di carica eccessiva). Se si utilizzano batterie con una capacità inferiore a
1600mAh, le batterie devono essere approvate per una corrente di carica di 1600mA (carica rapida).
Si prega di chiedere al produttore della vostra batteria se la vostra batteria soddisfa questi requisiti.
È possibile collegare solo una singola batteria alla volta al caricatore. Caricare 2 batterie
allo stesso tempo NON è permesso e causerà danni alla batteria o al caricatore (pericolo di
incendio).
Important notes on the suitability of the battery:
Make sure to use
only lithium polymer batteries with XH balancer connector
. Only these may
be used with the charger. Other connections and battery types must not be used (fi re hazard due to
reverse polarity or overcharging may result).
Please contact the manufacturer of your battery to fi nd out whether your battery is suitable. Only
LiPo batteries with a capacity of
at least 1600mAh must be used
(otherwise there is a risk of
fi re due to excessive charging current). If you use batteries with a capacity below 1600mAh, the
batteries must be approved for a charging current of 1600mA (Speedcharging). Please ask the
manufacturer of your battery if your battery meets these requirements.
You may only connect one single battery to the charger at a time. Charging 2 batteries at
the same time is NOT allowed and will cause damage to the battery or charger (fi re hazard).
IT
1. Ingresso 100 - 240 V
2. Attacchi di bolanciatore 2 cella
3. Attacchi di bolanciatore 3 cella
(Non richiesto per questo modello)
4. LED di stato
GB
Technical data:
1.
Power Slot 100 - 240 V
2.
2S Balancer
3.
3S Balancer
(Not required for this model)
4.
Status LEDs
LiPo Processo di ricarica
LiPo Charging process
LiPo Processo di ricarica
1. Inserire il cavo di alimentazione del caricabatterie in una presa adatta. I LED si illuminano di
verde e indicano che la batteria è pronta per la ricarica
2. Ora collega la batteria vuota al caricatore. Batterie 2S da 7,4V al connettore a 3 poli o 11,1V
batterie 3S al connettore a 4 poli. Non usare la forza e fare attenzione a non invertire la polarità.
I LED diventeranno rossi dopo pochi secondi, indicando che le celle della batteria si stanno
caricando.
Attenzione!
Quando si collega una batteria 2S, solo i primi 2 LED (Cell1-2) diventano rossi, il LED 3
(Cell 3) rimane verde. Quando si collega una batteria 3S, tutti i LED (Cell1-3) diventano
rossi.
Non appena una cella della batteria è completamente carica, il LED corrispondente diventa
verde. Poiché le celle sono caricate individualmente, è possibile che una cella sia
completamente carica prima delle altre, a seconda dello stato della batteria. Lasciare sempre la
batteria sul caricatore fi no a quando tutte le celle collegate sono completamente cariche (verde)
per permettere al caricatore di bilanciare la batteria.
Charging a battery
1. Plug the power cord of the charger into a suitable socket. The LEDS light up green and indicate
that the charger is ready for charging.
2. Now connect the empty battery to the charger. 7.4V 2S batteries to the 3 pin connector or 11.1V
3S batteries to the 4 pin connector. Do not use force and pay attention to reverse polarity. The
LEDs change to red after a few seconds and indicate that the battery cells are charging.
Attention:
When connecting a 2S battery, only the fi rst 2 LEDs (Cell1-2) change to red, LED 3 (Cell 3)
will remain green. When 3S batteries are connected, all LEDs are red (Cell1-3).
As soon as a the battery cell is full, the corresponding LED changes to green. Because the cells
are charged individually in a balanced way, it is possible that one cell is fully charged earlier than
the others. Always leave the battery on the charger until all connected cells are fully charged
(green) to allow the charger to balance your battery


