


6
Troubleshooting
1. The vehicle does not run
● The battery may low on power.
After each use, or once a month minimum, charge the battery. Do not leave the battery on the
charger for more than 20 hours.
● Thermal fuse has tripped.
The vehicle is equipped with a self-resetting fuse. When the vehicle is overloaded or operated
incorrectly; the self-resetting fuse will be cut off for 5 - 20 seconds before becoming
operational again. The self-resetting fuse is under the seat
Cut off the power, follow these guidelines:
-
DO NOT
overload the vehicle, Maximum weight allowed: 30 kg
-
DO NOT
tow anything behind the vehicle.
-
DO NOT
drive up steep slopes.
-
DO NOT
drive into fixed objects, which may cause the wheels to spin, causing the motor
to overheat.
-
DO NOT
drive in very hot weather, components may overheat.
-
DO NOT
tamper with the electric system, Doing so may create a short circuit, causing the
fuse to trip.
● Battery connector or wires are loose.
Make Sure the battery connectors are firmly plugged in to each other.
● Battery is dead.
Have you properly maintained the battery according to the directions? Is the battery old?
Your battery may need to be replaced.
● Electric system is damaged.
Water may have corroded the system, or loose dirt, gravel or sand might have jammed the
switch.
● Motor is damaged.
The motor needs professional repair
.
2. The battery will not recharge
● Battery connector or adapter connector is loose.
Make sure the battery connector and adapter connector are firmly plugged together.
● Charger is not plugged in.
Make sure the charger is plugged into the wall outlet and the power flow to the outlet is on.
● Charger is not working.
Is the charger warm while charging? If not, the charger may.
3. The vehicle does not run very long.
● Battery may be undercharged.
You may not be charging the battery long enough. After each use, or once a month minimum,
charge the battery. Do not leave the battery on the charger for more than 7 hours.
● Battery is old.
The battery will eventually lose the ability to hold a charge. Depending on the amount of use,
and varying conditions, the battery should operate for one to three years. Replace the battery
with a new one.
4. Battery buzzes or gurgles when charging.
● This is normal and not a cause for concern. It may also be silent when charging, which is also
normal.
5. Charger feels warm when recharging battery.
● This is normal and not a cause for concern.
GB
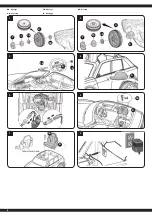
1. Assembly of the front wheels
Place the body with the underside facing up.
Slide a Ø10 washer (10) onto the front axle. Attach a frontwheel (4) and a washer (10) onto
the axle. Fix the whole thing with a lock nut (11). Finally, put a cover (7) on the wheel. Repeat
this on the other side.
2. Assembly of the rear wheels
Put the drive motor (2) onto the rear axle, connect the motor wire plug with the plug in at the
motor clamp port, and insert the motor into the clamp slot. Put the driving wheel (3) on the
rear axle and slide a washer (10) onto the axle. Fix the whole thing with a lock nut (11). Finally,
put a cover (7) on the wheel. Repeat this on the other side.
3. Assembly of the steering wheel
Open the battery case on the steering wheel (6) and put in two AA Batteries.
Install the steering wheel (6) in the intended position and secure it with the safety screw (14)
and nut (12).
4. Assembly of the wing mirror
Install wing mirror (5) to the designated position, and fasten it.
5. Battery connection
Connect all connectors as shown. Only connect plug connections that fit into each other and
take care not to reverse polarity. Make sure that the red cable (plus) and the black cable
(minus) are connected to the respective connectors of the same colour.
6. Mounting the motor hood
Place the motor hood (9) over the motor and tighten it with the safety screw (13)
7. Mounting the seat
Put the Tabs on the back of the seat into the corresponding grooves for internal fixation and
fix the Seat with screws (14).
8. Charging Your Vehicle
•
The power swich must be turned in OFF position when charging.
•
Insert the charger (16) into the socket - the LED lights up green. Connect the charger to
the charging socket on the dashboard.
•
The LED on your charger lights up red as long as the battery is being charged. If the LED
lights green again, the battery is fully charged.
•
The charge time is between 6 and 7 hours.
•
Do not charge the battery more than once within 24 hours.
•
Charger and battery heat up during the charging process.
Warning!
•
Let the model cool off sufficiently after each use before putting it back into
operation. When using an additional batteries let it cool off for minimum 15 minutes
until the model is operated again. Overheating can damage the electronics or may
result in fire.
•
Always disconnect the model from the charger immediately after charging. Always
disconnect the charger from the power supply immediately after disconnecting the
model. Inserting the rechargeable model or charger after charging will result in
damage tothe model, charger or the power supply (fire hazard).
10. Functions
1
Power button
Press to
turn the vehicle on and off
2
Foot pedal
To move the car, press the pedal down.
To brake or slow down, release pressure from the pedal.
3
Shift lever
Changes the direction of the car, Forward - Backward
IMPORTANT!
Always stop vehicle when changing the speed or direction to avoid damage the
gears and motor.
4
Music button
5
High speed button
Change the speed of the car more quickly.
Low speed button
Change the speed of the car more slowly.
6
AUX input
Input for a Smartphone or other AUX devices.
9


