2
2
1
3
4
5
A
B
C
DE
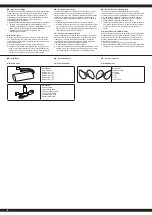
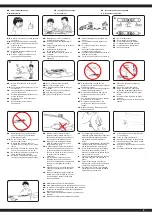
- Komponenten
Fernsteuerung:
1. Vorwärts/Rückwärts
2. Power LED
3. Links / Rechts
4. Ein-/Ausschalter
5. Batteriefach
Boot:
A Rumpf
B Akkufach
C Schiffsschrauben
GB
- Components
Transmitter:
1. Forward/backward
2. Power LED
3. Left / Right
4. ON/OFF Switch
5. Battery compartment
Boat:
A Fuselage
B Battery compartment
C Propeller
FR
- Composants
Radiocommande:
1. Marche avant/arriére
2. Power LED
3. gauche / droite
4. Interrupteur On/Off
5. Compartiment pour piles
Bateau:
A Coque
B Compartiment pour piles
C Hélice
IT
- Componenti
Trasmittente:
1. Avanti/Indietro
2. Power LED
3. Sinistra / Destra
4. Interruttore ON/OFF
5. Compartimento batteria
Barca:
A Scafo
B Compartimento batteria
C Elica
ES
- Componentes
Emisora:
1. Adelante/Atrás
2. Power LED
3. Izquierda / Derecha
4. Interuptor On/Off
5. Compartimento de la batería
Barco:
A Carcasa
B Compartimento de la batería
C Hélice
CZ
- Komponenty
Funkce:
1. Páčka (doleva)
2. LED
3. Dopředu/dozadu
4. ON/OFF přepínač
5. Krytka baterií
Loď:
A Trup
B Krytka baterií
C Prostor pro baterie
DE
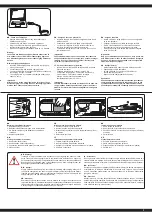
- Einlegen der Batterien
Sender
• Nehmen Sie den Batteriefachdeckel ab.
• Legen Sie 2 x AA Batterien ein, achten
Sie auf die richtige Polung.
• Setzen Sie den Batteriefachdeckel wieder auf.
GB
- Insert the batteries
Transmitter
• Remove the battery compartment cover.
• Fit the 2 x AA batteries, observe the correct polarity.
• Replace the battery hatch
FR
- Mise en place des piles
Radiocommande
• Retirez le couvercle de la batterie.
• Insérer les piles 2 x AA, respectez la polarité.
• Remplacer le couvercle du compartiment.
IT
- Inserimento delle batterie
Trasmittente
• Togliere il coperchio del scomparto batterie.
• Inserire 2 x AA batterie nella giusta
posizione, facendo attenzione ai poli.
• Rimettere il coperchio del scomparto batterie.
ES
- Colocar las pilas
Emisora
• Retire la tapa del compartimiento de la batería.
• Coloque 2 x AA baterías, respetando la polaridad.
• Reemplace la tapa del compartimiento de la batería.
CZ
- Vložení baterií
Funkce:
• Sundejte krytku bateriového prostoru.
• Vložte
2 x AA baterii se správnou polaritou.
• Dejte zpět kryt bateriového prostoru.
DE
-
Batteriehinweis:
Nicht wiederaufladbare Batterien dürfen nicht aufgeladen werden!
Nicht öffnen!
Nicht ins Feuer werfen!
Alte und neue Batterien nicht mischen!
Keine alkalischen, Standard-(Kohlenstoff-Zink) oder wiederaufladbare Batterien mischen!
Aufladbare Batterien sind aus dem Spielzeug herauszunehmen, bevor sie geladen werden!
Aufladbare Batterien dürfen nur unter Aufsicht Erwachsener geladen werden!
Die Anschlussklemmen dürfen nicht kurzgeschlossen werden!
GB
-
Battery warning:
Non-rechargeable batteries are not to be recharged!
Do not open!
Do not dispose of in fire!
Do not mix old and new batteries!
Do not mix alkaline batteries, standard (carbon-zinc) or rechargeable batteries!
Rechargeable batteries are to be removed from the toy before being charged!
Rechargeable batteries are only to be charged under adult supervision!
The supply terminals are not to be short-circuited!
FR
-
Informations concernant l‘accumulateur:
Les batteries non rechargeables ne doivent pas être rechargées!
Ne pas ouvrir!
Ne pas jeter au feu!
Ne pas utiliser des piles neuves et usées à la fois!
Ne pas utiliser en même temps des piles alcalines, standard (zinc-charbon) et des accumulateurs!
Les piles rechargeables doivent être retirées du jouet!
Les batteries rechargeables ne peuvent être rechargées que sous la surveillance d‘un adulte!
Les connexions ne doivent pas être court-circuitées!
IT
-
Informazioni relative alle pile:
Le batterie non ricaricabili non devono essere caricate!
Non aprire!
Non gettare nel fuoco!
Non usare contemporaneamente pile nuove e pile usate!
Non usare contemporaneamente pile alcaline, standard (zinco-carbone) e ricaricabili!
Le batterie ricaricabili devono essere rimosse dal giocattolo!
Le batterie ricaricabili possono essere ricaricate solo sotto la supervisione di un adulto!
I morsetti di collegamento don devono essere cortocircuitati!
ES
-
Advertencia sobre las baterías:
Las baterías no recargables no se pueden cargar!
No abrir!
No arrojar al fuego!
No mezcle baterías nueva y viejas!
No mezcle baterías alcalinas, estándar (carbono-zinc) o baterías recargables!
Las baterías recargables deben retirarse del juguete!
Las baterías recargables sólo pueden cargarse bajo la supervisión de un adulto!
Los conectores de conexión no deben estar en cortocircuito!
CZ
-
Informace ohledně akumulátoru:
Nenabíjejte jednorázové baterie!
Neotvírejte!
Nevhazujte do ohně!
Nedávejte dohromady staré a nové baterie.
Nedávejte dohromady alkalické a standardní (carbon-zinc) nebo nabíjecí baterie.
Před nabíjením vyjměte nabíjecí baterie z hračky!
Nabíjecí baterie lze nabíjet pouze pod dohledem dospělé osoby!
Nezkratujte připojovací svorky!


