


3
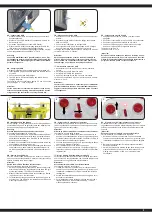
DE - Ladevorgang USB
1. Stellen Sie sicher, dass die Fernsteuerung und das Modell
ausgeschaltet sind.
2. Stecken Sie den USB-Stecker des Ladekabels in die USB-
Buchse ihres PC`s.
3. Verbinden Sie das Modell mit dem USB-Stecker.
4. Erlischt die LED ist der Ladevorgang gestartet. Sobald die
LED leuchtet, ist der Ladevorgang abgeschlossen.
Nach etwa 45 min. ist der Ladevorgang abgeschlossen, die Flug-
zeit bei vollgeladenen Akku beträgt ca. 4 - 5 Min.
Achtung!
Lassen Sie dem Modell nach jedem Einsatz ca. 8 min. Zeit
um abzukühlen bevor Sie es wieder in Betrieb nehmen. Bei
Überhitzung kann Beschädigung der Elektronik oder Brand-
gefahr die Folge sein.
GB - Charging by USB
1. Make sure that the radio control and model is switched off.
2. Insert the USB plug from the USB cable into the USB socket
of your PC.
3. Connect the model with USB charger.
4. The LED light is OFF whilst charging and turns ON when
charging complete.
The charging process should take approx. 45 min. and should
give you approx. 4 - 5 min. flying time.
Attention!
Let the model cool for minimum 8 minutes off suffi ciently
after each use before putting it back into operation. Overhe-
ating can damage the electronics or may result in fire.
FR - Processus de charge USB
1. Assurez-vous que la radiocommande et votre modèle soient
éteints.
2. Branchez la prise USB du cordon de charge dans la prise
USB de votre PC.
3. Connecter la modèle avec un chargeur USB.
4. Le chargement est mis en marche quand le LED s’éteigne.
Dès que la lumière brille, le chargement est terminé.
La charge est complète après environ 45 minutes et la durée de
vol est de l‘ordre de 4 - 5 minutes.
Attention!
Après chaque utilisation, avant de remettre le modèle en
marche, laissez-le 8 minutes le temps de refroidir. En cas
de surchauffe, les composants électroniques peuvent être
endommagés ou un risque d´incendie peut survenir.
IT - Caricamento attraverso USB
1. Assicuratevi che il radiocomando del vostro modello sia
spento.
2. Collegare il cavo USB alla preso del PC.
3. Collegare il cavo USB con la modello
4. Appena si accende la luce LED, la carica è terminata.
La ricarica é completata in 45 min‘ e la durata del volo é media-
mente di 4 - 5 min.
Attenzione!
Lasciate che il modello di 8 minuti tempo per raffreddarsi
prima di rimetterlo in funzione. Il surriscaldamento può dan-
neggiare l’elettronica o pericolo d’incendio posso no essere
le conseguenze.
ES - Cargamiento a través de USB
1. Asegúrese de que tanto la emisora y el modelo están
apagados
2. Enchufe el conector USB a un puerto USB de su ordenador.
3. Conecte el otro extremo al enchufe en el modelo.
4. Cuando el LED se apaga, se inicia el proceso de carga.
Cuando el LED se brilla, la carga está completa.
Tempo de carga: 45 min.
Tempo de vuelo: 4 - 5 min
¡Atención!
Deje que el modelo después de cada uso el tiempo 8 minu-
tos para enfriarse antes de volver a ponerlo en funciona-
miento. El sobrecalentamiento puede dañar la electrónica o
peligro de incendio puden ser la consecuencia.
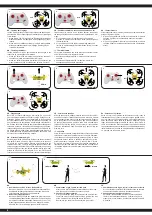
DE - Inbetriebnahme und Binden
Der Empfänger in Ihrem Modell ist mit einer Einschalt-Sicher-
heitsfunktion versehen. Das garantiert, dass das Modell nur bin-
det wenn es ein gültiges Sendersignal erhält.
Achtung!
Erst das Modell und dann den Sender einschalten.
Die korrekte Vorgehensweise ist wie folgt:
1. Schalten Sie das Modell ein. Dabei sollte das Modell auf einer
ebenen Fläche stehen, damit sich das Gyrosystem während
des Bindens initialisieren kann. Die LEDs an den jeweiligen
Enden beginnen zu blinken.
2. Stellen Sie den Gashebel auf die unterste Position (kein Gas)
und schalten Sie jetzt den Sender ein.
3. Zum Initialisieren schieben Sie den Gashebel ganz nach oben
und wieder zurück, dabei ertönt ein akustisches Signal. Ist
die Bindung aufgebaut leuchten die LEDs am Modell dauer-
haft.
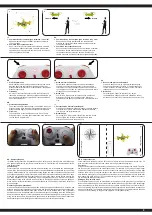
GB - Start to fly and binding
Your RC model is fitted with a Power-On failsafe. This is desig-
ned to ensure that the helicopter’s motor will not start unless it
detects a suitable radio-control signal.
Attention:
Switch the model on first then the transmitter.
The correct Start-Up sequence is as follows:
1. Switch on the model and place this on a spacious flat ground,
at this time avoid moving the helicopter so the radio and gyro
system can initialize. The LED on the model blinks.
2. Make sure that the throttle stick are at the bottom (no throttle
is given) and turn on the transmitter.
3. For instalation put the gas pedal to the top and back, now an
acoustic voice. The binding is completely and the LED on the
model lights permanently.
FR - Synchroniser le modèle avec l‘émetteur.
Le récepteur de votre modèle est équipé d‘une fonction de sécu-
rité. Cela garantit que le modèle se connecte uniquement si les
signaux de l’ émetteur sont valides.
Attention!
Allumez en premier modèle puis seulement votre l’émetteur.
La procédure à suivre est la suivante:
1. Allumez le modèle. Pendant l’opération le modèle devra se
situer sur une surface plane de sorte que le gyroscope puisse
s’initialiser pendant la synchronisation. Les lumières LED à la
fin des branches commencent à clignoter.
2. Poussez la manette des gaz jusqu’ à la position la plus basse
(pas de gaz). Allumez le récepteur.
3. Pour l’initialisation, poussez le manche des gaz
complètement en avant puis retour, un signal acoustique se
fera entendre. Quand la connexion est établie les LED brillent
régulièrement.
IT - Avvio + binding del trasmettitore al modello
La ricevente del modello è dotato di una funzionalità di accensio-
ne di sicurezza. Questo garantisce, che il modello reagisce solo
quando riceve un segnale valido dal trasmettitore.
Attenzione!
Accendete prima il modello e poi la trasmittente.
La procedura corretta è la seguente:
1. Il modello si accende. In questo caso, il modello dovrebbe
essere su una superficie piana in modo che il giroscopio può
inizializzarsi correttamente. I LED del modello cominciano a
lampeggiare.
2. Portare l‘acceleratore nella posizione più bassa (gas a zero).
Accendere il trasmittente.
3. Per inizializzare premere la leva del gas fino sopra e tutto il
tragitto indietro. Una volta effettuato il binding, i LED del
modello splendere di continuo.
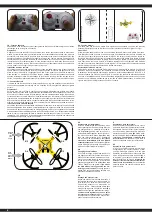
ES - El primer uso + Enlazar la emisora con el modelo
El receptor de su modelo está provisto de una función de
seguridad de encendido. De esta forma garantiza, que el modelo
solamente se enlaza, cuando recibe una señal de transmisión
correcta.
¡Atención!
Encender primero el modelo, y después la emisora.
La forma correcta de comenzar es la siguiente:
1. Encienda el modelo.In questo caso, il modello dovrebbe
essere su una superficie piana in modo che il giroscopio può
inizializzarsi correttamente. Los LEDs comienzan a parpade-
ar.
2. Baje el stick del acelerador del todo (ninguna aceleración).
Encienda la emisora.
3. Para iniciar, presione la palanca de gas hacia arriba y nueve
mente hacia atrás, te va a suenar un señal acústico. Si el
binding esta construido, el LED en el modelo de forma
permanente.
1
2
3


